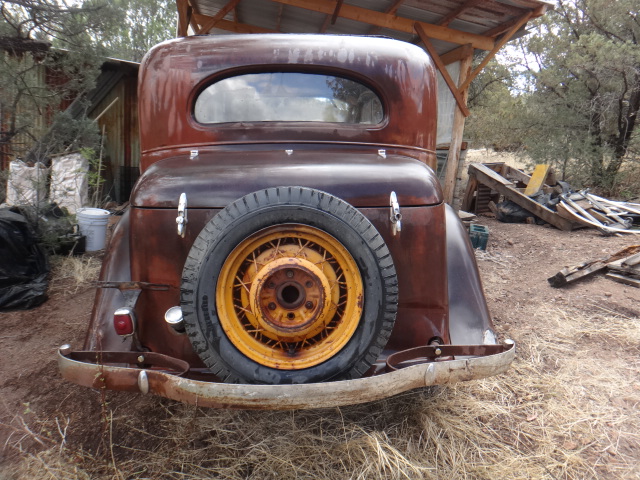
I just had my Dubonnet shocks, rebuilt, and just now installed One with a NOS king pin set.... But ... the arms with the spindle are NOT in the correct position to mount the backing plates or the wheel.... from what I can gather the arm needs to be almost horizonal to the ground (see photos where my hand is in the horizonal position)......The arm is down abut 45 degrees from there... Now from what I understand about the internal parts of these... is that the spindle arm & main splined shaft... are one piece, in that their angles to each other can NOT be changed.... that main shaft inside is splined... and can only go in one way to be able to put the set screw into the spindle support shaft to lock it to the cam assembly.....It seems to me, that the spindle shaft spines CANNOT be slipped into the cam assembly splines, in the wrong way, or the set screw would not screw in correctly...... I tried to move the spindle arm by hand... it doesn't move.... should I try to put a jack under the arm to move it up closer to the horizonal position...???? Could the splined arm be inserted at the wrong angle....?? Being newly rebuilt and newly installed, the internal springs have not been compressed yet (No weight on the arm with the wheels on).... PLEASE someone who has rebuilt these... let me know how to get the spindle arm in the correct position to install backing plates, brakes and wheels... See Photos...( of one installed, and the other sitting in the mounting position)
I did contact the rebuilder.. and he asked Evan ( another member wo lives near him, and who rebuilt his Dubonnets...) He said the arm are on the wrong side, (left one in the right housing & right one in the left housing).... he suggests switching the main shaft/spindle arms to the opposite housings...... because the set screw can only go in to the shaft in one position... so the spline/arm position can't be wrong...... Any body else have experience.. putting these back together after a rebuild...??
When you switch the arms. It puts the hole for the set screw in the correct orientation, which will put the arm in the correct place. And put the arm closer upward where it should be. Everything will line up fine. It's a quick fix
Thanks CochinaPa.... I will drain the oil out..... back off the packing nut.... open the upper shock cap.... and back out the set screw...... reverse to other side... put it all back together.. fill with oil and.... do the same to the other side.... not so quick fix... at least... it will be right, so I can proceed with brakes & tie rod, etc.... I must have mixed up the main shafts when I shipped them off for rebuilding..... I know the spindle on these 1938 dubonnets are 5/8" shorter than the 1934 Dubonnet spindles.... I guess I should use the 1938 wheel bearings...??? or the 1934 wheel bearings...??? are they the same bearings..???
I put the 1938 units on my 1934 and did not require changing any thing. The bronze bushings in the backing plate are the same fom 1934 to 1938. Wheel bearings are the same.
Good to know the wheel bearings are the same... Bill... I am going to cut the roundness off of one side of the dust shields on the '38 spindles to fit the '34 backing plates...... I will get to it today.... and report later.... thanks for the help.... Sunny
I cannot see why a person that has built these units before did not see his error before shipping......HE OWES YOU A PARTIAL REFUND FOR YOUR TROUBLES. I would be very pisxx
I put '38 units on my '34, and I had to modify them. The shield on the '38 is completely round, as shown in Sunny's pictures. The '34 shield has a flat area that matches a spot on the brake backing plate.
Well..... I switched them around and the spindle is lined up with the king pin... so the tire will be centered in the wheel well..... The fault was mine.. when I boxed them up I put the wrong spindle/main shaft arm in the wrong box... when the rebuilder opened the boxes he marked them left and right with the housings they came boxed with.... so he did not know the difference... he had never assembled the units before... he had only done the machining previously... never disassembly and assembly... My mistake, not his.... It took me all day to get the main shafts back into the New bushings..... The splined area that sits between the new bushings is spring loaded and once I pulled the splined main shaft out... it would not go back into the splines on either side.... (See photos of the miss-aligned splines)...... so I ground down a bevel.... on the end of the shaft and a bevel where the splines began on the shafts... so that the shaft would align itself as I pushed it in....with a big clamp and taps with a hammer.... They went in aligned with the hole for the shaft set screw... and the set screws are fully in.. and the spindle is aligned with the king pin... so tomorrow I will put the shock valve covers back on and fill with hydraulic oil..... then comes the backing plates and bearings and drums and steering and tie rods (after I put new tie rod end on those....) It is getting closer to being drive able..... the engine is starting easy & running good... all new brakes... new gas tank and radiator.... gauges are all working... new tires, flaps &tubes.... I am happy with the progress... and have been adjusting doors in their openings, new glass in the doors, sound proofing/insulation in the doors... and new door panels and real leather upholstery on the doors & arm rests... Thank you all for your advice and suggestions on bringing this '34 town sedan back to life.... you have been a real help to me... thanks again... Sunny ( I will keep you posted as this project continues...)
Marco Sr...... Mine were intact not dried out or broken.... I do have one good extra one that I salvaged out of the 1938 knee action units, that I bought and had rebuilt... I think I will keep it as a spare..... you might want to use graphite embedded 1/4" rope like Gene says... it will probably work just fine to keep dust out of there.... goggle it on ebay... that is where I got my graphite rope....
If the true cork has dried and shrunk a couple of minutes in warm water will rejuvinate it but wont be so effective on the modern neoprene type cork. Tony