Reproduction Parts for 1916-1964 Chevrolet Passenger Cars & 1918-1987 Chevrolet & GMC Trucks


Visit the new site at vcca.org

Previous Thread
Next Thread
Print Thread
Rate Thread
Joined: Jan 2007
Posts: 1,441
ChatMaster - 1,000
OP Offline
ChatMaster - 1,000
Joined: Jan 2007
Posts: 1,441
Some parts are painted and going back in.

Attached Images
100_8608.JPG 100_8612.JPG 100_8609.JPG

VCCA #45194
Join VCCA For Technical Help

VCCA members have access to a list of over 50 Technical Advisors who can help you with your car. It's worth the price of membership! While you can get a lot of information for free in this forum, sometimes the info that you REALLY need is only available from the right person. This is what "The World's Best Chevrolet Club" is all about!


JOIN THE VCCA TODAY!

Joined: Jan 2007
Posts: 1,441
ChatMaster - 1,000
OP Offline
ChatMaster - 1,000
Joined: Jan 2007
Posts: 1,441
Headliner is in and the windlace on the pass side

Attached Images
100_8741.JPG 100_8742.JPG 100_8743.JPG 100_8744.JPG

VCCA #45194
Joined: Feb 2019
Posts: 15
Grease Monkey
Offline
Grease Monkey
Joined: Feb 2019
Posts: 15
Looking good JYJeff


Kurt Johnston VCCA# 56333
1952 Chevrolet Styleline DeLuxe

Joined: May 2002
Posts: 6,149
Likes: 42
ChatMaster - 6,000
Offline
ChatMaster - 6,000
Joined: May 2002
Posts: 6,149
Likes: 42
Looks good.
What material did you use as the lining, cloth or something else.
I am getting close enough to that stage that I should be working out which way to go, I had thought of making a fibreglass version.
Tony


1938 1/2 ton Hope to drive it before I retire
Joined: Jan 2007
Posts: 1,441
ChatMaster - 1,000
OP Offline
ChatMaster - 1,000
Joined: Jan 2007
Posts: 1,441
I have a fiberglass headliner covered with modern foam backed headliner material.


VCCA #45194
Joined: Jan 2007
Posts: 1,441
ChatMaster - 1,000
OP Offline
ChatMaster - 1,000
Joined: Jan 2007
Posts: 1,441
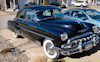
For those with US and most likely Canadian 37 to 38 trucks this is how the windlace is supposed to be,it also goes on the front of the door that I did not know.

Attached Images
100_8747.JPG 100_8744.JPG

VCCA #45194
Joined: May 2002
Posts: 6,149
Likes: 42
ChatMaster - 6,000
Offline
ChatMaster - 6,000
Joined: May 2002
Posts: 6,149
Likes: 42
Thanks Jeff.
Mine is a Aus built cab which has the door tops and cab top more rounded than yours appears to be, probably like your 37 models.
If I remember correctly there was remnants of windlace on the frame of the door opening but not on the door.
Tony


1938 1/2 ton Hope to drive it before I retire
Joined: Jan 2007
Posts: 1,441
ChatMaster - 1,000
OP Offline
ChatMaster - 1,000
Joined: Jan 2007
Posts: 1,441
I was looking around on the Jim Carter website and there was a tech section for the windlace and there was pictures from a low mile truck that showed the windlace on the front of the doors,I tore my truck apart around 76 and could not remember seeing any there and only had it around the top when I put it back togather and used 1/2 at that time and its supposed to be 3/8. I am going to look into installing seals too.


VCCA #45194
Joined: Jan 2007
Posts: 1,441
ChatMaster - 1,000
OP Offline
ChatMaster - 1,000
Joined: Jan 2007
Posts: 1,441
Starting on the seat.

Attached Images
100_8750.JPG 100_8751.JPG

VCCA #45194
Joined: Jan 2007
Posts: 1,441
ChatMaster - 1,000
OP Offline
ChatMaster - 1,000
Joined: Jan 2007
Posts: 1,441
Backrest about done.

Attached Images
100_8753.JPG

VCCA #45194
Joined: Jan 2007
Posts: 1,441
ChatMaster - 1,000
OP Offline
ChatMaster - 1,000
Joined: Jan 2007
Posts: 1,441
Seat is done and now on to the door panels,the new foam now pushes me towards the steering wheel again but will have to deal with it.

Attached Images
100_8758.JPG 100_8759.JPG

VCCA #45194
Joined: Jan 2007
Posts: 1,441
ChatMaster - 1,000
OP Offline
ChatMaster - 1,000
Joined: Jan 2007
Posts: 1,441
Door panels are done and installed so the interior is done enough,going to deal with a firewall insulation pad next winter.

Attached Images
100_8762.JPG 100_8763.JPG

VCCA #45194
Joined: Dec 2007
Posts: 4,024
Likes: 99
ChatMaster - 4,000
Offline
ChatMaster - 4,000
Joined: Dec 2007
Posts: 4,024
Likes: 99
That looks great! Thanks for keeping us aware of your progress.

I have helped 2 friends with firewall insulation pads on AD trucks. We learned as much about how not to cut holes in it as we did how.

Here are a few tips that helped us.
- It's a real hassle but cutting with the pad out of the truck and on a piece of plywood or hardboard really works. The best approach we figured out was to install the pad and hold it in place with tape. From the engine side use a white paint pen and mark all the openings you will need. Then take the pad out and cut them.
- If the required opening is small enough we simply would cut a small "X" with a razor knife and push the cable, bolt, or wire through that. In a few cases we took a pair of heavy duty scissors or snips and cut back a small portion of the flaps on the "X".
- Use punches that are used to make holes in gaskets to cut larger round holes. We even made a few larger punches by sharpening the end of a piece of tubing or pipe that was the size we needed.
- To make square holes use a wood chisel.
- Don't try to drill a hole with a regular drill or hole saw! It just wraps and pulls material.


Rusty

VCCA #44680

Link Copied to Clipboard
 

Notice: Any comments posted herein do not necessarily reflect the official position of the VCCA.

Powered by UBB.threads™ PHP Forum Software 7.7.5