|
|
Joined: Sep 2013
Posts: 17
Grease Monkey
|
OP

Grease Monkey
Joined: Sep 2013
Posts: 17 |
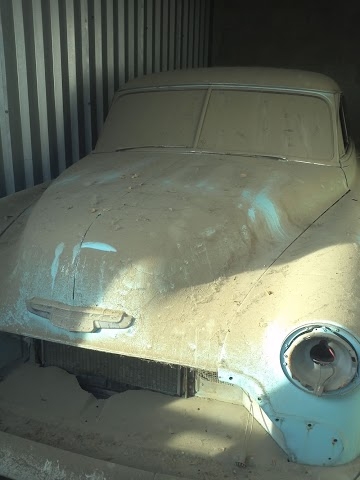
26 (nearly 27) years ago my grandfather who also was a car nut gave me his 1952 hardtop. I drove it, then put it in storage.... ![[Linked Image from lh4.googleusercontent.com]](https://lh4.googleusercontent.com/Qq6khzLo2ed4a5gtdOd0jzJpPrlO0Uf4IzYwDsV0mYO_nDk2D_qzmadZDlypG9Evjot6jWgWg82r1Kg=w1300-h1082?-tmp.jpg) At the time, he made me promise to not 'hotrod' it. I of course did, and I am proud I held to this promise. Now that the restoration has been at full speed (much to my Wifes misgivings due to cost) I have some remaining questions and could use your seasoned wisdom. My dream with the car is to have her beautiful again. I desperately want to tour with my dad, and proudly show her. I am not aiming nor can I afford to play in the big leagues with a high point show car (Wife Acceptance Factor is waning). I very much want the results of all this to be authentic. "Just because you can, doesn't mean you should.", I think we have all seen the abortions at certain 'car shows'. As of today, the car is nearing the final stages of the bodywork. He has started asking and suggesting things such as 'paint the engine bay black'... yeah... no. What the hell? That isn't how they did it back then. ![[Linked Image from lh4.googleusercontent.com]](https://lh4.googleusercontent.com/k0hHynwkjPnmwHKWCGFea_JA4v7HJdf9Auw3R1r-vIw-2IUCefJL03T-jo7XtTJmnBeIk1mmhvA35eCePtP10w=w1300-h1082?-tmp.jpg) Justin, Is that your final answer? Justin, Is that your final answer?The car was originally painted color code 484 - Birch Gray over Twilight Blue. Looking at the paint chips for that, it really isn't very appealing to me. I am strongly leaning toward paint option 488 - Saddle Brown over Sahara Beige. In looking at the color scheme (ref image is attached), that car came up and I love it. Classy. ![[Linked Image from lh4.googleusercontent.com]](https://lh4.googleusercontent.com/TOxwBBF06gqTKBda2UfY_ubF4cv1mQ3aC0s_CkL4R9Gg8ZfYST_QuDT_PkM7mNIkSK95eeRnwOFDMjI=w1300-h1082?-tmp.jpg) -- Yet the lower paint seems off to me, perhaps photoshop? Is this ref image accurate? Does anyone have any images of a car painted Birch Gray over Twilight Blue they can share? I didn't like Saddle Brown over Sahara Beige either until I saw it done. Seeing is believing as they say. Lastly, assuming I stick with the paint combo of Saddle Brown over Sahara Beige, how should the dash, firewall, and interior trim portions be painted? From what I can gather (these aren't the most common pictures on the 'net) - Firewall is painted as the lower body color - Upper dash is the upper body color - Lower dash is lower body color.... - Interior Color strips are painted upper body color but you all know what is said about assumptions... :) Lastly, with the holidays on top of us yet again... I very much appreciate the VCCA (You included Brownie) and all that is done under the banner. Best Wishes, and happy holidays!  Justin
Deep into restoring my grandfathers 1952 Chevy Hardtop.
'Don't do that, set the bar that low and it's pretty easy to step over' - ME
|
|
|
|
|
Joined: Feb 2008
Posts: 3,801 Likes: 1
ChatMaster - 3,000
|
|
ChatMaster - 3,000
Joined: Feb 2008
Posts: 3,801 Likes: 1 |
"I very much want the results of all this to be authentic"
As you know, if you change the color combo, it won't be "authentic", but the word authentic may have various meanings to different folks.
FYI, your pics did not appear.
Best of luck with your choices, for there are many.
1951 Chevy Styleline Deluxe 2 door sedan / purchased from second owner 6-19-2000.
|
|
|
|
|
Joined: Jan 2002
Posts: 30,701 Likes: 141
ChatMaster - 25,000
|
|
ChatMaster - 25,000
Joined: Jan 2002
Posts: 30,701 Likes: 141 |
firewall is painted body color
For the blue/gray exterior the top of the dash is Admarial blue (dark blue) and the lower is Twilight blue.
For the brown exterior the top of the dash is Saddle brown and lower is Sahara biege.
The garnish mouldings are Admiral Blue or Saddle Brown.
Yes, pictures not delivered.
Last edited by Chev Nut; 12/20/16 06:37 PM.
Gene Schneider
|
|
|
|
|
Joined: Sep 2013
Posts: 17
Grease Monkey
|
|
OP
Grease Monkey
Joined: Sep 2013
Posts: 17 |
Thanks for the that... I thought the google pics should come up, but aren't. I also can't seem to find to edit my earlier post... any thoughts? I'll try this again. ![[Linked Image from lh3.googleusercontent.com]](https://lh3.googleusercontent.com/Z-MuT7L4WHB51imwQ1MeBahBWgLpz6T1N9dBAYk4dqoyg2tsri2VErbuTZFAiT90veYjGLjWek4kAmxbrc2-jiDCN7ypgc5S-6bVUR69tkbj2YB6dGxn7Thcat8yCOPsbdaPy10OCoJ6khtzDempySAsljy9lq6xCfl0KIwj6T9axvK7nO2qr7jxkPGRGINx8iBCIsGW8eti-qR5GgDn27uH_Ibk-btHWSo0iMLgbMbayUhqXp2ouGElxOk9yJYYBx3mMdvxCr2DHHuCMSieHUmDWdWPGeGiJTSbOY1x2D6TubxLFF_p9tlDgIvu3CTd6Rw8-PITkg7XPtOoZWE3atybyuyQ7PE6lcpmxbRDK9YbkSRT5rKLlFwnPXtF7YKN7WhvQ3bFJlBs-kMB1ppknj1C5u1ehPAAXUpynArYWzxSf_S7Pvsm0ZoPpkNdJ2EzD83DJu_8MEWsh760vk5IDi9ynngPOyBoB5z6WB0oOUTLIVegyyFlRlAmSjTSjABUqH_E5IwW0ehcXuz9v0EDwiNQn9_YZTknz2GRLFFaaZ2gr6QNp7aMl80c5hKU9JHYS7EvL15Z=w1300-h782?-tmp.jpg)
Deep into restoring my grandfathers 1952 Chevy Hardtop.
'Don't do that, set the bar that low and it's pretty easy to step over' - ME
|
|
|
|
|
Joined: Nov 2007
Posts: 3,620 Likes: 5
ChatMaster - 3,000
|
|
ChatMaster - 3,000
Joined: Nov 2007
Posts: 3,620 Likes: 5 |
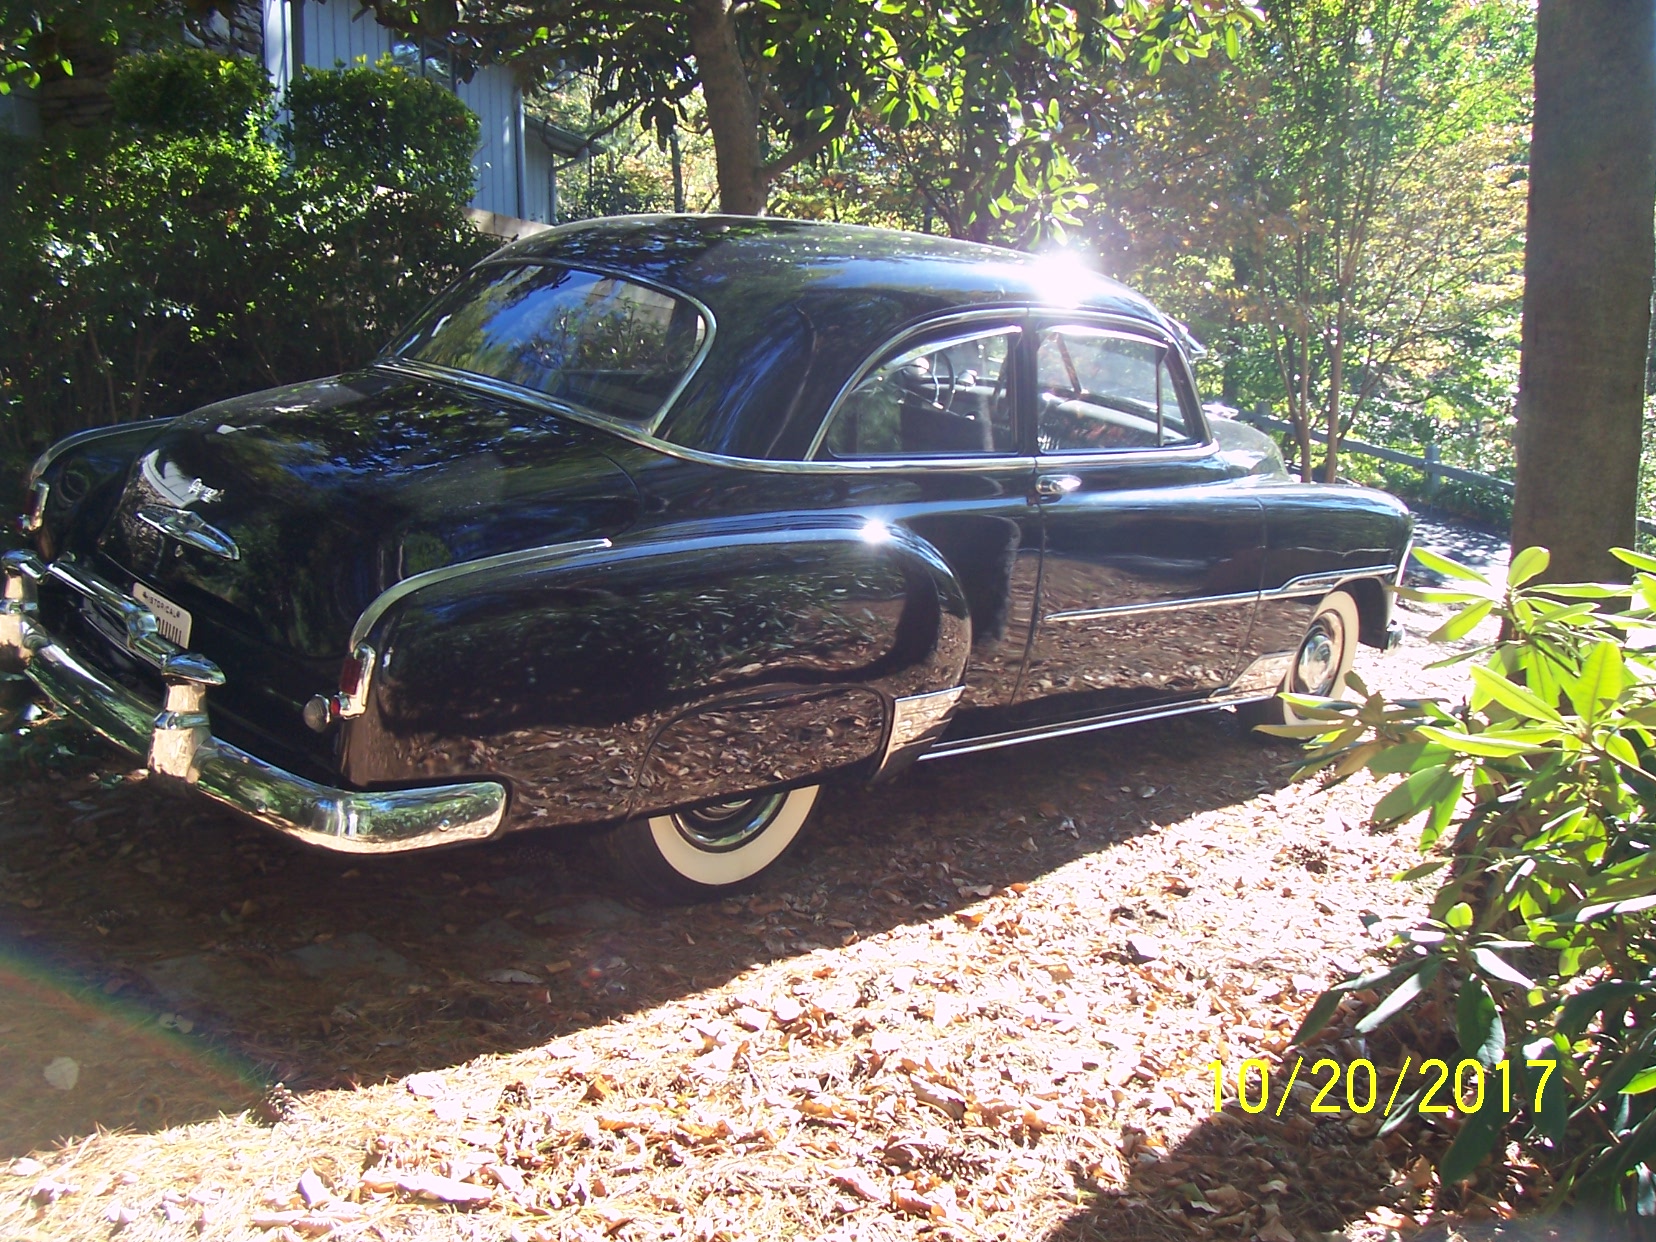
Justin... Glad to see you're doing a restoration. It will be a beautiful car when finished. Here's my advice, and what I used to finish my '51 sedan. (If you haven't read about it, here's the link) https://vccachat.org/ubbthreads.php/topics/290948/My_1951_Deluxe_Sedan_Restorati#Post290948A couple of the things I wanted to do was 1) Keep the costs down, and 2) keep the accuracy to originality up. My advice is this... 1). If you're going to apply any paint, do the research and find out what colours are right for which parts. It costs roughly the same $ to paint it the right colour as it does the wrong colour, and you will kick yourself later for not taking the time to do it right the first time. Nothing makes me cringe more than looking at someone's "restoration" at a car show, then seeing simple stuff painted the wrong colour. Get the right Grey for the engine, and the right black for the inner fenders, air cleaner, etc... Nothing looks worse than people that "save" by painting it all the same colour, or just plain pick the wrong colour. (orange 216 sixes!) 2)Take it apart, and do it right. Don't mask the engine to paint the inner fenders, get the shop manual, take the front end apart, and paint it all separate. It takes time, and effort... not $ if you do it right yourself. 3) Invest in good degreaser and steel wool, and clean everything. Repaint stuff that needs it, and keep stuff original if it still looks good. It's all effort and elbow grease. You can do a quality rattle can restoration of smaller parts with the proper preparation of parts. 4) Spend the money you save on the wife. She'll notice less of what you spent on the car if she's looking at it from inside a new pair of shoes...
Those accustomed to the finest...find it in Chevrolet.
1953 Belair Convertible
1951 2dr Deluxe Sedan
2015 GMC SLE 4X4
|
|
|
|
|
Joined: Nov 2007
Posts: 3,620 Likes: 5
ChatMaster - 3,000
|
|
ChatMaster - 3,000
Joined: Nov 2007
Posts: 3,620 Likes: 5 |
And for God sakes, hose the car off and send us better pictures!!! 
Last edited by brewster; 12/20/16 10:26 PM.
Those accustomed to the finest...find it in Chevrolet.
1953 Belair Convertible
1951 2dr Deluxe Sedan
2015 GMC SLE 4X4
|
|
|
|
|
Joined: Sep 2013
Posts: 17
Grease Monkey
|
|
OP
Grease Monkey
Joined: Sep 2013
Posts: 17 |
Well, I did get the hose out so to speak and got serious (back in 2013!)... So let us see if I can post some pictures that will show up, and share some of the progress.... I never really did appreciate the amount of time, effort, and money it took to restore a car. This is my first one, and it still isn't done. Since this is a 'family' car so to speak there will some random things tossed in for humor. Know what is the SUCK to remove? Frozen brake drum. I think this one small thing ate a full day. I finally gave up on the pounding and prying and built this. The bolts used to hold the bitter things weren't all that and were very bent, but it DID work and I got it off. ![[Linked Image from lh3.googleusercontent.com]](https://lh3.googleusercontent.com/EMt2bssCvjiBNGKugmgR3wiBZrOzZ1iKdPf80mF685yMXcRXnenJdDVmuCTGxRxhQbgoSCUwd8QmEx3DkyrzDVCO7zwnNvu3jMAsVVFG-ME5PIwk1NHq0_kewzTG9Skww1Tf1c7ddUDWIXbV34Yw0dkrROKxTSKZFuo6-y8G3AL39w_pyXA9iDVi_BGt2j911GwW_C9eq7eGYoTKjJ_1avNBghshdWkoLVBAn63RPAUQw7ana2u61ki-NFHd9WM_UWTbcaK0CVQv7w1E7LdKIyDxgRfkuttdKoqMMymN603s0tQxdXljM0UyPDDgpJ8EtpaexX0g_RpnzAsa5QRes6oLtsJ6roOgGprl7ib766iM1HZqHmMfVO9ZFV0FtDDxs2MK8hGz7jsU-UDQQyYGwVB6l4o3eGJGSkUGK6ePWSR6Qo6gz5Lt1UEArvcci7i74d9hyBiUaSkV_Px6NqM5skHIZJCPVF4vQRkqpArdT5PtLJzpR7XARrTZZyPPaNsr_tkpOvyPqesIMLS46H_So7WYss6o5kwSwaFheLJe88wHHg9jzH0gK4Y05nBxB2skBrr-13EddQOU75vFBN21Tc6Yz7b0djSkStXrW9AYTUXR0jfbWm-joIFw9RNwCnE9oISklp3suXvfm9CUGi8d9jNzVBXcpWLBlMyZFylSEg=w854-h1143-no?tmp.jpg) This is what greeted after it came off. The markings are from MANY years ago and have their own story. My grandparents owned the land family friend and junk yard operator rented. When my grandfather got the car, he must have replaced the axle shaft at some point. ![[Linked Image from lh3.googleusercontent.com]](https://lh3.googleusercontent.com/jxXsRDaSi3g9aUmFeFTy3JOSvp_0AgaIgaXarcxB_1n3iqMruPWIZLlGqQFJFvp5gU90PYltliTbJbGGOOmltzlilmXvGBZq4rHontOc0aiFfNaqY9h9vbciTHQ13R9ht6xlQgg6wBYiu0aa5aU-INmrF5ZF6Ck7untVk20aUg9P7gXSld1VSPHgMNUNwyOVtJXF-PNtZAt0kG6blOk6PjhUaZ09KTn1upgykYYufZbJzzBRd3LkAy2eC5kKrT95zPZ0BWsDAwVxeQPLKJZ-5Vm_hBa6KbvdrheCx993n7k89XBP1t-ri953_ys-se7bwaHYExFp2nnjuq_FZsUPKXTcRP492V4JxHriCnpOXOtbz282NfVTRFykLYjDFEyWb4xW5ATCiZ782uJdm1BWqfHR1CUP2m198PZOef6kHyn1OdFBB6E5_ClU1DNyX3hPDsHiKIXN7gRm_Hf7B7SIFK8D-UVlqN40k6b0FNJiU2yJOfiOq-4SeYSh9-uCZkdEjOeRkzlBJpR96ln1c0Mx1AHwoPLAfJ1H8hZtmCxtzoLQPgCMGi-ir7EA76HP0l6x-GXEwJ2iWY4Meb8OGQ0vtFDp7Lxc9fHgaQSLY2cIbbM_eTkXZjZu79vDgvh69AffTv8vzHeTFc-E1vaT6WK47yYLZ_0qG5J3IT7wEUgd6Q=w854-h1143-no?tmp.jpg) My Father and Daughter. My father was moved the first time seeing her in the body shop. When I first mentioned it he was to be professionally restored he was surprised I still had the car. Incidentally, she knows the story of how I came to possess the car and seems to think this will be her first car as well. It's nice to have dreams, right? (a footnote, The car is actually in my will to be finished and given to her, when she's 25 should anything shitty happen). ![[Linked Image from lh3.googleusercontent.com]](https://lh3.googleusercontent.com/QkfEWlJpNnYKq6B0EVf9ETfs661ZE7D5Dm8rQ0aERWNJBip_KP-ge4QIpriuLjIZHOKZJPGwP1YZdcQH_JEnOhzo1STzrj-2uvvmm1O_74WIblRujzNp1t3uZSpsnLw1exsLRHOSIdsFAJjn62LKPAEHRpD3xLPaKzC8D1wdkjo1rItg7uap3MlZkZ_9MtYzDHbFUO__W_PuMomeUfAlOTgP0u4izLdcoWbttvPOiC1dg4mAXc_aRLDsVYPYGUWfC7yNZEF2moWWSKVXL56f9ttYVKyKgLLH5bQWo755sRetXn-Ai0E9dLtuTOnusn_aX866QF4LHTjSkTji-F9BX0J2KBE8O0JL7aA2O0IjRJtswfV4Vq5BXIhCXWwHJwDXg9cysHkFzuqPAL7LILinfldm2uY8f8oXPv7rTtXc3YwP1rwlBm5lHN-HZkthg3JBXf-OR8JUCMFXrOISIqvhMb73wIYJuPDiivajAwjGmv_jiNz8PAzzzPvUqBNtYK3UKqdHL0xSE1SUXLcZHjouJxqnwm7LYTYH7SrKfI4G4N___TqpbBMftt7Mfnfv69rS5Xg0e9tPd8-4gI86mRvuKxWXoPItDOIcAlc_lGMGR4jCG-K-mM84xX-pyD5GENJYHrlS1Taga1jMMFxE_z8FeWDdfoIJdZqmZafB8Z5q1A=w1337-h1003-no?-tmp.jpg) I was pretty excited to rebuild the engine. I hadn't done one in years. Fortunately there are less computers needed for these to run. ![[Linked Image from lh3.googleusercontent.com]](https://lh3.googleusercontent.com/lisJ74Laonpz8DOPTJJJVSJfr2mgm0jzpKc_lV6QllM23NbkdUeSTpLdmR-ldeiGZPC5y0EmOOA0_VqrdfYJdBcpwp9G9_4qbJI0msSsha6ziqbNjP6xB5S0z42q2FtmGU-05weUhOTXz9QhGWeCxIkVRFN7OQ9kaY01XMDNAvBr_fiFsmiBfsQhODZ9slJ9p_dM8FbJjboxyHVCCMWDhYgUf2RdPf86C0eTHqu5JQvIisrY4XGO6Qbc7qXFLg6TF2wbn2fu_XMkCHb1yKv5nNb16U3VIbx5-C_wr-tuXZ0RuJHNvKAEGRIgUs3akABNh2_clejXXuvr_HgTRcBdQxDUiBQf1KsELsS_8Do0RfaKWEE4ErWn6ZCWVqjV7gtVtffeMM-gSF2xcnTgNEPuLmiapp8VARDBdLis6u-_0svJTMpv8RMSVtShSjdzRFo5b96UTtIMzBHmzv2aktKyTwvDdT-APbGIeJq8qwKg_HvpSTdIkBGEGJBcccPkbrHUNrqbuOH8DEllzIJr1Xa8HIklQ8dprMPCW-NCo2yYZtQ0BQd9QB9hyVbkxzz6CnaxVcVSW53dS4G06DL2zCL5GQ01XK8ZEyNqVk65caZxP4imW46nceHBtVbgvCgdznzWA27zqdTfFWmJyxKG-yn-L2PatBiJ7h6eOb_ZlwiFWw=w640-h480-no?-tmp.jpg) I lost a piece of sandpaper in the block while removing the old paint to put in a new set of freeze plugs after I got it back (the engine shop had painted it 'Chevy Blue' as a favor). Well, that was lovely but wrong color. Uhhg. I spent a little more time on the engine rebuild than planned. ![[Linked Image from lh3.googleusercontent.com]](https://lh3.googleusercontent.com/Jnhwvk_VHM0hsjQwjmslb5Y4hDFl1Cr33xD-FiWazwkXiW8auscp2XWls9R6Mv3Eub7UbcHgS8wv-DEr4oUYHJC_BT4fISSq-XERuOjMuo4JWEFpaeijRFb9tSAFaAGOTSx1oAUOcvj1YLINscCuJDvfj6nq1OQLHDfr1u_LanCx7CSvWOfvwzwnamAAlTbftGRZ5WLrPdykaQgmUpDppHpm5vqdof1PJ5N4VTzm_yDFH6Vx6mmjdWNq9-fFZ1ng-JpTtulzNzAcUhc0r6SbpqBROI9lGqQ6IoeyInGeAqEvj-6RtS1IcViGWL3NOSuRSM4jWicoytGH_xE1aWDctaY_T0bWCvb2RtrRQawlTDKTQJzvxqS6WKUO21zqWaD6v4ix90B2EdOji9iBSxN_1mme3-5Iiooh-t1dcBAL73XMiGPz2qtH90UXGARIDa0f_zNVplug8x3npzgcjxmh5NIwAF3Ta1XpI3SlBTO6aTZGEE0zjFvZ4Q0Ro9_hcwiev_jPwftJBZTgkU2UWrgjbQKGmXSQtYBGkDSfrYUZj1941B-srbdHEaguczcr1HKYs8vJAqfHLLsrqCmb3tmPsubscqrWauJDu9gSbTzul7vARyCGSwShCoGRjpMOfq8bJaWLVNhp-AQ5uVrqW0iRSrGoNKYcXgee5PmcakLjog=w854-h1143-no?-tmp.jpg) ![[Linked Image from lh3.googleusercontent.com]](https://lh3.googleusercontent.com/QGE90VS8AGx8o7OuCrbaUIiYEzWzB14MRGRdh1JofTFJlCj7PFPSmnZdq4AiyOTUA94zmk1j5652E4Gh7JW_vMOlcqh0nxUOkYLiTwqxm9Dzq2wBDlv1Q4p5C47ygpF4CxeW2tVxtp3Vs3AZ4fIdgKu1bkAUbZZCI-Y6T2DNhZAbZNqU5tu6076CZkTxC4JyhbHtT8HZOwmDE87OrbXAXeGvdqMYuSXMjeO2kcmReoQLEQpd4XGRY-Oi3MXx-vqsLiIrWoM3TEvx5sW5FeJu23KDOe3u8Kiy-VMrFgXvleJNEpvaBjjI8uEoo1I0G1F61wnYKTEzKbrWNrd5TnkKciBL2Q_hQ1nqeqXTEVdJd8xuowkcjhlMw2SUJYXriQmwt5Gu6gFa6gEx9JpI03JR7jIOQQ36ytVoSaMlVOBEpT0mfPZezUxJvjHZlYBAlTgLGrPLM4064W8wRMBkgerid3AVL2RqM9sbGcSEdjM4TPhxZnaoQiGCyZtrY5kqgrNxBSeMyNOw4FrraWJgI2SOmtimO_sghlaJXClPZbWSmx-OBrYzbDeJAtXZhWiTTqLZji2dPPrxsF5QThSvjH-8mhvnVYK6Sse4VAmrFHz9IgsU8BBXPOoW=w854-h1143-no?-tmp.jpg) I tore it back down, stripped it and repainted it... making sure those gaskets didn't get painted. [img] https://lh3.googleusercontent.com/F...41kSO8WgMiDTKf_1sH=w1337-h999-no?tmp-jpg[/img] Getting her all stripped down..... ![[Linked Image from lh3.googleusercontent.com]](https://lh3.googleusercontent.com/Q29urYJTcKw90-mCkfLSQa2yfmIDyTZWBvdCcfQX6izSFIKKuHRXyqnf_uWLqmLDHbsQnEAayyW3ZRof4SZgnykgSGmtke5WtiBf91sWgLi-6sVe1lbWDPaH8GJeDhbl2cjKvr6K_LrTCS6CaHBdDqq_W7sWZX8cBu-KN2zPg1WCpWoO9JxhGsnX6k63EWkXDJRqVFZZGeMKNbSjr0AaeVIGUuSVtzUV3Hu7cgvI6PL9KIOTysv3XNMErrVvEgCHljTDoQxkcrfLneULYz_PPZewtquoCsdNq-5MGLvxSeM2xkJe1qLqHrcgkPyZpT8oTPCc-gO5zu-xLgLC17IMn1UOxpTdNPgoySVt27NrureIvKsbTJUFlaVvmjNFQ_qijY9m7fAQ6Q-ghdZ3i6c_D5L5_LqQD7SDA9OQjoFXKk8ED7JEVv-5TNU2r50HNHJPcGxoNAl9-tTjxBXkxJzWHQNaM7fRemuKic_Nv54qUAci5IZIjTNcMzQN2owH_-A3uOVEn5GM_ZUyZtP8NezRLswEbiPVWC6sO3IYAtbY34MVoISRwhjI90Xys8RezD-1J3emv1TRJKuUNNZ5x2DzFsaRfKA3AQQ8ckyfgwvRAyKFWSjCVqMWb9KysktG-f0lmBdmjJkbEj5HrHbBVJxShUZRtsQu7fBkgdA2IRfWSQ=w858-h1143-no?-tmp.jpg) She even chipped in, ![[Linked Image from lh3.googleusercontent.com]](https://lh3.googleusercontent.com/s7D15j1KQhcZ1U2NqlgtQRh5LVFgjW2w1qwlYFASzwQA1bspfIxo4OWi0dDjW0yAubj57C21RTaPIs_hxd32ktWPjv3636upSuJxxKE1RyUMNGxGHSuh32luaHlp9dD7Jz8AjXyoGXE0NSCB7trlv7WHdLuyvGvom9NazpVaFzGR2u6ZQVJHR9djveQolmOZXu3cdkKg5O8LQSBFF50ByD2OyO63zP9lav1chxtPKMwaMC5ZuY4RjRQP5WvLJFP4sd8qR0im6HLKO40nv_XgzEgqe4hx2ZfbXOvej33isfE3zRfqerULhPLRV4A9gyFBkylrZUkJw6tZkMMzSpEciBhhcunyT2xWuskZIrlxv55mvV6lwGefmtiNqK6rdwPFCKwRgmc6k6vrsS_NHIMeBWOBSWg06B0XlUWJa2rMuS7z6hiwZaTLj_R2kMrkI94nYwT-gyhoEkc2fEf-f2o28FDI2lEKhCzjcGhF3PxHvNHRMqb8Kl_MQfrJ8RrH2GMg_dRJ8NFbRa0aZrDMl-MGzdi5x8YHMYq0h0SXaHABk9gAQUipMaZsvWSjpf09bLVZmzG7QXOdRNT1K07iQBzpdVOM1to6RWF0_KzlBYqe1iiDylHOwRpdOFiSqMMcaVpMJB4YCqpkZMjaskTSuDHaBd-hkJdkqEmMbk8GIsPDSA=w1337-h999-no?-tmp.jpg) But now with the hired gun things are moving much faster... The drivers side rear qtr, underway ![[Linked Image from lh3.googleusercontent.com]](https://lh3.googleusercontent.com/iVtc8qmbZ1ziv5d91oOQe4MJEEBwEpCUVdk1KBbXIuQbYK2qxgkwJ2595D2gZcmq5Td9JNMM77GExK9y7xYBNqVxteWedSa8hGhWcn6AoFkIYKDD2l3Uv0XWmWL1Uo8GpZDNruDzDHmlrd5sD0NjRaz3qtVTNYQS9aleJm6OIz8uppqy1kP29PdRdW_I-3uIKWS_ehrSlAqobFKcTaMSpZPDcT55WRDW-x6tsP2dhVZc4F9zCMqdXCXhnkhodRYzbKGfs3AAG2gQ9HPYKsSG0AfZNImy9dErYbMkL49aJHGYxfNydqb5-o9QAIjWJZEOgquysbL-D3F1Y9q9xSfIPkrqWvU8D5MnVD5O8cFmj-J3f6CkrvNh2YPVKnGW3RuYZy6O5xcNqGgSuhPRU6Ao550NHeJt-wl69AXKAVoF74YG8Si9aUi2TGI7O0JODcBybIwOO7n2RQT0cSimy24HsoeaPRiay36e9vhlCoq0nnlIFPfERpqEaLlt0Jtuxo-oBH3HNxUj229EkEPb-tbAJktrT_Tyn8p8Ah7ww2Jod7PrlDtvp_7raqkXHOLi_28KUbd5g9v0bxMFI6MRIiXXMJIH3mP5e3GTUCQz-yuA_95tKzIQnT7IUy65U-q64OqLwhgtdqUP7P1reugCoRzVb1trJKB_GC_XCuT2gMA-xQ=w1337-h1003-no?tmp.jpg) Front of the car - ![[Linked Image from lh3.googleusercontent.com]](https://lh3.googleusercontent.com/qUI78Fe-cA5WMuZNBS6uIfKUv5UgTSEE9nI9mXhW0x9YkInnG0w5dJ0lB7qWqB1pm05xGuY2sM7uCWhnb29JZE6kXKQj_lXSAH7nZiD7m2Ik_RVDS9LnhjAqwFe0J0jWycEIkf-ONnLF3uNfIxmT0GWZ-ZeyMcqFf3TA0tZrvbjWY6nK-OnXqtLfyFIyKP4kOJX1tgJJCV7vq5Oz6r67z9WubvSp0zRLBTB_9KlhZmiK3Tvq68CDO7BtyKiKtji_vDqrc7YEbdEqEcot2Kjyn_egSNtZkAKRZ2ilon5RJ3P5qMXp9kgq3rsMUU04G9MC0qnj4PP2y7QyHgUEIeGjg3HcMgs7EU43iq7M7wp0Bl_Yde_vzrjFlG910ULdsi6I3y1M1YcI1xPUbqQwAba00MpWGCin3eVx3mmKEoUs6dKmUUtlspxThUdHpzOV48SSVfJyXJzFTKRdgTpA2dU6qwaepksrPSvvFjJLHr4vpXtPPC_npi45SdJLVcZpMD_V6X-Vhr67L5pRymF0wA9U6GpjY0QdWJLqkXaYegou-Tk83z3AKIrf8wZS6Suo6ZXG1TsooRiuVEiN9pZ2AbvrWjkbHP6yegfg_FODPH_FvmRsCi699P_kwFCEgmAqa8Q2X8FRt5Rec-26CJvco8hDoArHGrpcllm6btmFaGoJlg=w643-h1143-no?tmp.jpg)
Deep into restoring my grandfathers 1952 Chevy Hardtop.
'Don't do that, set the bar that low and it's pretty easy to step over' - ME
|
|
|
|
|
Joined: Sep 2013
Posts: 17
Grease Monkey
|
|
OP
Grease Monkey
Joined: Sep 2013
Posts: 17 |
And the rear - ![[Linked Image from lh3.googleusercontent.com]](http://lh3.googleusercontent.com/jz1ZHNyITywzonNXAK5Rbq-OnkwNQwhjd8WjHzHQbzqfd2ZUqtlA5TzF8i2fLDMwUVPK-9s5F5Z0z2leOrARkeHaNpwZGjqp3qazDsc5TAg27fkG8CMi2fREOTAEyAvH23yu8fq_mIRd2nDrdWdmJmsXz4bJcS1h-i0ua1ZTJw_W05sfNNeTssRYmFv0nB_Tys0XUR-Adlm5lSu3ME4FRyXtDdvL3I2prU-dZ9CL38Tr3O_PWyNHyEO3rsBQjZ9HLGmtfvlLjC77LqKp6PZkD7dP17tjU-X-OBoVXNMiQFiTSEtywlLtGT0RQM3jy9vC0ExbiQ9iKq-UkAZ7IUhaavUg47EO3fHgYSAxa4a0rOV51lI1iAhEmmbq-ZYyVjtfzV-Br2P6InaJO2P1tf6cp5mfz0LEr-0vnB5Dp9MyxrghLQvHqOCl052zQQlyvciM2_NJkt03q5TRDuPuSQ_oIwsGtnD2iFFocVJmFcSK3qf4q3qvNZX9xISq-y_FIHoEKn9fgicSN4DF27vWeyCX7y20sILAcA5YY5Mh6NwJjhwfmY92i1XqW-qGb4Gfinbbf78p_qPecFw8bLlPbVZa_iK5Aboc2avL91vz1oe8BT0zUWFFivXZE4P8tRVJFe3rrevPW0ac9azsp0NUtR5TIc0AdNkN4pl19uY3BNpUGg=w643-h1143-no?tmp.jpg) A favorite image of the car (I'm sure there will be others) - ![[Linked Image from lh3.googleusercontent.com]](https://lh3.googleusercontent.com/_GHl3WxosNFlKti0j0KL_sfgtZ7k528hnez3RBinsaqJlRO8GJJJjRH2ghUCaKtiRxrUZtufByZDXD7ciWOk865HmJ8fztBKlSILiLtlX5uzJuY9TPvGbeTnWs7fwfbzKsOLWC2RO1cxZ-SmjgMP0EWbyABfWu6_7D7cGnIZYng3T45X_cfjAT5toR1oXh4Pq9V-yzUqc1ANMwwnPS71ctT7Ty3KM2GzpCHzsyfVPwhUs-uqB1HY0UBOfzb9NV3O9YnuQbcluYiS1lN9ZDhSzD9Kr0JzAugvHkxw5krmM42aUnyDeZanTZj0AK1WlDLriyfyZl6Vulaw0oFgaewTEC1Spmlzuid9lxC46cGtlONBZrAKkTSpUbTKQ30BO_Da8vx-KQKZHLOcPnSuAzC1DOufAVNIjTpoi9ba7uNVHzQVYeomfifz2gIam5qCnVp3zZf1yKdu-bPjMDPMR_5DcgoSxPAgqFVcV01VUGE4TfKjHEFHOImiW3Li9oUE5EfgUTmqgf6Gx8N6mPCLImsfRyPlnCu9eiobbWFthdRd50UoIKjVniUYoK-MX2wy6x40JkjmuDkzUaVFuf8534xo2WNfX8ZdMNnjc0N3sjkKf6-CrrJjG7hjNLowMAeH1jw5U7G8mpegRwuZ6fv5IT2ssv8WU4j0vWwaMHD7znn0OQ=w576-h1024-no?tmp.jpg) I hear the passenger side is nearing completion. I will post some up Friday. Hope you enjoyed.
Deep into restoring my grandfathers 1952 Chevy Hardtop.
'Don't do that, set the bar that low and it's pretty easy to step over' - ME
|
|
|
|
|
Joined: Sep 2013
Posts: 17
Grease Monkey
|
|
OP
Grease Monkey
Joined: Sep 2013
Posts: 17 |
A couple of the things I wanted to do was 1) Keep the costs down, and 2) keep the accuracy to originality up. My advice is this... Amen!! Couldn't agree more. 1). If you're going to apply any paint, do the research and find out what colours are right for which parts. It costs roughly the same $ to paint it the right colour as it does the wrong colour, and you will kick yourself later for not taking the time to do it right the first time. Nothing makes me cringe more than looking at someone's "restoration" at a car show, then seeing simple stuff painted the wrong colour. Get the right Grey for the engine, and the right black for the inner fenders, air cleaner, etc... Nothing looks worse than people that "save" by painting it all the same colour, or just plain pick the wrong colour. (orange 216 sixes!) Ha! I know what your speaking of. Even my engine shop painted the head and block blue even after I had told them it was gray. Question! The inner fenders facing upward are black? I had been under the belief it was the same as the firewall! Were they flat black? Was the e-break painted the same color? 2)Take it apart, and do it right. Don't mask the engine to paint the inner fenders, get the shop manual, take the front end apart, and paint it all separate. It takes time, and effort... not $ if you do it right yourself. We definitely have the same driving philosophy. I was determined to do this all myself initially. I took the cowardly exit due to a fear of making things worse. My ethos has been pretty old school, it drives me personally, and professionally, "If it's worth doing, then it's worth doing right". Do it right the first time and be proud of your work. 4) Spend the money you save on the wife. She'll notice less of what you spent on the car if she's looking at it from inside a new pair of shoes... you are speaking from experience(?) Wife Management and Body Shop Management are two new life experiences. Mark who is doing all the heavy lifting on the bodywork and paint reminds me of the moody poet/artist/son of treasury guy in the show Wedding Crashes. Not because of his appearance or dress, but the drama following him. Clearly very talented in sheet metal and all that entails... Any other suggestions? -J
Deep into restoring my grandfathers 1952 Chevy Hardtop.
'Don't do that, set the bar that low and it's pretty easy to step over' - ME
|
|
|
|
|
Joined: Sep 2013
Posts: 17
Grease Monkey
|
|
OP
Grease Monkey
Joined: Sep 2013
Posts: 17 |
"I very much want the results of all this to be authentic"
As you know, if you change the color combo, it won't be "authentic", but the word authentic may have various meanings to different folks.
FYI, your pics did not appear.
Best of luck with your choices, for there are many. Thank you for your comments. I agree that it isn't assembly line authentic. I guess my take from speaking with others is that it is authentic to paint it from the relevant factory paint options. I am not considering clear coat, a metallic, etc. I don't want to start a religious war and I'll assume this has been one in the past... but am I mistaken about selecting an option I prefer off the build sheet? ps - I think I got the picture thing figured out. Google Images doesn't seem to want to play nice.
Deep into restoring my grandfathers 1952 Chevy Hardtop.
'Don't do that, set the bar that low and it's pretty easy to step over' - ME
|
|
|
|
|
Joined: Jan 2002
Posts: 30,701 Likes: 141
ChatMaster - 25,000
|
|
ChatMaster - 25,000
Joined: Jan 2002
Posts: 30,701 Likes: 141 |
The inner fenders were satin black on both sides. The under side of the main fenders was the same black as was the under side of the hood.
The front splash pan was black EXCEPT for the visable area between the bumper and grille. All the grille braces etc. were black.
The hood top color was painted with the hood halves apart as was the divider center strips. When the body was pinted at the Fisher Body plant the doors and trunk lid was attached so all hardware holding them on is body color. Emblems, mouldings, handles, stricker plates, etc were not attached.
Gene Schneider
|
|
|
|
|
Joined: Nov 2007
Posts: 3,620 Likes: 5
ChatMaster - 3,000
|
|
ChatMaster - 3,000
Joined: Nov 2007
Posts: 3,620 Likes: 5 |
The access panel that the regulator is mounted on is black as well... not the body colour.
As far as your concerns to factory originality go, VCCA judging marks only parts and options that were available in that specific year. Your paint colour does not have to match the code, but must be from that year's available colours. Options were mostly dealer add on, and as long as you add proper options for that year of car, nobody is marking on what originally came on that specific car.
Those accustomed to the finest...find it in Chevrolet.
1953 Belair Convertible
1951 2dr Deluxe Sedan
2015 GMC SLE 4X4
|
|
|
|
|