The timing cover bolt fix is good and I did it to my `40 a couple summers ago. Then last year I decided to adjust the mains and rods and the reverse problem arose.....to get the front main bearing cap off , I had to get the bolts out from the front of the timing cover .....and that was a real -----, without removing the balancer.....so , end the end , I would have rather left the bolts in their original position ,from inside the oil pan ....easier to drop the pan for me
David Martin-Hendersonville NC, Pine Island Fl....... 1940 Chevy SDSS,
The timing cover bolt fix is good and I did it to my `40 a couple summers ago. Then last year I decided to adjust the mains and rods and the reverse problem arose.....to get the front main bearing cap off , I had to get the bolts out from the front of the timing cover .....and that was a real -----, without removing the balancer.....so , end the end , I would have rather left the bolts in their original position ,from inside the oil pan ....easier to drop the pan for me
Maybe it is because my engine was rebuilt, but I was surprised that my balancer came off without resorting to brute force while using the HF bolt puller, so that is the route I will take if I need to remove it again (hopefully not)...
~Jim
'38 Master Deluxe 2-Dr
*Disclaimer*...All technical advice given is for entertainment value only, and is not to be taken seriously...
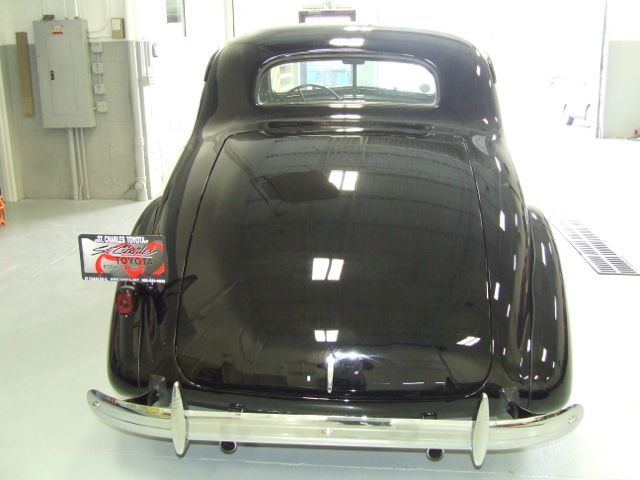
Got the front end back together. Took awhile, but she finally started up. The vibrations are different from before, and less noticeable. It is strange seeing the engine at idle speed and not moving.
Timing was off after replacing the cam gears, so reset it and made sure the vacuum advance worked correctly. Existing vacuum line had some gunk in it, cleaned it out.
Drove her out of the garage and turned her around to start working on the trans & axle.
Still have to fix the dent and repaint the air filter housing, as well as repaint the horns.
Pics come out better in broad daylight:
Video showing the engine running:
Last edited by green427; 12/14/1411:44 PM.
~Jim
'38 Master Deluxe 2-Dr
*Disclaimer*...All technical advice given is for entertainment value only, and is not to be taken seriously...
Nice! Very Nice! I have the same car but a four door. If you need any parts let me know!
Thanks! Fortunately most of the mechanical parts are still in excellent condition and can be cleaned up, however....most of the parts that I will be eventually needing are moulding pieces and chrome plated items such as hood center, wiper housings, trunk hinges, etc, and will need new running board mats. Definitely will need a new windshield, as one piece is clouding up.
It would be nice if I can get my hands on a ring & pinion set for a Master axle...most of the new ones out there are for the 4:22 Master Deluxe.
We can PM to discuss details if needed.
~Jim
'38 Master Deluxe 2-Dr
*Disclaimer*...All technical advice given is for entertainment value only, and is not to be taken seriously...
It will get louder if I don't replace the exhaust soon...
Do most of you guys pay more $$$ for a stainless steel exhaust system? If the aluminized stuff will last me at least 4 years with occasional driving, I may go that route....
~Jim
'38 Master Deluxe 2-Dr
*Disclaimer*...All technical advice given is for entertainment value only, and is not to be taken seriously...
The findings under the rear seat reminds me of the "SURPRISE" series that was in the G&D a few years ago. Subtitle was "things found in the jockey box, top drawer or under the back seat." Too bad the author was told to stop the series as it was not interesting.
Drained the diff fluid, looks like it was maintained well over the years, everything looks and feels nice & tight. No sludge buildup on the bottom at all. Will have to check backlash.
Inlox bushings are still intact but will need replacing.
Propeller shaft bushings are intact, will remove the front bushing and put an Oakie in place.
~Jim
'38 Master Deluxe 2-Dr
*Disclaimer*...All technical advice given is for entertainment value only, and is not to be taken seriously...
Took the transmission out. Got some bolts and cut the heads off to make guide pins in the top holes.
When I took the front bearing retainer off, I expected to find a large nut that needs to be unscrewed off, but this is exactly what I found:
Looks like the last person to service the transmission did not put the retainer nut on???? I have a spare 'donor' transmission that I will rebuild as well, hopefully there is one in that.
Front bearing came out fairly easily, pulled out the main shaft.
Bearings and all gears appear to be in decent shape.
~Jim
'38 Master Deluxe 2-Dr
*Disclaimer*...All technical advice given is for entertainment value only, and is not to be taken seriously...
Cleaned the case, primed, and painted all external parts.
While waiting for the new bearings to arrive, put the idler & main gears back in with new thrust washers. Learned a lesson here...be sure to use a small screwdriver to align the idler shaft with the pin hole before driving it in. Eyeballing is not good enough.
~Jim
'38 Master Deluxe 2-Dr
*Disclaimer*...All technical advice given is for entertainment value only, and is not to be taken seriously...
Question for all the experts here...how much sideways play is normal for the main shaft? Looking at this video, it appears to have about 1/8" sideways play at the bearing.
I assume that by replacing the short & thick bearings inside the shaft should reduce any play?
How about lateral play? Looks like I can slide the shaft in & out about 1/4"...is that normal?
~Jim
'38 Master Deluxe 2-Dr
*Disclaimer*...All technical advice given is for entertainment value only, and is not to be taken seriously...
Had a spare instrument cluster from the donor parts bin. Previous owner cut all lines, so there wasn't much to re-use, so I decided to take it apart and match colors to the inside.
Got the replacement gauge decals & glass from FS, made my own needles using toothpicks, matched the colors found inside, painted, and made this desktop display. I used Gunmetal Grey paint between the cluster & display frame. Did this over the winter.
Surprisingly it was very easy to do once you find the correct colors.
Compare it to the faded one currently in my '38.
~Jim
'38 Master Deluxe 2-Dr
*Disclaimer*...All technical advice given is for entertainment value only, and is not to be taken seriously...
The input shaft is held in place by the bearing retainer against the front bearing. Those ridges and grooves are to direct any transmission lube that goes through the bearing back into the transmission.
Trans rebuild is now complete. Wirebrushed & cleaned the underside before painting with POR-15. Rebuilt rear axle's brakes & put new lines in. Started putting new axle eye bushings & shackles.
Need to take the master cylinder off, rebuild it, and finish painting the frame.
~Jim
'38 Master Deluxe 2-Dr
*Disclaimer*...All technical advice given is for entertainment value only, and is not to be taken seriously...
Finally put the transmission back in. What a pain in the a**.... it would not budge, so I used a large screwdriver between the crossmember and the transmission, rocked it slightly, then it finally started moving.
Installed the shackle rebuild kit parts from FS. I thought the shackle bolts were in good condition until I looked at them closely, they appear to have been damaged from hitting the springs a few times. I could not find any grade 5 or 8 carriage bolts locally and used grade 8 hex bolts instead. Also got 4 new square U-bolts for the leaf springs.
When I installed the transmission and attached the axle to the springs, the torque tube would not clear the crossmember under the transmission. I checked everything on the rear axle & springs to see if I installed it incorrectly, but could not pinpoint the issue. I ended up loosening the U-bolts and pulled the axle back a couple inches to get the torque tube attached to the U-joint.
Afterwards, I went back to the axle and found that I could not get the left side leaf spring pin to line up with the hole in the axle. Something was out of alignment by a quarter of an inch, so I jacked up the axle, loosened all bolts, observed and measured everything......It appears that the old shackle pins & eyebolts were not centered for a long time, and all the other parts settled into a certain position while sitting for many years....and when I put new eye bushings, pins, bolts, etc in, the axle & leaf springs had to be forced into their new positions.
The new gaskets on the torque tube made everything super tight. Tested different gasket thicknesses while the transmission was out of the car, but did not anticipate how tight the screwed end was going to be. Lubed everything withe gear oil and used muscle to get it all in. Afterwards I had to paint over all the scrapes I made.
~Jim
'38 Master Deluxe 2-Dr
*Disclaimer*...All technical advice given is for entertainment value only, and is not to be taken seriously...
Also, the transmission mount's rubber was really bad, it felt like jello and was easy to stretch in long lengths. Removed the old rubber and used the mount rebuild kit.
~Jim
'38 Master Deluxe 2-Dr
*Disclaimer*...All technical advice given is for entertainment value only, and is not to be taken seriously...
The new ball gasket seems to be a little tight when fresh but mine free'd up with a little use .. no leaks is the clincher .. Love the picks . that a fresh looking under carriage.


![[Linked Image from green427.smugmug.com]](http://green427.smugmug.com/photos/i-Rrmw64T/0/L/i-Rrmw64T-L.jpg)
![[Linked Image from green427.smugmug.com]](http://green427.smugmug.com/photos/i-9P6sqxp/0/L/i-9P6sqxp-L.jpg)
![[Linked Image from green427.smugmug.com]](http://green427.smugmug.com/photos/i-X2bqkQp/0/L/i-X2bqkQp-L.jpg)
![[Linked Image from green427.smugmug.com]](http://green427.smugmug.com/photos/i-Pz4xpWq/0/L/i-Pz4xpWq-L.jpg)
![[Linked Image from green427.smugmug.com]](http://green427.smugmug.com/photos/i-CtGkjvg/0/L/i-CtGkjvg-L.jpg)
![[Linked Image from green427.smugmug.com]](http://green427.smugmug.com/photos/i-FJnG2zP/0/L/i-FJnG2zP-L.jpg)


![[Linked Image from green427.smugmug.com]](http://green427.smugmug.com/photos/i-WhpXsRn/0/XL/i-WhpXsRn-XL.jpg)
![[Linked Image from green427.smugmug.com]](http://green427.smugmug.com/photos/i-V4kZDrT/0/XL/i-V4kZDrT-XL.jpg)

![[Linked Image from green427.smugmug.com]](http://green427.smugmug.com/photos/i-RhLtZ4j/0/XL/i-RhLtZ4j-XL.jpg)
![[Linked Image from green427.smugmug.com]](http://green427.smugmug.com/photos/i-NcXM4B2/0/XL/i-NcXM4B2-XL.jpg)
![[Linked Image from green427.smugmug.com]](http://green427.smugmug.com/photos/i-NXM4bTK/0/XL/i-NXM4bTK-XL.jpg)
![[Linked Image from green427.smugmug.com]](http://green427.smugmug.com/photos/i-dhzpXd9/0/XL/i-dhzpXd9-XL.jpg)
![[Linked Image from green427.smugmug.com]](https://green427.smugmug.com/photos/i-gDHdJkc/0/XL/i-gDHdJkc-XL.jpg)
![[Linked Image from green427.smugmug.com]](https://green427.smugmug.com/photos/i-MGSRPWb/0/XL/i-MGSRPWb-XL.jpg)
![[Linked Image from green427.smugmug.com]](https://green427.smugmug.com/photos/i-Tm6WLV7/0/XL/i-Tm6WLV7-XL.jpg)
![[Linked Image from green427.smugmug.com]](https://green427.smugmug.com/photos/i-dM4RhDg/0/XL/i-dM4RhDg-XL.jpg)
![[Linked Image from green427.smugmug.com]](https://green427.smugmug.com/photos/i-VPQDQkC/0/XL/i-VPQDQkC-XL.jpg)
![[Linked Image from green427.smugmug.com]](https://green427.smugmug.com/photos/i-2vtjh42/0/XL/i-2vtjh42-XL.jpg)
![[Linked Image from green427.smugmug.com]](https://green427.smugmug.com/photos/i-LhTnZS3/0/XL/i-LhTnZS3-XL.jpg)
![[Linked Image from green427.smugmug.com]](https://green427.smugmug.com/photos/i-j85Vhq6/0/XL/i-j85Vhq6-XL.jpg)
![[Linked Image from green427.smugmug.com]](https://green427.smugmug.com/photos/i-kxNRm2G/0/XL/i-kxNRm2G-XL.jpg)
![[Linked Image from green427.smugmug.com]](https://green427.smugmug.com/photos/i-35g5Hb4/0/XL/i-35g5Hb4-XL.jpg)
![[Linked Image from green427.smugmug.com]](https://green427.smugmug.com/photos/i-G7KW6sf/0/XL/i-G7KW6sf-XL.jpg)
![[Linked Image from green427.smugmug.com]](https://green427.smugmug.com/photos/i-dvMQDr9/0/XL/i-dvMQDr9-XL.jpg)
![[Linked Image from green427.smugmug.com]](https://green427.smugmug.com/photos/i-bGZqvXK/0/XL/i-bGZqvXK-XL.jpg)
![[Linked Image from green427.smugmug.com]](https://green427.smugmug.com/photos/i-XfHr2dc/0/XL/i-XfHr2dc-XL.jpg)
![[Linked Image from green427.smugmug.com]](https://green427.smugmug.com/photos/i-c9PZHd9/0/XL/i-c9PZHd9-XL.jpg)
![[Linked Image from green427.smugmug.com]](https://green427.smugmug.com/photos/i-2x8GFXp/0/XL/i-2x8GFXp-XL.jpg)


![[Linked Image from green427.smugmug.com]](https://green427.smugmug.com/photos/i-RWdR2cw/0/XL/i-RWdR2cw-XL.jpg)
![[Linked Image from green427.smugmug.com]](https://green427.smugmug.com/photos/i-fvF5Kzj/0/XL/i-fvF5Kzj-XL.jpg)
![[Linked Image from green427.smugmug.com]](https://green427.smugmug.com/photos/i-FT7C7zs/0/XL/i-FT7C7zs-XL.jpg)
![[Linked Image from green427.smugmug.com]](https://green427.smugmug.com/photos/i-ShT4xW7/0/XL/i-ShT4xW7-XL.jpg)
![[Linked Image from green427.smugmug.com]](https://green427.smugmug.com/photos/i-VLQ8RGd/0/XL/i-VLQ8RGd-XL.jpg)
![[Linked Image from green427.smugmug.com]](https://green427.smugmug.com/photos/i-dqMfwHs/0/XL/i-dqMfwHs-XL.jpg)
![[Linked Image from green427.smugmug.com]](https://green427.smugmug.com/photos/i-kTcp3ng/0/XL/i-kTcp3ng-XL.jpg)
![[Linked Image from green427.smugmug.com]](https://green427.smugmug.com/photos/i-GxMCpxh/0/XL/i-GxMCpxh-XL.jpg)
![[Linked Image from green427.smugmug.com]](https://green427.smugmug.com/photos/i-vCgCpbp/0/XL/i-vCgCpbp-XL.jpg)
![[Linked Image from green427.smugmug.com]](https://green427.smugmug.com/photos/i-8SXbvZt/0/XL/i-8SXbvZt-XL.jpg)
![[Linked Image from green427.smugmug.com]](https://green427.smugmug.com/photos/i-smC2552/0/L/i-smC2552-L.jpg)