|
|
Joined: Apr 2009
Posts: 1,966
ChatMaster - 1,500
|
OP

ChatMaster - 1,500
Joined: Apr 2009
Posts: 1,966 |
Finally decided to put the FS fold-over wired vinyl roof molding on my '31 Coach today. Was very disappointed with the results. While I followed carefulluy the instructions and took my time (about 7 hours of work), it was impossible to get a god job. The profile of the material is not suitable to get what we need. I trimmed the rof fabric as close to the nails as possible (about 1/8"+), but even at that it was impossible to get the molding to lie flat against the sheetmetal, wanted to sit on roof membrane. The fold over portion they show in their detailes as being able to take an almond sort of profile when tapped with a block of wood, will not do so. So end result sits to high not to mention the challenges of getting it in a straight line and uniform in the profile. The hide-em strip on front edge went about as good as you can expect from it, makes a reasonable substitur=te except hard to get good finishe turning down front corners.
I used a black mono sealant for all layers, masked either side of trim to minimize mess. Im thinking I will leave it for now, at least it's water tight, and look around for some off the shelf aluminum or stainless molding which can be used at some point. Too bad the original material is no longer available.
My advice to anyone planning on using this to have a good look for alternatives!
|
|
|
|
|
Joined: Nov 2001
Posts: 19,758 Likes: 64
ChatMaster - 15,000
|
|
ChatMaster - 15,000
Joined: Nov 2001
Posts: 19,758 Likes: 64 |
My understanding is that the original type aluminum moulding is now available. Made by Bob's Automobilia (Buick parts house) in California.
How Sweet the roar of a Chevy four!
|
|
|
|
|
Joined: Oct 2007
Posts: 558
Oil Can Mechanic
|
|
Oil Can Mechanic
Joined: Oct 2007
Posts: 558 |
Page 6 under Body and roof......8 ft strips...Fortunately I could still use my curved pieces but I drilled small holes in the strips, counter sunk the holes and used brass wood screws to fasten them down. Worked great.
Mac
|
|
|
|
|
Joined: Apr 2009
Posts: 1,966
ChatMaster - 1,500
|
|
OP
ChatMaster - 1,500
Joined: Apr 2009
Posts: 1,966 |
I will chack them out, thanks. If I get some, I figure over the winter I will see if the material I put on can be pried off without damaging the new roof fabric. Nothing is ever easy when working on these old cars eh!
|
|
|
|
|
Joined: Apr 2011
Posts: 331 Likes: 4
Backyard Mechanic
|
|
Backyard Mechanic
Joined: Apr 2011
Posts: 331 Likes: 4 |
It unfortunate that one of our major suppliers for Chevrolet restoration parts has gone to the dogs (sorry,reallyJYD) by supplying so many items that are so very cheaply made,many in China or Bangledesh. I have had to return so many parts simply because they were horribly manufactured. Why do they not understand that MOST of us would gladly pay the extra to get a product that is of good quality??
Last edited by jay32249; 08/11/13 12:02 PM.
|
|
|
|
|
Joined: Jun 2013
Posts: 51
Shade Tree Mechanic
|
|
Shade Tree Mechanic
Joined: Jun 2013
Posts: 51 |
I just bought a roof kit also. I will not be installing it for about a month or so. I have an engine to put back together first. I am watching this thread with much interest as I want a roof that will last many years and not leak. I used to do custom upholstery work but never put a roof on. Thanks for all the information.
Craig
Not till I have done and seen it all will I go peacefully.
|
|
|
|
|
Joined: Apr 2009
Posts: 1,966
ChatMaster - 1,500
|
|
OP
ChatMaster - 1,500
Joined: Apr 2009
Posts: 1,966 |
The FS roof fabric is very nice and went on relatively straight forward following their directions. Installing it outside on a somewhat warm day is suggested. It takes some care to avoid wrinkles along edges. As for the fold-over molding, while I was disappointed with the finished look, others may find it OK. If I were you I would check out the availability of the aluminum trim.
|
|
|
|
|
Joined: May 2012
Posts: 4,374 Likes: 30
ChatMaster - 4,000
|
|
ChatMaster - 4,000
Joined: May 2012
Posts: 4,374 Likes: 30 |
I am interested as well in the roof scenario, as I will have to install or have installed a new roof on my 1929 4door in the furture. I have most of the original trim pieces, but they are all mangled up and covered in goo (looks like someone used an rtv or sealant to try and stop an old leak) I Checked out Bob's Automobilia and found the Roof Crown Modling this would do hte straights, how would you do the corners ?? I also looked at LeBaron Bonney Company since they bought out/ took over Hampton Coach. I got a sampler pack, very nice looking product they offer, They sell upholstery kit for my 1929 as well as a of kit, but does NOT include the Moulding. Does anyone make or reproduce the moulding kit including the corners ?? or ideas ??
AACA - VCCA - Stovebolt - ChevyTalk
Love the Antique Chevrolet's from 1928-1932
The Beauty, Simplicity, History, and the Stories they Tell
|
|
|
|
|
Joined: Nov 2001
Posts: 29,863
Tech Advisor ChatMaster - 25,000
|
|
Tech Advisor ChatMaster - 25,000
Joined: Nov 2001
Posts: 29,863 |
how would you do the corners ?? The corners are bent from the straight mouldings using a custom made jig. Does anyone make or reproduce the moulding kit including the corners ?? No.   
The Mangy Old Mutt
"If It's Not Junk.....It's Not Treasure!"
|
|
|
|
|
Joined: Aug 2003
Posts: 720
Oil Can Mechanic
|
|
Oil Can Mechanic
Joined: Aug 2003
Posts: 720 |
you can make a jig using 3/4 plywood with a top and bottom piece . but the secret is to soffen the molding with heat not melting . i seal the fabric and molding with urathane black sealant put masking tape down to mark the holes to fasten and trim the fabric after every thing is in place with a exato knife or single edge razor you may get some pucker in the fabric but it will releave itself on a warm day . i was very upset the first one that i done with the pucker the next day i looked at it and it was tight as a fiddle stringe . hope this helps
|
|
|
|
|
Joined: Jun 2013
Posts: 51
Shade Tree Mechanic
|
|
Shade Tree Mechanic
Joined: Jun 2013
Posts: 51 |
Thanks everyone. I have been following for several days. Just ordered my molding form Bob's. Had a nice long talk with the person on the counter. Very informative. They are having these strips extruded specially for them.
Bending the strips with a jig should not be hard. The part I am not sure of is this strip has a bend over flap. If you bend the curve with the flap up, the flap will have to be notched so it will bend down around the curve. If you bend the curve with the flap bent down can you then bend it up enough the get the fabric under the flap??
I am getting 4 strips so I should have some to practice on.
Any one have pictures of what this is supposed to look like when finished??
Thanks everyone it would be much harder to get this old car going without everyones input.
Craig
Not till I have done and seen it all will I go peacefully.
|
|
|
|
|
Joined: Aug 2003
Posts: 720
Oil Can Mechanic
|
|
Oil Can Mechanic
Joined: Aug 2003
Posts: 720 |
if you bend the flap down and then open it up it will break off . the molding is extruded makes it very hard to bend it has to be soften . the front piece is the hardest to bend
|
|
|
|
|
Joined: Mar 2004
Posts: 1,290
ChatMaster - 1,000
|
|
ChatMaster - 1,000
Joined: Mar 2004
Posts: 1,290 |
CRS1929, It sounds like you are going to put the fabric under the metal flap if I understand your comment from above. The metal goes on top of the fabric and the flap covers the fasteners to the roof. I reused my old molding from my 31 sport coupe. I ground off the nails on the bottom and then drilled and countersunk the top edge so that I could use screws to hold it down. I then filled the countersunk holes with epoxy and sanded it down. Then it got a coat of black paint and I do not think that it will ever come loose with the screws. I tried bending some of the new metal and it is way harder than the old stuff. I did try annealing it with a torch to soften it a little. Hope that this will help.
Sal Orlando
Chat Group Region Member
|
|
|
|
|
Joined: Jun 2013
Posts: 51
Shade Tree Mechanic
|
|
Shade Tree Mechanic
Joined: Jun 2013
Posts: 51 |
I looked in the Fisher book I bought and yes I did not understand how this went together. Thanks for the info. I need all the help I can get. Wish I could get the aluminum strips in the kiln. I did this with some short aluminum strips. I think I heated to 600 degrees for about 30 min. When it cooled it was very easy to bend. Almost to easy.
Not till I have done and seen it all will I go peacefully.
|
|
|
|
|
Joined: May 2012
Posts: 4,374 Likes: 30
ChatMaster - 4,000
|
|
ChatMaster - 4,000
Joined: May 2012
Posts: 4,374 Likes: 30 |
Ok, what are the ORIGINAL Strips made of ?? I think I have the complete set, need to look at what I have. I know that WHAT I have is covered in goo, just wondering if they could be cleaned up and reused, or if they are shop beyond usability ?!? Will take a look and see. Scanning the web and my picture files here is what I found on a 1929 4dr Roof. This is about what my moulding/ trim looks like, minus the roof material: 1929 4dr Roof Pict 011929 4dr Roof Pict 02Also looks like there is a Metal Part that goes across the FRONT of the wood, then a piece of channel that forms a u-shap that goes over that and the roof material.
AACA - VCCA - Stovebolt - ChevyTalk
Love the Antique Chevrolet's from 1928-1932
The Beauty, Simplicity, History, and the Stories they Tell
|
|
|
|
|
Joined: Nov 2001
Posts: 19,758 Likes: 64
ChatMaster - 15,000
|
|
ChatMaster - 15,000
Joined: Nov 2001
Posts: 19,758 Likes: 64 |
I am not 100% sure on the composition. Think it is aluminum alloy. Likely not like the extrusion grade alloy used today. I think that part of the problem in bending the new mouldings is that they are work hardened in the extrusion or pulltrusion process. Annealing should make the metal more malleable so bending much easier. Maybe someone can contact Bob's Automobilia and see if they have any recommendations on shaping the pieces.
How Sweet the roar of a Chevy four!
|
|
|
|
|
Joined: Nov 2001
Posts: 29,863
Tech Advisor ChatMaster - 25,000
|
|
Tech Advisor ChatMaster - 25,000
Joined: Nov 2001
Posts: 29,863 |
Ok, what are the ORIGINAL Strips made of ?? The original roof crown mouldings for 1929 and 1930 were an aluminum alloy.
The Mangy Old Mutt
"If It's Not Junk.....It's Not Treasure!"
|
|
|
|
|
Joined: Apr 2009
Posts: 1,966
ChatMaster - 1,500
|
|
OP
ChatMaster - 1,500
Joined: Apr 2009
Posts: 1,966 |
Well, I decided the fold over vinyl had to go! While it took me about 6-7 hours 2 weeks ago to carefully install it as well as I could on my '31 Coach, it took all of about 15 minutes to peel it back off. No damage to vinyl as mono sealant was still pliant.
I was talking with the local Weld-Pro shop and they advised me they can laser cut me 2 pieces of 1/8"x3/4" aluminum strip the exact shape I need, including the curves at the back (they cut it from 1/8" sheet aluminum. They will also laser cut holes at 3.5" centers etc to permit screwing to the body. When I get it next week, I plan to use my router to round/bullnose both edges before installing. Will use stainless countersunk screws, likely flush to aluminum (may prefer oval heads). Depending on how this works out (should look just like bottom half of original pieces), I will decide how to finish up, i.e. type of sealant to use, sealing of screws and whether to pre-paint, and also whether to plan to glue on a 3/8 wide x 1/8 high round cover molding over screws (Weld Pro says there is adhesive that is great for this type of aplication). Necissity is the mother of invention (NITMOI), and if this works out well and looks pretty authentic, I'll post some photos. Not original but then again, no computer programmable laser cutters available in '31.
Have not figured out a solution for front piece, but may use similar approach if it looks good or stay with some hid-em strip (I have some very nice smooth 40 year old hid-em).
|
|
|
|
|
Joined: May 2012
Posts: 4,374 Likes: 30
ChatMaster - 4,000
|
|
ChatMaster - 4,000
Joined: May 2012
Posts: 4,374 Likes: 30 |
Sounds like a plan, I am interested in seeing how it comes out and how it looks when done.
Keep us updated and post pictures of the process !!
AACA - VCCA - Stovebolt - ChevyTalk
Love the Antique Chevrolet's from 1928-1932
The Beauty, Simplicity, History, and the Stories they Tell
|
|
|
|
|
Joined: Apr 2009
Posts: 1,966
ChatMaster - 1,500
|
|
OP
ChatMaster - 1,500
Joined: Apr 2009
Posts: 1,966 |
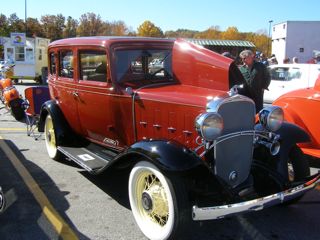
As promised, I have posted at left photos of my purpose made aluminum trim for the roof of my '31 Coach.
A short summary, made a careful pattern of each side of roof fabric curvature (I used a scrap of vinyl flooring upside down), compared each side to see they were very close and took pattern to local Weld-Pro outlet. They laser cut the 2 pieces from 1/8" aluminum sheet, making each piece 3/4" wide, and 2 inches longer at each end than required. I gave them a hole pattern (about 3.5" CC average) based on location of slots/nails in fabric. Cost $120 for the 2 pieces.
Once home, I used the rotor and a suitable bit to 1/4 round the edges, used a rotor table for 90%, had to do curves using a jig cut from 3/4 plywood. These corners were quite a challenge to get just right. I then used the drill press to add a countersink at each hole suitable for a #10 wood screw flush. However I was going to use #8 screws, with the oversize countersink allowing for the challenge of getting the screws centered in each hole. Taped pieces to roof and carefully drilled holes starting at rear corner and working both ways, leaving each finished screw in place (I decided to have screws where sheet metal had not been slotted so I had good bearing) and test fitted all screws (#8x1"). I masked off both sides of pieces and then removed the pieces.
I now spread mono ultra along the 3/4" area between masking tape and set pieces carefully back in place. Started at rear corner and worked both ways. Once all screws were in place (they squezed out excess mono and also had mono rise up in screw hole to seal screw to aluminum), I used a dremel tool and small grinding wheel to finish off tops of any screws sticking above aluminum. Finally I then filled countersink area and screw head with a structural steel filler and a final good quality spot body filler.
Final finish required sanding all filler to smooth finish and spraying with self etch primer suitable for aluminum. Top coat is 3 coats semi-gloss black from a can to provide a luster closer to roof fabric rather that glossy finish to go on rest of car.
While result is not perfect and does not emulate the original molding, it makes a very neat job and a low profile similiar to many cars of the period. There is a tendency for screws to squeeze the aluminum into a depression at each screw hole, but care in not screweing in too tight minimizes that issue. Looks so much better than the fold-over vinyl!
|
|
|
|
|
Joined: Apr 2010
Posts: 734 Likes: 14
Oil Can Mechanic
|
|
Oil Can Mechanic
Joined: Apr 2010
Posts: 734 Likes: 14 |
Hello Gunsmoke,
I checked out Mono Ultra sealant and found out that it's made by DAP. Here in the US, I believe DAP calls it Dyna Flex 230. From one of your previous posts you were contemplating glueing on a cap moulding (" and also whether to plan to glue on a 3/8 wide x 1/8 high round cover molding over screws (Weld Pro says there is adhesive that is great for this type of aplication"). Is that still necessary or no? I'm still curious to know what the recommended adhesive is. Also, is there a need to apply a waterproofing product to the top material for protection, something like Scotch Guard? My top material looks like the surface of a dried up lake bed, so would like to know how to care for the new material after installation. Good job on your moulding.
|
|
|
|
|
Joined: Apr 2009
Posts: 1,966
ChatMaster - 1,500
|
|
OP
ChatMaster - 1,500
Joined: Apr 2009
Posts: 1,966 |
I decided a cover mold was not necessary, and decided to fill in screw heads and leave a smooth thin molding instead. So I have not asked Weld=Pro about the adhesive. Next time I am near them will ask. The new vinyl coated fabric from FS does not call for and should not need any protection (at least I hope it doesn't!). My old original roofing was rubberized canvas and dried up like you describe.
|
|
|
|
|
Joined: May 2012
Posts: 4,374 Likes: 30
ChatMaster - 4,000
|
|
ChatMaster - 4,000
Joined: May 2012
Posts: 4,374 Likes: 30 |
Awesome, and thanks for sharing. Knowing that I will be tackling this task soon !!
Pictures say it all, as it looks good.
AACA - VCCA - Stovebolt - ChevyTalk
Love the Antique Chevrolet's from 1928-1932
The Beauty, Simplicity, History, and the Stories they Tell
|
|
|
|
|