|
|
Joined: Oct 2010
Posts: 1,005 Likes: 5
ChatMaster - 1,000
|
OP

ChatMaster - 1,000
Joined: Oct 2010
Posts: 1,005 Likes: 5 |
I need to remove and rebuid the Master Cylinder on my 1950 Chevrolet Belair. Can someone walk me throught the best way to remove it? Now remember, I have to do this laying under the car NOT standing under it. Thanks.
|
|
|
|
|
Joined: Nov 2001
Posts: 19,758 Likes: 64
ChatMaster - 15,000
|
|
ChatMaster - 15,000
Joined: Nov 2001
Posts: 19,758 Likes: 64 |
If you roll the car over on its side then access is far easier. Might be expensive and require several other fellas to get in on its side. As long as they have a couple of beers they will get the job done especially when it is a prerequisite for more beer.
Otherwise, get it as high as you can safely. Make sure it is well supported on jack stands. A creeper or other means to move around is a plus. Be sure to use a flare nut wrench on the brake lines. It may be necessary to apply a little heat or penetrating oil (PB Blaster) to get the nuts to rotate independently of the tubing. Take a couple of photos so you will know how the brake pedal linkage goes back together.
How Sweet the roar of a Chevy four!
|
|
|
|
|
Joined: Jan 2002
Posts: 1,069 Likes: 9
ChatMaster - 1,000
|
|
ChatMaster - 1,000
Joined: Jan 2002
Posts: 1,069 Likes: 9 |
Do you have a service manual? Here is the online manual. Page ahead to get the text for the master cylinder. http://chevy.oldcarmanualproject.com/shop/1949_53/05brakes/5_14.HTM
1946 Chevy 3100 1/2 Ton Pickup Purchased 11/18/17 Sold 9/20
1948 Chevy Fleetmaster Coupe, Purchased 6/20/2010
1965 Chevy ll 350 Purchased Feb 2021. 3-speed Saginaw Hurst Floor Shifter 3.08 Rear End
2019 Ford Ranger Lariat Super Crew
|
|
|
|
|
Joined: Oct 2010
Posts: 1,005 Likes: 5
ChatMaster - 1,000
|
|
OP
ChatMaster - 1,000
Joined: Oct 2010
Posts: 1,005 Likes: 5 |
Thanks Chipper and Keith for the information. I put some Blaster on the fastners about a week ago. Had to go out of town so hopefully I will get back to it today. Still need to raise the car up a little more. Can't get under it on a creeper. I may just have to go to Chipper's first plan and put the car on its side. I will let you know my progress. Thanks again.
|
|
|
|
|
Joined: Nov 2001
Posts: 19,758 Likes: 64
ChatMaster - 15,000
|
|
ChatMaster - 15,000
Joined: Nov 2001
Posts: 19,758 Likes: 64 |
On second thought it might be more prudent to find someone with a lift that you can borrow or rent. Of course you can always pay someone to change out the MC. Biggest problem is finding someone that has the first clue to the location under the floor and not hanging on the booster on the firewall. Of course if you do it yourself and take your time you have a much better chance of not twisting off one of the lines. Liberal use of PB Blaster and maybe a little heat can prevent replacing the line.
How Sweet the roar of a Chevy four!
|
|
|
|
|
Joined: Aug 2011
Posts: 214
Backyard Mechanic
|
|
Backyard Mechanic
Joined: Aug 2011
Posts: 214 |
I have to wrench on commercial turf equipment every day, and they just don't make lifts for this stuff. Many times there is not enough room to work on a creeper underneath these things. My solution for this, and working on my '51 Stylineline Deluxe is a nice big chunk of cardboard. It is really quite comfortable
|
|
|
|
|
Joined: May 2011
Posts: 596
Oil Can Mechanic
|
|
Oil Can Mechanic
Joined: May 2011
Posts: 596 |
I have to wrench on commercial turf equipment every day, and they just don't make lifts for this stuff. Many times there is not enough room to work on a creeper underneath these things. My solution for this, and working on my '51 Styline Deluxe is a nice big chunk of cardboard. It is really quite comfortable Ditto on the cardboard; done it often. A large tarp folded over a few times also works well. But if you get a set of truck jack stands, you can lift the car about 18" off the cement. Unless you need to do a serious diet, you should be able to fit under there on a creeper. I'm a bit portly, and I do... It does help to use four stands so the car is level. And a couple of good hydraulic jacks to get it up there safely is also a good thing to have.
Richard
Waverly, IA
|
|
|
|
|
Joined: Nov 2012
Posts: 604
Oil Can Mechanic
|
|
Oil Can Mechanic
Joined: Nov 2012
Posts: 604 |
I'm 76 and have never been under one without jack stands! In my teens, a fellow was killed by a car falling on him (no stands!). I promised myself then.
That cardboard works great. around here we call it an "Alabama Creeper". 'Got one with wheels but I prefer cardboard. It doesn't move around when you don't want it to. Those wheels have a mind of their own.
Good luck with the M cyl.
|
|
|
|
|
Joined: Jan 2002
Posts: 1,069 Likes: 9
ChatMaster - 1,000
|
|
ChatMaster - 1,000
Joined: Jan 2002
Posts: 1,069 Likes: 9 |
I lost my cousin in 1957 when he used a bumper jack to put on tire chains with snow hanging down under the car. I use jack stands or 6X8 wooden blocks under the tires. My son always tells me he always uses them because I hammered it in to his head when he was a teen.
1946 Chevy 3100 1/2 Ton Pickup Purchased 11/18/17 Sold 9/20
1948 Chevy Fleetmaster Coupe, Purchased 6/20/2010
1965 Chevy ll 350 Purchased Feb 2021. 3-speed Saginaw Hurst Floor Shifter 3.08 Rear End
2019 Ford Ranger Lariat Super Crew
|
|
|
|
|
Joined: Oct 2010
Posts: 1,005 Likes: 5
ChatMaster - 1,000
|
|
OP
ChatMaster - 1,000
Joined: Oct 2010
Posts: 1,005 Likes: 5 |
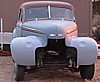
I was able to raise the car safely and get to the master cylinder. But I hit a snag. The lock ring is different than the one shown in the manual online. I have attached a photo of it. Any ideas has to how to remove it? ![[Linked Image from i1311.photobucket.com]](http://i1311.photobucket.com/albums/s663/hawkeye1932/f175756c-9329-43f8-a63f-430233d0a15d_zpsd160d7f0.jpg)
|
|
|
|
|
Joined: Apr 2008
Posts: 1,194
ChatMaster - 1,000
|
|
ChatMaster - 1,000
Joined: Apr 2008
Posts: 1,194 |
Spray some penetrating oil in around the pin. Try and clean some of the rust and dirt out of the small hole in the center. Then take a punch and put it in the hole and work the pin in and out, keep spraying it with penetrating oil and you should be able to work it out.
|
|
|
|
|
Joined: May 2011
Posts: 596
Oil Can Mechanic
|
|
Oil Can Mechanic
Joined: May 2011
Posts: 596 |
I believe it is threaded 5/16" but don't remember is fine or standard; fine, I think. Anyway, screw a bolt into it and pull it out.
Last edited by RichardJ; 07/06/13 04:37 PM.
Richard
Waverly, IA
|
|
|
|
|
Joined: May 2011
Posts: 596
Oil Can Mechanic
|
|
Oil Can Mechanic
Joined: May 2011
Posts: 596 |
Can also get hold of it with a thin nose vise grip and yank it out. There is nothing holding it in. It just holds the brake and clutch pedal bars in place.
Richard
Waverly, IA
|
|
|
|
|
Joined: Oct 2010
Posts: 1,005 Likes: 5
ChatMaster - 1,000
|
|
OP
ChatMaster - 1,000
Joined: Oct 2010
Posts: 1,005 Likes: 5 |
I was able to remove the clip with a fine threaded bolt. I removed the master cylinder from the car, disassembled it, cleaned it up and rebuilt it. Now, am I suppose to bench bleed it or put it back on the car an bleed it? If I am suppose to bench bleed it, how do I do that. Thanks to everyone who have tried to educate me along the way.
|
|
|
|
|
Joined: May 2011
Posts: 596
Oil Can Mechanic
|
|
Oil Can Mechanic
Joined: May 2011
Posts: 596 |
I was able to remove the clip with a fine threaded bolt. I removed the master cylinder from the car, disassembled it, cleaned it up and rebuilt it. Now, am I suppose to bench bleed it or put it back on the car an bleed it? If I am suppose to bench bleed it, how do I do that. Thanks to everyone who have tried to educate me along the way. Don't know what's right, but I reinstalled mine and then bled it, hooked it up and bled the wheel cylinders.
Richard
Waverly, IA
|
|
|
|
|


![[Linked Image from i1311.photobucket.com]](http://s1311.photobucket.com/user/hawkeye1932/media/f175756c-9329-43f8-a63f-430233d0a15d_zpsd160d7f0.jpg.html)
