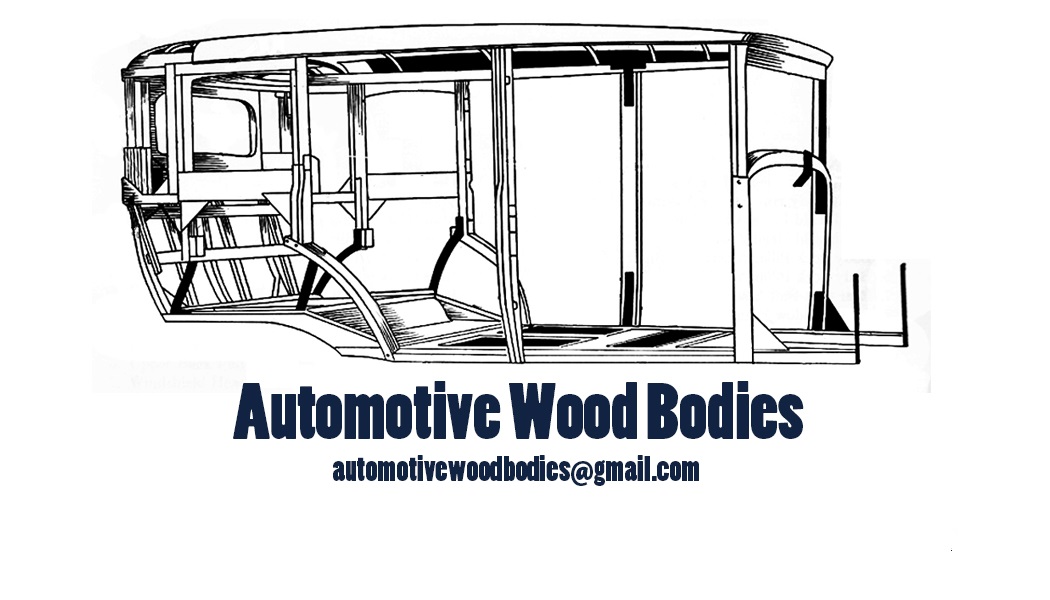
I have a 1941 SD Woody wagon. I have restored all of the mechanicals and now I’m turning to the wood restoration. All of the original wood was disassembled and bundled up. This was done by the previous owner. So...,I’m trying to figure out this very large jigsaw puzzle. Does anyone have detailed pictures,diagrams, or directions on how to restore and assemble the body on this car. Thank you very much for your help and expertise. Bob
Bob, I am currently restoring a 1948 woodie which I suspect is very similar to your 41. Fisher Body did the wood for the 48 while I believe Hercules-Campbell Body Company out of Waterloo, NY built the 41. You can find information about them on www.coachbuilt.com. Once on the site search Hercules-Campbell. Another great source of information is the Fisher Body Station Wagon Service and Construction Manual 1948 that is available in print. It might also be on the Old Car Manual Project website
Regarding your jigsaw puzzle, I have many pictures of the various pieces and assemblies that make up the 48 body. Here are a couple taken during recent virus lockdown. It might be helpful if we had a phone conversation if you would like to pm me your contact information
Hi Mike, I talked with you a few weeks ago. I’ve began to try to figure out where the framing goes for the back seats. Do you have any detailed pictures of the back seat structure? I’m having a hard time trying to figure out what goes where. Any help would be greatly appreciated! Thanks Mike, Bob
This sounds like a great project. Here is some advice I and many others have learned the hard way.
Make and take time to maintain all the mechanical systems while you focus on the body restoration. You need to run the engine and drive the vehicle some over the extended time period it will take to complete the body restoration. Otherwise those parts will possibly need refurbishing before you can drive the completed vehicle.
Even my simple rejuvenation project took many years longer than expected. I had 7 year old "new" tires when I finally started driving the car. The fully rebuilt engine for my friend's '49 3100 pickup sat for 10 years before we started working to install it.
The lesson is that in the hierarchy of vehicle restoration the mechanical and electrical are much easier and quicker to do than body and interior work. We all know of situations when a car sits at a paint shop 2 years waiting for the artist/painter to "get to it".
Bob, Both the middle and rear seat on the 48 are separate upholstered metal frames that attach to the floor assembly with an anchor plate and bolt with wing nut. The floor assembly is the foundation for the rear quarter panels and tailgate. I don’t have any pictures of the floor assembly as I have not removed it from the the car. There is a picture of the top side of it with description on page 3 of the 1948 Fisher Body Station Wagon Manual. Sorry I can’t be of more help. Feel free to call me if I can be of more help. mike
Hi, there is a 46 page book put out by chevrolet titled chevrolet parts price list supplement for special models issued march 15 1941 this has 3 pictures of the 41 station wagon supplied by midstate bodies which is like the regular parts book in that it shows where some of the parts go with the part numbers. It also has the parts numbers and description in a section called 1941 station wagon bodies mounted on the AH chassis. this manual covers from 1933 to 1941 various model special bodies. is orange with black lettering, there is one issued may 1 1948 which covers from 1937 to 1948 and is red with black lettering. these books come up from time to time on ebay, and some literature vendors might have them in stock as well. hope this will be of some help. Dennis
Hi Mike, it’s been a while since we’ve talked. I now have the back platform done and I’m now trying to figure out how the wood goes around the back inner fender. And, how it attaches to the back pillars. Do you have any pictures detailing any of this? The more specific the better. There is nothing on the internet that helps. The couple of books I have aren’t much better. Thanks Mike and I hope your Christmas was a good one. Bob
Bob, The back wooden platform should butt up against the inside surface of the rear wheelhouses. There is a row of screws installed from the outside of the wheelhouse into the edge of the wooden platform as shown as “C” on page 17 of the Fisher Body manual. The outside lip of the wheelhouse should have holes for screws to secure it to the bottom edge of the wooden quarter panel also shown on page 17 as “A”. I’ll see what I have for pictures when I get to the shop. I also sent you a PM. Mike
Hi Mike, I’m making progress and I’m now rebuilding the top structure. The original is a good pattern with the exception of how it fits to the front window frame. This part of the assembly was rotted out and doesn’t exist. Can you shoot me a few pictures? Thanks, Bob
Bob, The leading edge of the roof rail is tapered so that it engages into the opening on top of the a pillar. There is also a second piece that screws to the bottom of the roof rail that also engages into the a pillar. It forms the stop for the top of the front door and makes a place to attach the weather strip. As you can see in the pictures there are both screws at the top of the a pillar and carriage bolts on each side. Mike
Hi Mike, sorry to jump into conversation with Bob, I recently bought a unmolested 48 chevy woodie. metal body was pretty original, no one cut it up or took it apart. I do need a few wood pieces like right rear D column is in bad shape, I do have most of it in pieces. My biggest problem is left passenger door is missing, so assuming I don't find one I'll be trying to build one. All the plywood needs changing as someone in the 1970's sanded through mahogany to remove what ever was on door. So from what I can see so far doors have to come apart to remove plywood.
I noticed you took your whole body apart, is that something that I should consider or try to repair intact? roof and most other parts seem usable (at this time), my thoughts where to change out bad pieces, probably have to bleach out Ash wood and then stain and finish.
Do you have any specifications on left rear passenger door?
I am not a carpenter by trade but have worked at a marina years ago and worked on many wooden boats, steaming ribs, repairing teak decks, repairing rotten cabin works and of course mahogany planks.
Wayne, I only took apart the joints that were loose or where components needed replacement or repair. Both quarter panels were apart for D pillar and horizontal rail replacement but the doors were in great shape and stayed tight even during the bleaching process. It was not necessary to disassemble the doors to remove the plywood, once the wedges are removed. I did not use any stain before varnishing but used wood sealer as the first step. Good luck and enjoy your project. I think you have my information in your pm’s if you’d like to contact me. Mike