Can you tell me how the rear main seals? I do not see a rear seal in your pics. Is there a seal? I see the groves art the rear of the bearing and wonder if they serve that purpose?? I have rear crank shaft leaks. Thanks.
There are no crankshaft seals on '28 engines. Both ends have slingers to direct oil away from the ends of the shaft. For the rear the slinger is a raised ridge between the bearing and end of the shaft. As the shaft spins oil is thrown off the edge of the ridge into the groove in the block and cap. A passage in the cap directs oil back to the pan. If the rear main bearing clearance exceeds 0.002" more oil can pass by the bearing than can be directed back to the pan.
Hey Dean, I was just rereading a portion of your recent update. I came across another tidbit that was aggravating to me. The little spring that goes on the bottom of the spark linkage, it kept falling off my linkage. I was trying to figure out how I was going to get it to stay on. I thought I might have to find a replacement. I just noticed in your pic that there is evidently a place for a small cotter pin
I didn't know there was a hole in the linkage for a pin. You have unknowingly come through again.
Happy New Year
Jeff
1925 Superior K 4 Dr Sedan 1966 C10 2003 Silverado 1500 HD
An item that many may not know was used is the spring on the timing retard/advance as well as the throttle linkage. It also was used on the foot pedal linkage to the carburetor. Not exactly sure when the spring, held in place by a washer and cotter pin started or stopped. My 1928 thru 1931 had those springs, washers and cotter pins. Apparently they were often discarded by mechanics so many vehicles are missing them.
Chipper, you mentioned oil slingers at both ends of the crankshaft. I didn't see any of these slingers in the three engines I torn down.
Please explain a little more about these slingers. Are they a sheet metal ring that slides onto the crankshaft?
From what I saw, the oil that seeps out of the front bearing ends up in the cam gear box and from there flows back into the block.
The rear of the crankshaft is smooth and the oil can naturally 'sling' off as it attempts to migrate past the three oil-catching grooves that are in the rear main bearing. As you mentioned, the bottom rear main bearing half has an oil tunnel that allows the oil in the grooves to drain back into the oil sump.
Below are photos of the rear main bearing areas that I took during my final build. I don't see any slingers.
Thanks! Dean
Last edited by Rustoholic; 06/18/1811:33 AM.
Dean 'Rustoholic' Meltz old and ugly is beautiful!
Dean, My bad I was thinking early 6 not late 4. You are right that the rear main has the grooves that lead to the drain hole. The front uses the crank and cam gears to route the oil away from the hole in the crank gear cover.
Although I know that it is not nice to take pictures of patients while they are in surgery, I don't think Lurch will mind.
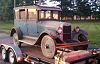
The first photo shows him in my driveway awaiting his new engine.
In the second photo, I've lifted the engine off the engine stand and temporarily placed it on my open trailer. This is so I can put the clutch and pressure plate onto the flywheel before dropping the engine into Lurch. You'll see in the pic that I have the input shaft from another tranny to use as a centering device for the clutch.
Another thing to mention is that I put a new transmission shaft bushing in the end of the crankshaft. I soaked it in oil and put a dab of bearing grease in it before pushing it into its hole.
While the engine was sitting on the trailer, I also installed the starter. It worked in Lurch so I just put it back in as is (famous last words!). It's easier to do this while the engine sits on the open trailer instead of in the engine bay.
Cheers, Dean
Last edited by Rustoholic; 06/18/1811:34 AM.
Dean 'Rustoholic' Meltz old and ugly is beautiful!
The next step was to install the transmission. This operation is simple, but trying because of the limited work space (under the truck).
Before putting the transmission in, I changed the throw out bearing to the new ball bearing type. I like the idea of not worrying about the old solid bearing getting too hot. Below are a couple of pics that show loosening the throw out bearing clamp bolt, the throw out bearing actuating arm, the old throw out bearing, and the new one.
For installing the tranny, I used a floor jack with a piece of plywood bolted to it as a platform for the tranny to sit on. I then was able to easily raise and lower the transmission, slide/roll it into position, and bolt it to the flywheel cover on the block.
Regarding the tranny itself, I took a 3-speed tranny out of Lurch and am replacing it with a 4 speed. The new tranny I put together with the best parts from two transmissions. The difference between the 3 and 4 speed is that there is a granny, super low first gear in the 4 speed. Lurch wants to be in some parades, so he asked me to put in the 4 speed so he could cruise super slowly.
Cheers, Dean
Last edited by Rustoholic; 06/18/1811:35 AM.
Dean 'Rustoholic' Meltz old and ugly is beautiful!
When I took Justin's head off a few years ago, I took a couple of old '28 head bolts (1/2-12) whose threads were stretched and made them into guide pins. I put them in my lathe and turned down the heads (pun intended) and cut a slot in the top so I could take them out easily with a screw driver.
Anyway, I dug those bolts out to use them in this rebuild. See the first photo below.
With the guide pins in place, I sprayed Permatex Copper sealant on both sides of the head gasket and slid it onto the block. See the second pic below.
Step number three was putting on the head itself. I tightened the head bolts using the sequence described in the shop manual.
Cheers, Dean
Last edited by Rustoholic; 06/18/1811:35 AM.
Dean 'Rustoholic' Meltz old and ugly is beautiful!
The first photo shows a lifter as it came out of Lurch's engine and another one that is cleaned up. The second photo shows the lifters in the block (with RedLine Assembly Lube smeared on them), the push rods, and the push rod caps in place.
The third photo shows the rockers in place. Notice that there are felt washers under the rocker adjuster bolts. These washers get a squirt of oil when you oil the rockers. The user manual says every 50 miles, but I give the rockers, washers, and the front water pump bushing some oil every time I take my 4 bangers out for a drive.
Ever onward! Dean
Last edited by Rustoholic; 06/18/1811:36 AM.
Dean 'Rustoholic' Meltz old and ugly is beautiful!
I used old, stretched bolts for the guide pins. The way I determined that they were stretched was to first clean out the threaded holes in the block with a 1/2-12 tap and then try to screw in the old bolt by hand. It became stuck at the point where the threads are stretched.
To hold the head on, I purchased a set of new bolts from the Filling Station. A friend of mine, John Thorpe, who is a certified Caterpillar Mechanic, said that he was taught to replace any bolt that could be stretched.
Cheers, Dean
Dean 'Rustoholic' Meltz old and ugly is beautiful!
Did you use a USS tap or a British Standard tap? Did you use The Filling Station's tap? When you chased the threads did you cut any metal? My understanding of The Filling Stations head bolts are that they are cut to a British Standard thread which has a 55 degree thread angle instead of the original 60 degree angle. Were you able to run the bolts down with your fingers before you chased the threads?
The tap that I used to chase the threads says 1/2-12 NS on the side. I've had it in my toolbox for years and I cannot say whether it is USS or British.
I did not try to screw the new bolts into the uncleaned bolt holes because the block threads had a lot of rust below the level where the old bolts had reached.
When I chased the threads, no metal came out of the threads, just dirt and rust. And, yes, the new bolts screwed in nicely by hand after chasing.
The new bolts from the Filling Station torqued down okay and I'm happy with them.
Cheers, Dean
Last edited by Rustoholic; 01/23/1807:48 PM.
Dean 'Rustoholic' Meltz old and ugly is beautiful!
Thanks for the info. I need to rebuild my engine in the future and my concern is that I don't want to do any more damage to the vehicle than what the previous owners have already done. It appears that as long as the thread angle is less than the original the new bolts will work without damaging the block. I think there could be a problem with the bolts loosening up in the future due to the 5 degree thread angle difference because there is less surface area contact between the bolt and the block. If you monitor this in the future I would be interested in the results.
If the bolts are torqued using the proper technique there will not be a problem from the 5 degree difference. The proper technique is to tighten in several steps. At each step tighten to desired torque, back off, tighten again, noting the amount of additional rotation from the last one. Repeat until you no longer get much rotation. The bolt is then properly seated. What is happening is the threads on the bolt and hole are working off the differences and that maximizes the contact area.
Dean, I should have included to be sure to lubricate the bolts & holes. Light oil up to may be 30 weight is best. Dry parts will not result in the proper torque.
Some say "Street is neat". I prefer "1928 is great"
I have documented my 45 years with a 1928 Chev Tourer, from 1973 to 2018, and regulary add other items that I hope are of interest to others. Your comments are most welcome.The story of the Red Chev can be viewed at http://my28chev.blogspot.com/
Moving right along, the push rod covers go on next. In the first photo below, you can see the clean inside of one and the 'patinaed' outside of the other. Needless to say, I left the black gold on the outside.
The second photo shows how the exhaust gaskets fit under the push rod covers and are held in place by nuts on 3/8-16 bolts. This is so that the gaskets will be in aligned properly when I put the exhaust manifold on.
The third photo shows both push rod covers in place. You can also see how the rocker arm cover fits on the outside of the push rod covers.
Hint: Notice that the oil return line (under the water pump) dives under the side of the engine. Up and coming attraction!
Cheers, Dean
Dean 'Rustoholic' Meltz old and ugly is beautiful!
Lurch is a cool cat and I want to help keep him that way.
There have been MANY discussions on the VCCA web site about engines overheating and what to do about the many possible causes of the problems.
One thing I've done on both of my 4 bangers is to plumb an oil cooler in the oil return line as it leaves the oil filter. I cannot say with certainty that this helps, but I feel that it can't hurt! I suspect that if the oil is a little cooler, it will help cool the bottom end of the engine.
In the pics below, you can see where I mounted the oil cooler so it is unobtrusive (below the front cross member and just behind the front axle).
Cheers, Dean
Dean 'Rustoholic' Meltz old and ugly is beautiful!
The top of the heat stove had rotted off, so I put a new end on it. This is just an exhaust pipe adapter from the local auto parts store. See the first photo.
I cut some slots in it to allow the smaller end to slide into the heat stove and then I put some sheet metal screws in to hold it in place. KISS priciple (keep it simple, silly). The second photo shows the assembled part ready to be installed, along with another heat stove that I used for reference. The reference part is paper thin, so it is not viable to put into service.
The third photo shows the exhaust manifold and horn mounted. This location for the horn is not correct, but what the hay! This is where I mounted it over 20 years ago and to respect Lurch's past, that's where it goes back. Besides, the horn bracket was already bent. While I had the horn off, I took off the motor cover and put a few drops of 3-in-1 oil on the motor bearings and made sure that all the electrical connections were clean.
The fourth photo shows the heat stove pipe and exhaust pipe hooked up. The last photo shows that the generator and intake manifold have been installed.
By golly, we're getting close to a first fire up!
Cheers, Dean
Dean 'Rustoholic' Meltz old and ugly is beautiful!


![[Linked Image from vccachat.org]](https://vccachat.org/gallery/48/medium/5567.jpg)

![[Linked Image from vccachat.org]](https://vccachat.org/gallery/48/full/5181.jpg)
![[Linked Image from vccachat.org]](https://vccachat.org/gallery/48/full/5199.jpg)
![[Linked Image from vccachat.org]](https://vccachat.org/gallery/48/full/5571.jpg)
![[Linked Image from vccachat.org]](https://vccachat.org/gallery/48/full/5572.jpg)
![[Linked Image from vccachat.org]](https://vccachat.org/gallery/48/full/5573.jpg)

![[Linked Image from vccachat.org]](https://vccachat.org/gallery/48/full/5582.jpg)
![[Linked Image from vccachat.org]](https://vccachat.org/gallery/48/full/5583.jpg)
![[Linked Image from vccachat.org]](https://vccachat.org/gallery/48/full/5619.jpg)
![[Linked Image from vccachat.org]](https://vccachat.org/gallery/48/full/5620.jpg)
![[Linked Image from vccachat.org]](https://vccachat.org/gallery/48/full/5621.jpg)
![[Linked Image from vccachat.org]](https://vccachat.org/gallery/48/full/5622.jpg)
![[Linked Image from vccachat.org]](https://vccachat.org/gallery/48/full/5623.jpg)
![[Linked Image from vccachat.org]](https://vccachat.org/gallery/48/full/5624.jpg)