|
|
Joined: Aug 2005
Posts: 251
Backyard Mechanic
|

Backyard Mechanic
Joined: Aug 2005
Posts: 251 |
Just to ad another method I too am replacing virtually all the wood in my 1929 Imperial Landau. Started as a small deal, then two days later the body was off, and now I am remaking everything, accept the rear top body rail, no kit. Take the word of others this is no small task with lots of odd angel cuts and router work. A kit would be the best / maybe only way to go.
Luckily most of my body wood was present, so duplication is going ok. However, I had no seats. This summer I was able to get a front seat, with enough wood to piece together the sides, back and bottom. I was also given enough of the rear bottom seat to duplicate what I need. I am now stuck with whatever I need for the back (Sides also if the are any side pieces)portion of the rear seat. I would appreciate measurements if you have them, and I picture is worth 10 cuts. (Some pieces I have cut were too short even when I cut them twice).
Also, I have found front seat springs, bottom and back, but cannot find any rear seat springs. Hemming sent me to Snyder. Both suppliers were understanding, but unable to help. Your assistance with this challenge will be a great help.
|
|
|
|
|
Joined: Nov 2001
Posts: 29,863
Tech Advisor ChatMaster - 25,000
|
|
Tech Advisor ChatMaster - 25,000
Joined: Nov 2001
Posts: 29,863 |
The Mangy Old Mutt
"If It's Not Junk.....It's Not Treasure!"
|
|
|
|
|
Joined: May 2003
Posts: 115
Shade Tree Mechanic
|
|
OP
Shade Tree Mechanic
Joined: May 2003
Posts: 115 |
I agree completely with what JYD says; a kit is the best option for success. The way the original was constructed makes it very, very difficult to "hang the body panels as you go".
The wooden framework of the body was contructed as a whole, in full body jigs, just like you see it in my pictures above. The body panels were then "snapped onto it". Once we got the wooden structure completed we were able to hang the body panels in two weekends of work. I did not have the jigs, but I had a quality kit from K.C Wood, and I had my original framework to use as a measurement / construction technique guide. I also had Bill Cartwright's (K.C Wood's owner and operator) expertise to draw on when I needed it.
All the best, Don
|
|
|
|
|
Joined: Jan 2002
Posts: 1,866
ChatMaster - 1,500
|
|
ChatMaster - 1,500
Joined: Jan 2002
Posts: 1,866 |
31Chevylover'nSC,
Thanks for the pictures and information. I got mine from Auto Wood Restoration and the kit is going up great. Your pictures and your's and everybody elses in put will help me greatly. Did you use any glue on yours as I heard you should. Thanks again.
jerrygolf
I think I'm a fairly wise person because I'm smart enough to realise I'm not too bright.
|
|
|
|
|
Joined: Dec 2003
Posts: 52
Shade Tree Mechanic
|
|
Shade Tree Mechanic
Joined: Dec 2003
Posts: 52 |
Hi Bill,
I talked with you about my wood some time ago. I believe that the people in VA have converted you over. You sounded more like your neck of the woods now. I live in the upper part of Alabama but I travel to Mobile on vacations alot. I still need a couple of pieces of wood and am getting them from you. If I plan on doing another one, I am getting my wood from you. Take care.
Dennis
|
|
|
|
|
Joined: May 2003
Posts: 115
Shade Tree Mechanic
|
|
OP
Shade Tree Mechanic
Joined: May 2003
Posts: 115 |
Originally posted by jerrygolf:
31Chevylover'nSC,
Did you use any glue on yours as I heard you should. Thanks again.
jerrygolf Hi Jerry, sorry it took me awhile to get back to you. I used Tightbond yellow wood glue when I assembled my body framework. It was recommended by KC Wood, and worked very well. The key is to know when to glue. When I assembled my kit, I used the chassis as a jig, laid the bottom sills on it, ran the body bolts home, checked the fit and all my measurements from the original framework, then I glued and clamped. Taking X-measurements from corner-to-corner of the side sills is also a good way to make sure everything is square. After the side sills and kick-ups were done I then installed the lock and hinge pillars. The proper location of these, both front-to-rear, and making sure they are installed at the correct height is critical to a proper fit. Before I glued them in place, I installed and test fitted the windshield header assembly and the side-roof rails, just to make sure everything lined-up correctly. I then backed-out the screws and glued 'em up. When I built the roof I just glued things up as I proceeded through the assembly process; just make sure you get everything square and matched-up to the original. I did not glue the rear roof bows; rear window assembly; or install the locking pins into the side roof rails, at the top of the hinge pillars and the rear quarter pillars, until I had installed the metal body panels and was sure everything fit. If you need any help, please do not hesitate to ask.
All the best, Don
|
|
|
|
|
Joined: Jan 2002
Posts: 1,866
ChatMaster - 1,500
|
|
ChatMaster - 1,500
Joined: Jan 2002
Posts: 1,866 |
Thanks much Don. I'm working on the motor now so will be a little while before I get back to the wood but will keep you in mind. I know this will make it so much easier. Thanks,
Jerry
I think I'm a fairly wise person because I'm smart enough to realise I'm not too bright.
|
|
|
|
|
Joined: Nov 2005
Posts: 1,125
ChatMaster - 1,000
|
|
ChatMaster - 1,000
Joined: Nov 2005
Posts: 1,125 |
Thanks so much to all who are involved in this chat. I just bought my 31 5 window coupe, which came with a new wood kit. Until I read your comments and looked at your pictures, I was working on a big jigsaw puzzle, but now I understand where nearly every piece of wood goes. I wish there had been resources like this during my previous restoration projects!
|
|
|
|
|
Joined: May 2003
Posts: 115
Shade Tree Mechanic
|
|
OP
Shade Tree Mechanic
Joined: May 2003
Posts: 115 |
Glad to hear this helped 6wheel. The wood restoration part of this hobby can be challenging, but I found it to be one of the most rewarding parts of the hobby.
I think the biggest revelation for me was that the Fisher Body guys constructed the wooden framework 1st and then installed the metal body panels onto the completed framework. Once I knew that, it all started to make sense.
One thing I haven't discussed up to this point is the "anti-squeak" friction tape that was installed by Fisher, between all of the wooden components and the black metal reinforcing brackets, and the windshield header. The original stuff looked very much like the old, black, cloth electricians tape. I used a self-adhesive product sold by Hampton Coach that they call "mole-skin". I highly recommend it to you.
If any of you guys have any questions, or need any help with this part of your resto, please do not hesitate to ask.
All the best, Don
|
|
|
|
|
Joined: Nov 2001
Posts: 19,758 Likes: 64
ChatMaster - 15,000
|
|
ChatMaster - 15,000
Joined: Nov 2001
Posts: 19,758 Likes: 64 |
30 lb roofing felt is also a good substitute for the original insulator. In addition to between the wood and the metal brackets and supports it is found between the headlight bar and fender. Never found any under the cowl or taillight stand and sheet metal. The material was used to prevent squeeeeeks.
How Sweet the roar of a Chevy four!
|
|
|
|
|
Joined: May 2003
Posts: 115
Shade Tree Mechanic
|
|
OP
Shade Tree Mechanic
Joined: May 2003
Posts: 115 |
Thanks for the additional info Chipper, and I agree, there was no friction tape on my '31 Coach where the cowl panel or rear body panels contacted the wooden sub-structure.
All the best, Don
|
|
|
|
|
Joined: Nov 2001
Posts: 19,758 Likes: 64
ChatMaster - 15,000
|
|
ChatMaster - 15,000
Joined: Nov 2001
Posts: 19,758 Likes: 64 |
Don,
I hope that I did not imply that fabric isolation pads were used between all wood and metal contact points. I have only found it between metal brackets and other major contact points and the wood. It sure would not hurt add more than was originally installed. Sound deadening on the major sheet metal panels and doors will also give a much quieter body. If any is used make sure that it does not absorb or trap water as that will hasten rusting.
How Sweet the roar of a Chevy four!
|
|
|
|
|
Joined: Sep 2005
Posts: 189
Shade Tree Mechanic
|
|
Shade Tree Mechanic
Joined: Sep 2005
Posts: 189 |
Chipper,I saw a rubber insolator pad on the Filling Station website that fits between the headlight bar and fenders.Is a rubber pad correct for a '30 Coupe? And to stay on subject of this post my wood/metal is coming together after a 12 year break.Some problems years ago have been overcome thanks to all the VCCA chat gang.THANKS ALL!!!! Stan
|
|
|
|
|
Joined: May 2003
Posts: 115
Shade Tree Mechanic
|
|
OP
Shade Tree Mechanic
Joined: May 2003
Posts: 115 |
Hi Stan,
Glad to hear that all is going well on your wood restoration. If you need anything else, please don't hesitate to ask :) .
Post some pics when you get a chance. I will post some of mine as soon as the painter get's the last of the bodywork done, and has her in primer.
All the best, Don
|
|
|
|
|
Joined: Oct 2005
Posts: 124
Shade Tree Mechanic
|
|
Shade Tree Mechanic
Joined: Oct 2005
Posts: 124 |
Gentlemen, Moderator
That doesn’t mean the Moderator isn’t a gentleman, but I need his permission too :)
Would you mind if I use the info and pictures in this tread for an info sheet for the Stovebolt. This is the first time I have seen a complete body in wood. I think that Bill did an exceptional good job and I would like to recommend him in the Stovebolt. If it is published in the Stovebolt is not up to me, but I would like to keep the info for my self too. Restoring a 1926 truck, I might need some wooden parts to finish. :)
Thank you for your time
Richard
How sweet is the roar of a Chevy four (Thanks Chipper)
|
|
|
|
|
Joined: Nov 2001
Posts: 29,863
Tech Advisor ChatMaster - 25,000
|
|
Tech Advisor ChatMaster - 25,000
Joined: Nov 2001
Posts: 29,863 |
"I saw a rubber insolator pad on the Filling Station website that fits between the headlight bar and fenders.Is a rubber pad correct for a '30 Coupe?" No! Not those rubber pads since they have rolled edges. The rubber pads that the Filling Station sells are a sales "gimmick" made by I&I Reproduction to make more sales. Several items made by I&I are not original equipment such as the gearshift lever rubber boots and the emergency brake lever rubber boots. These items were never used on the 1930 Chevrolets! However, what some dudes are doing is to purchase these rubber headlight bar pads and once they are installed the rolled edges of the pads are carefully cut off with a knife so that the remaining pad cannot be seen.  
The Mangy Old Mutt
"If It's Not Junk.....It's Not Treasure!"
|
|
|
|
|
Joined: May 2003
Posts: 115
Shade Tree Mechanic
|
|
OP
Shade Tree Mechanic
Joined: May 2003
Posts: 115 |
Hi Chevtruck1926, I am not a moderator, but I put the wood framework in the photos together, and the photos are mine, so you definitely have my permission to use them for your info sheet for the Stovebolt. As for Bill, he does not check here often, as he is very busy making wood, so I just called and left him a message letting him know you are trying to contact him on this request. The rest I leave to the gentleman moderators
All the best, Don
|
|
|
|
|
Joined: Oct 2005
Posts: 124
Shade Tree Mechanic
|
|
Shade Tree Mechanic
Joined: Oct 2005
Posts: 124 |
Thank you Don,
Very nice, I saw those pictures, read the remarks and I thought you should copy that, by the time you're doing Chev26's wooden parts, it will be gone. I had already contacted Bill before I read this topic and was planning to have him do my wood. But after reading this he has to. My cab, a Brantford, isn't in his documents yet, that's why I'm measuring every splinter and copying that to AutoCAD to make production drawings, but with so much wood gone, it’s tough to be sure about it, but now these picture will be a nice guide line to finish the drawings and that added with Bill’s experience should give me (in 5 years or so) my finishing woodwork. My idea of doing it myself is now completely gone.
And while collecting woodwork data, I thought I might as well write it down properly and make it in an info file for other builders.
Thanks for the help and good luck with your ’31 coach; so far it looks pretty good.
Thanks,
Richard
How sweet is the roar of a Chevy four (Thanks Chipper)
|
|
|
|
|
Joined: Sep 2005
Posts: 189
Shade Tree Mechanic
|
|
Shade Tree Mechanic
Joined: Sep 2005
Posts: 189 |
Don,I'll try to post a picture soon.My Coupe project isn't looking very good right now.I started 20 years ago and everything I finish years ago needs alittle cleaning but it still runs sweet!This is a father/son project and we have stopped at started many times but right now we are coming along pretty good.We have the cowl,windsheild,quaters all nailed in place.We are fitting doors,trunk,and trim right now so hopefully it will all come together soon!And Thanks JYD for the information on the rubber pad.
|
|
|
|
|
Joined: May 2003
Posts: 115
Shade Tree Mechanic
|
|
OP
Shade Tree Mechanic
Joined: May 2003
Posts: 115 |
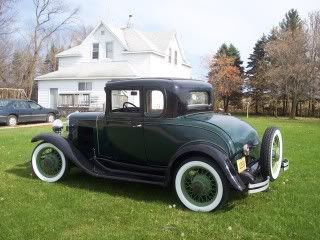
Glad to hear things are moving along Oniz, I look forward to seeing the results. Here is a pic of my '31 ready to head off to the painters...will update in a few weeks :) ![[Linked Image from fallenangels.dyndns.org]](http://www.fallenangels.dyndns.org/images/articles/Dsc00163_2.jpg)
All the best, Don
|
|
|
|
|
Joined: Mar 2004
Posts: 1,290
ChatMaster - 1,000
|
|
ChatMaster - 1,000
Joined: Mar 2004
Posts: 1,290 |
When I was rebuilding my 31 coupe wood frame I was also looking for the material that went under the brackets. I called Hampton Coach to see if they had anything but all of their products were to thick. They referred me to a guy that restores Model A's. When I talked to him also said that it was just for squeaks. He told me to just use a heavy waterproof canvas material. I went to a local awning shop a got a piece that was left over from one of their jobs. I think that I am going to try it also under my headlight bar and cowl lights. Hope this might help.
Sal Orlando
Chat Group Region Member
|
|
|
|
|
Joined: Dec 2001
Posts: 1,281
ChatMaster - 1,000
|
|
ChatMaster - 1,000
Joined: Dec 2001
Posts: 1,281 |
You can buy the rubber pads made for the headlight bars and also the pads made for the cowl lights for 1931 and 1932 cars. Call I&I Reproductions In Paramount California. Their phone number Is 562-531-8117. 
DON BOLTZ FROM THE EVERGREEN STATE
|
|
|
|
|
Joined: Nov 2001
Posts: 29,863
Tech Advisor ChatMaster - 25,000
|
|
Tech Advisor ChatMaster - 25,000
Joined: Nov 2001
Posts: 29,863 |
The rubber pads with the rolled edges for the headlight bars and the cowl lights are not stock . :( :( These items are something dreamed up by I&I to make a buck. Points should be deducted for cars using these unless the rolled edges are trimmed off so that the pads cannot be seen. My 1930 coupe had all of the original material still in place under the reinforcement brackets and the material found was leatherette. I had some new leatherette in stock and I cut pieces to match the original pieces and installed them under the reinforcement brackets. This material worked great!
The Mangy Old Mutt
"If It's Not Junk.....It's Not Treasure!"
|
|
|
|
|
Joined: Dec 2001
Posts: 1,281
ChatMaster - 1,000
|
|
ChatMaster - 1,000
Joined: Dec 2001
Posts: 1,281 |
I have talked to a couple of guys that cut the rolled edges off and they said the rubber works great. I myself put nothing under my cowl lights and headlight bars and have had no problem.
DON BOLTZ FROM THE EVERGREEN STATE
|
|
|
|
|
Joined: Nov 2001
Posts: 29,863
Tech Advisor ChatMaster - 25,000
|
|
Tech Advisor ChatMaster - 25,000
Joined: Nov 2001
Posts: 29,863 |
The Mangy Old Mutt
"If It's Not Junk.....It's Not Treasure!"
|
|
|
|
|