|
|
Joined: Jul 2020
Posts: 349 Likes: 20
Backyard Mechanic
|
OP

Backyard Mechanic
Joined: Jul 2020
Posts: 349 Likes: 20 |
OK... I need your advice ... about how to time this 1934 master, without cranking it with the starter or turning the engine over.... New wiring, rebuilt carb, New gas tank & battery.... All clean down to shiny metal connections... new, good ground straps.... the motor turned over, almost fired... Getting gas & spark.... but sounds like the starter is dragging a little, as it cranks..... The distributor was PULLED, to turn the new gear drive oil pump with a drill... to get the oil flowing first..... I marked the distributor when I pulled it ... with the rotor position..... But I probably got it back in wrong..... I Think the timing is off..... I CAN'T crank it... to put a timing light on it.... and I pulled the plug out of # 1 cylinder... and poked a screwdriver down the hole to see if I could feel the piston coming to TDC... BUT couldn't touch the piston top..... Oh well..... How do I time it... without running it..?? Even with the 6 volt battery charger on it... it will not crank over the motor..... the starter was cranking it over for about a minute... while I pulled the choke... and tapped the gas ..it did fire a few times.. NOW .. even with the battery all charged up (6.73 volts).. and the charger on it... the starter will not turn..... the solenoid just clicks.. but won't turn the starter...
So... It was cranking fine but sounded slow and just stopped.... would it help to get the timing as close to right as possible.. to eliminate the drag it would place on the starter... or should I pull the starter off (keeping the wires connected)..... and the try to hit the starter button and spin the starter ... while off ??
Last edited by WildernessTruck; 10/31/22 07:08 PM.
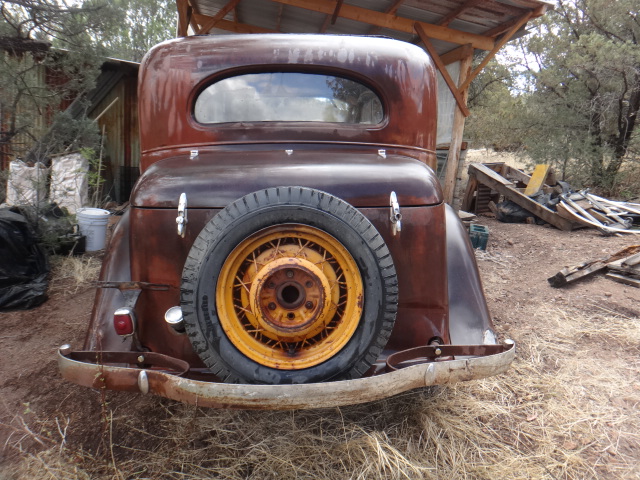
1934 Chevrolet Master sedan
|
|
|
|
|
Joined: Jan 2002
Posts: 30,701 Likes: 141
ChatMaster - 25,000
|
|
ChatMaster - 25,000
Joined: Jan 2002
Posts: 30,701 Likes: 141 |
Take the plugs out and trun it over (key offf) the cylinders may be filled with gas.....let it sit oover night and dry out.
Then retard the timing and try it.
Check - timing ball in hole, both valves closed on #1 cylinder and @1 spark plug wire going into cap at 4'00 position and rotor pointing a that 1 Cyl.
Gene Schneider
|
|
1 member likes this:
Jrlaplante |
|
|
|
|
Joined: Jul 2020
Posts: 349 Likes: 20
Backyard Mechanic
|
|
OP
Backyard Mechanic
Joined: Jul 2020
Posts: 349 Likes: 20 |
OK Gene... let me see if I understand you correctly..... Take the plugs out ... with key off..... crank it over with starter button....
(Won't the fuel pump keep pumping gas through the carb..???) let it sit overnight to dry out..... (taking all the plugs out overnight might help dry out cylinders... right)
Then retard the timing, turn key on, replace all plugs (hook it all up so it fires...???) ..... and Try it....?
IF it FIRES & RUNS...... ??? Then, Check - timing ball in hole ....???
When should i do this part: look to see that both valves are closed on #1 cylinder ....and #1 spark plug wire is going into the dis. cap at the 4:00 o'clock position.... and rotor is pointing at that 4 o'clock #1 post in the dist......
Please clarify... do I understand what needs to happen, in the right order....???
1934 Chevrolet Master sedan
|
|
|
|
|
Joined: Jan 2002
Posts: 30,701 Likes: 141
ChatMaster - 25,000
|
|
ChatMaster - 25,000
Joined: Jan 2002
Posts: 30,701 Likes: 141 |
As long as you do not touch the gas pedal and the carburetor bowl is full iit will not pump more gas into the engine,
If the timing is too far advanced - retard timing and see if this helps,
If that does not help see if #1 is firing at the right time which is when the ball is on the pointer in the hole andThe valves on the front cylinder are both closed ( etc, as suggested.such as rotor pointing at the #1 postion on the dist. cap.
I wish that I could be there to HEAR IT RUN AFTER ALL THOSE YEARS.
Last edited by Chev Nut; 10/29/22 11:24 PM.
Gene Schneider
|
|
|
|
|
Joined: Jul 2020
Posts: 349 Likes: 20
Backyard Mechanic
|
|
OP
Backyard Mechanic
Joined: Jul 2020
Posts: 349 Likes: 20 |
I will try again tomorrow and let you know what happens.... thanks for the advice....
1934 Chevrolet Master sedan
|
|
|
|
|
Joined: Jan 2002
Posts: 30,701 Likes: 141
ChatMaster - 25,000
|
|
ChatMaster - 25,000
Joined: Jan 2002
Posts: 30,701 Likes: 141 |
That is why I did not suggest removing the distributor for spinning the oil pump.
Gene Schneider
|
|
|
|
|
Joined: Aug 2004
Posts: 3,469 Likes: 48
ChatMaster - 3,000
|
|
ChatMaster - 3,000
Joined: Aug 2004
Posts: 3,469 Likes: 48 |
Sunny,
Your cylinder walls could be dry after all this time and with the cranking you have done. Squirt some oil into each spark plug hole.
Mike
ml.russell1936@gmail.com
Many miles of happy motoring
|
|
|
|
|
Joined: Jul 2020
Posts: 349 Likes: 20
Backyard Mechanic
|
|
OP
Backyard Mechanic
Joined: Jul 2020
Posts: 349 Likes: 20 |
Gene... I did crank the engine with the starter and the plugs out... and coil wire off.... but at such slow revolutions with the starter... I could not get any oil to come out the pipe going to the rocker arms... and only a little to the oil gauge... so I took apart the oil distributor cleaned all the orifices and made sure the valve with the spring was seating well in there.... Still no oil coming out the top hole to the rockers.... this is with the vane pump, and about one minute of starter cranking..... so I bought a NOS gear drive pump with the oval screen..... primed it and installed it..... then cranked it with the starter.... I only got a little dribble out of the upper pipe to the rockers, and nothing coming out of the oil holes on the top of each rocker.... So... I figured that The starter was Not turning the engine & pump over anywhere near fast enough.... like idle speed (700-750 RPM).....
That is the Reason I pulled the distributor and rotated the pump with my drill and a notched shaft I made.... turning about 1,500 RPM.... the oil flowed out of all the holes in the rockers..... But I think the distributor, after being reinstalled, did not get aligned correctly to give me timing that is even close......
So.... I am going to turn it over with the starter... with plugs out...(should turn more freely with no compression)... just enough to get the front (#1) two valves to be closed.... then I will know #1 is at TDC From there I can pull out the distributor and rotate it so that the #1 wire post is at about 4 o'clock and the rotor is pointing at that post... This should get my timing close enough to run the engine..... and get my timing light on the pointer & ball......... Hopefully this sequence will get the timing close enough to run the engine.....
Mike... I did put marvel mystery oil in the plug holes for several months... then, more recently, I squirted in some ATF..... and when I pulled the pan to tighten the rod bearings and clean the pan & the van pump screen... the cylinder walls were nice and shiny, with no scoring or signs of wear.....(at this point it had only been turned over by hand crank).... How much oil should I mist into the cylinders....??? I don't want to foul my new plugs.
1934 Chevrolet Master sedan
|
|
|
|
|
Joined: Sep 2007
Posts: 654 Likes: 3
Oil Can Mechanic
|
|
Oil Can Mechanic
Joined: Sep 2007
Posts: 654 Likes: 3 |
You are on the right track but you may have a weak battery, wrong size battery cables, corroded cables/connections, or a failing starter motor.
J Franklin
|
|
|
|
|
Joined: Jan 2002
Posts: 30,701 Likes: 141
ChatMaster - 25,000
|
|
ChatMaster - 25,000
Joined: Jan 2002
Posts: 30,701 Likes: 141 |
First do not worry about oil to the rocker arms.
Do mist the cylinder walls with motor oil and not MMO as it is not oil.
Gene Schneider
|
|
|
|
|
Joined: Jul 2020
Posts: 349 Likes: 20
Backyard Mechanic
|
|
OP
Backyard Mechanic
Joined: Jul 2020
Posts: 349 Likes: 20 |
I have a New battery, New Super thick heavy cables... all fresh down to bare metal, clean connections.... and a 6 volt battery charger to keep it topped up..... the drag on the starter must be.... from having the timing so far off....
I will mist the cylinder walls.....
1934 Chevrolet Master sedan
|
|
|
|
|
Joined: Sep 2007
Posts: 654 Likes: 3
Oil Can Mechanic
|
|
Oil Can Mechanic
Joined: Sep 2007
Posts: 654 Likes: 3 |
Timing shouldn't affect the speed of the starter motor turning the engine over unless it is just set too far advanced and trying to fire a charge. Retard the spark a bit more to check this. Your starting motor could be tired.
Last edited by J Franklin; 10/30/22 08:09 PM.
J Franklin
|
|
|
|
|
Joined: Jul 2020
Posts: 349 Likes: 20
Backyard Mechanic
|
|
OP
Backyard Mechanic
Joined: Jul 2020
Posts: 349 Likes: 20 |
Ok... I went out and took out all the plugs.. and hit the starter button... nothing but a big clunk, like the drive gear was trying to engage the flywheel but was being stopped short... so , I took of the starter and looked in the end that engages the flywheel... and sure enough... there was a nut , (that I had lost months ago) jammed in there so that the drive gear teeth could not reach the flywheel teeth... I put it back on... and the starter cranked the engine as it should...
so, I watched the two rocker arms on the #1 (front) cylinder... and cranked the engine over until both rockers were fully up at their highest point (both valves now shut) #1.... now TDC..... I pulled the distributor cap and followed #1 wire down to the cap, and saw that the cap & rotor position were way off (about two posts off)....... talk about being too advanced with the timing...
Tomorrow I will pull out the distributor and rotate it so the #1 post is about 4 o'clock and the rotor is lined up with the #1 post/wire.... that should put me close to correct timing... hopefully close enough to start it and time it with the timing light, with the octane selector on zero.........
I wanted to ask about this... The distributor has to slide down into the tang that is at the end of the oil pump.... when I fasten the clamp that holds the distributor in place (it grabs a grove in the distributor shaft) the distributor shaft can still be pulled up about 1/4" .... but the clamp keeps it from rotating or coming out further.... IS THIS AS IT SHOULD BE..???
I will post more about my timing & starting of the engine tomorrow..... I will also post a short video of it running after sitting for 50+ years....
1934 Chevrolet Master sedan
|
|
|
|
|
Joined: Sep 2007
Posts: 654 Likes: 3
Oil Can Mechanic
|
|
Oil Can Mechanic
Joined: Sep 2007
Posts: 654 Likes: 3 |
There would be a specification on shaft wear, but you will need to do some research as I don't have that information handy. 1/4 inch seems a lot.
Last edited by J Franklin; 10/31/22 12:22 AM.
J Franklin
|
|
|
|
|
Joined: May 2002
Posts: 6,149 Likes: 42
ChatMaster - 6,000
|
|
ChatMaster - 6,000
Joined: May 2002
Posts: 6,149 Likes: 42 |
When you have the rocker cover off an easy way to check that #1 is at TDC is watch #6 rockers, When the #^6 exhaust is just closing and inlet just opening #1 is at firing point.
Tony
1938 1/2 ton Hope to drive it before I retire
|
|
|
|
|
Joined: Jul 2020
Posts: 349 Likes: 20
Backyard Mechanic
|
|
OP
Backyard Mechanic
Joined: Jul 2020
Posts: 349 Likes: 20 |
The clamp that hold the distributor es part of a metal plate that the vacuum advance arm is attached to.... I can put my fingers under that plate, (that is part of the clamp), and lift the entire distributor up about 1/4 inch..... What keeps the distributor from moving up & down that 1/4" of flex/play in the clamp plate....??? this is my question, should the clamp plate flex up and down that much....??? or do the drive gears on the dist. shaft have a tendency to keep pulling the shaft down as they turn..??
Oan other makes of vintage cars, that I have worked on the clamp to hold the distributor in place... is attached to the block itself, Not a plate under the distributor...
1934 Chevrolet Master sedan
|
|
|
|
|
Joined: Sep 2007
Posts: 654 Likes: 3
Oil Can Mechanic
|
|
Oil Can Mechanic
Joined: Sep 2007
Posts: 654 Likes: 3 |
The distributor body should be held firmly and not move. correction: Chev Nut is correct the dist. needs to move.
Last edited by J Franklin; 11/01/22 12:39 AM.
J Franklin
|
|
|
|
|
Joined: Jan 2002
Posts: 30,701 Likes: 141
ChatMaster - 25,000
|
|
ChatMaster - 25,000
Joined: Jan 2002
Posts: 30,701 Likes: 141 |
It is normal to lift up. The truning gear with spiral teeth pull it down when engine is running ....The distributor also fits loose in the block so it is free to rotate with pull of the vacuum advance. All sounds OK to me.
All other cars have the distributor plate ROTATE in the distributor its self.
Gene Schneider
|
|
|
|
|
Joined: Jul 2020
Posts: 349 Likes: 20
Backyard Mechanic
|
|
OP
Backyard Mechanic
Joined: Jul 2020
Posts: 349 Likes: 20 |
Update...Again, I double checked the timing as best I could with out it running... #1 valves are both shut, The distributor pulled and rotated so #1 post, rotor& plug wire are lined up and the point are open on lobe ..... Turned on ignition switch and used screwdriver to short between point arm and dist. shaft... got good sparks at points.....Cleaned points with sand paper and set again at .018 ..... then, pulled coil wire from center of dist. and held near ground about 1/2".(while shorting points).... strong spark there too.... cranked engine with ignition on for about 1 minute... it didn't fire even once... during the cranking pulled choke out... Nothing ..... then held gas pedal down to floor and cranked some more... Nothing... I see & smell gas in the carb....
Dean Echols rebuilt carb and had it running & adjusted before sending to me.... so carb is adjusted to run as is....
IT would not fire even once.... Checked spark on several plug wires while cranking.... got a spark.. but not very strong looking....
I don't know why it won't fire... with volt meter, I got 6.23 vts at the + ignition wire on coil..... got the same reading at the distributor end of the big coil wire .... got the same reading at the small nut where the small coil wire enters the dist. and got the same reading on the points arm inside.... that is all read with the ignition key on.... I lifted up the points arm and made a thin paper gasket to place under the points to make sure they are not going to ground.... I do not not know what else to check.... HELP..!!! New battery on charger now, after so much cranking... I did spay oil down the plug holes yesterday to lube cylinder walls for all this cranking...
Last edited by WildernessTruck; 10/31/22 07:07 PM.
1934 Chevrolet Master sedan
|
|
|
|
|
Joined: Nov 2001
Posts: 19,758 Likes: 63
ChatMaster - 15,000
|
|
ChatMaster - 15,000
Joined: Nov 2001
Posts: 19,758 Likes: 63 |
It takes a strong spark at the plugs to have enough energy to ignite gas/air mixture.
Try a little squirt of carburetor cleaner into the carburetor just before cranking. It is far easier to ignite than gasoline so can help it to ignite if either weak spark, too rich or lean. If nothing try a little longer squirt.
How Sweet the roar of a Chevy four!
|
|
|
|
|
Joined: Dec 2007
Posts: 4,024 Likes: 99
ChatMaster - 4,000
|
|
ChatMaster - 4,000
Joined: Dec 2007
Posts: 4,024 Likes: 99 |
I still think the timing is not right. You want to points to just open when the pointer is at the ball on the flywheel. That means the spark plug will fire just before #1 cylinder gets to top dead center.
Just because the rotor is pointing toward the number one wire in the cap does not mean the points are opening at the correct time.
I statically time an engine by setting flywheel in the correct position. Then rotate the distributor body opposite the direction of shaft rotation until you hear spark at the #1 plug.
Rusty
VCCA #44680
|
|
|
|
|
Joined: Jul 2020
Posts: 349 Likes: 20
Backyard Mechanic
|
|
OP
Backyard Mechanic
Joined: Jul 2020
Posts: 349 Likes: 20 |
Rusty.... When you say," setting the flywheel in the correct position".... do you mean cranking the starter/engine over until I see the ball lined up with the pointer... in the bell housing window..??? and then I am to release the clamp that holds the distributor and rotate the distributor body counterclockwise (with the ignition key on)...... until I hear (or see), a spark at #1 plug...... then tighten the locking clamp....???
Chipper..... This afternoon.. I turned on the ignition key. went out to the carb, sprayed some starter fluid down the carb, hurried to the starter button and cranked.... Did Not fire once.... so I did the same thing again spaying a little more this time... cranked longer... Nothing...... So I will again try to adjust the timing as advised above... and use the starting fluid again....
Last edited by WildernessTruck; 10/31/22 11:17 PM.
1934 Chevrolet Master sedan
|
|
|
|
|
Joined: May 2002
Posts: 6,149 Likes: 42
ChatMaster - 6,000
|
|
ChatMaster - 6,000
Joined: May 2002
Posts: 6,149 Likes: 42 |
I am inclined to agree with Rusty, the timing is long way out. Crank the engine by hand (not starter) with key off so #6 valves are changing from exhaust to inlet should put the timing ball in the flywheel in the window, then point the rotor button to the #1 position making sure the distributor oil pump drive lug is aligned (keep in mind the distributor while rotate slightly as the drive gear engages the camshaft) as this happens lift the distributor and adjust both the distributor and oil pump positions to suit and drop the distributor fully down into place.
Tony
1938 1/2 ton Hope to drive it before I retire
|
|
|
|
|
Joined: Jul 2008
Posts: 1,896 Likes: 28
ChatMaster - 1,500
|
|
ChatMaster - 1,500
Joined: Jul 2008
Posts: 1,896 Likes: 28 |
Are your spark plug wires solid wire or the newer style of impregnated fiber?
Dave
Last edited by Dave39MD; 11/01/22 08:01 AM.
|
|
|
|
|
Joined: Jul 2020
Posts: 349 Likes: 20
Backyard Mechanic
|
|
OP
Backyard Mechanic
Joined: Jul 2020
Posts: 349 Likes: 20 |
My spark plug wires are solid wire, a new set from the filling station.. but I do not like the metal tips that they have to krimp onto the ends, of the wire...... I was thinking of soldering those ends on for solid contact...... I will look for the ball & pointer today and then properly align the rotor to #1........
1934 Chevrolet Master sedan
|
|
|
|
|