Reproduction Parts for 1916-1964 Chevrolet Passenger Cars & 1918-1987 Chevrolet & GMC Trucks


Visit the new site at vcca.org

Previous Thread
Next Thread
Print Thread
Rate Thread
Page 1 of 5 1 2 3 4 5
#370535 06/20/16 08:06 AM
Joined: Apr 2012
Posts: 490
Likes: 3
Backyard Mechanic
OP Offline
Backyard Mechanic
Joined: Apr 2012
Posts: 490
Likes: 3
Some people here know about my 1940. At the Moment the engine is in restoration. Long time ago, talked about restoration of the body. Should not be a complete resto, only the rust, other parts will be in original condition. I love the patina and also don't want to restore the Interior.
This week I have holiday and I will try to document my progress here every day, so you can take part of this. Hope this will help other people by there Restoration.
Lets Go:
First put the car on the Hydraulik Ramp. The screws I have loosen in the last few weeks. Some are broken, but I bought the screw set at Chevs40s. So I have a good overview, how many are installed and how they look like. I made a plan, on which i marked the mounting points. On this placed the old screws and the new one next to them.
(Pictures are coming later)
In the Set there are 20 bolts, my car only have 18. A Test with the Gearbox Lifter shows me, i´ve got all bolts!

Last edited by Alligator; 03/16/23 11:31 AM.

Greetings André
------
1940 Special de Luxe Sport Sedan
https://1940specialdeluxe.wordpress.com
Joined: Nov 2013
Posts: 54
Shade Tree Mechanic
Offline
Shade Tree Mechanic
Joined: Nov 2013
Posts: 54
Hi André,
ich habe zwar keinen 1940 Chevy, werde aber trotzdem sehr interessiert deinen Bericht verfolgen.
(I don´t have a 1940 Chevy but I am still interested in your restoration thread.)

Gruß Tino !

Last edited by Chipper; 06/20/16 11:31 PM.
37Freak #370550 06/20/16 05:30 PM
Joined: Apr 2012
Posts: 490
Likes: 3
Backyard Mechanic
OP Offline
Backyard Mechanic
Joined: Apr 2012
Posts: 490
Likes: 3
Hello Tino, your welcome ;-)
After I can not insert the images in the first post, I will do so here. First the plan with the screws. Here I have to correct my post, my car had 16 and in the set were 18. The two one,on the left site in front are too much.
Then the pictures with the marked screw positions

Attached Images
img_6657-e1466453440944.jpg img_66541.jpg img_66521.jpg img_66511.jpg
Last edited by Alligator; 10/23/18 02:20 PM.

Greetings André
------
1940 Special de Luxe Sport Sedan
https://1940specialdeluxe.wordpress.com
Joined: Apr 2012
Posts: 490
Likes: 3
Backyard Mechanic
OP Offline
Backyard Mechanic
Joined: Apr 2012
Posts: 490
Likes: 3
And here the details from front to rear

Attached Images
IMG_6644.JPG IMG_6645.JPG IMG_6646.JPG IMG_6647.JPG IMG_6648.JPG IMG_6650.JPG
Last edited by Alligator; 10/23/18 07:23 AM.

Greetings André
------
1940 Special de Luxe Sport Sedan
https://1940specialdeluxe.wordpress.com
Joined: Apr 2012
Posts: 490
Likes: 3
Backyard Mechanic
OP Offline
Backyard Mechanic
Joined: Apr 2012
Posts: 490
Likes: 3
You need to be carefull, because some Connections i´ve missed.
So you have to loose the Linkage to the brake Pedal, gearbox and the gas pedal. The vacuum house from gearbox and the speedomter cable. And don´t forget the Tank knozzle and the Ground Wire fron the fuel gauge
The steering gear i´ve loosed from the frame but not from the chassis
Now the first step is down, frame stands alone. But there is a problem, I have no idea how to lift the chassis so that I can roll through the workshop. The lift I use not alone and have to leave. If I longer lift the chassis as in the?
At the moment it is on wooden beams on the ground and the tail is extra supported, because without the whole chassis is tilted backwards

Attached Images
IMG_6665.JPG IMG_6667.JPG
Last edited by Alligator; 10/23/18 07:20 AM.

Greetings André
------
1940 Special de Luxe Sport Sedan
https://1940specialdeluxe.wordpress.com
Joined: Apr 2012
Posts: 490
Likes: 3
Backyard Mechanic
OP Offline
Backyard Mechanic
Joined: Apr 2012
Posts: 490
Likes: 3
Today i drove to the local steel trader to buy Wheels and Square tube for the Chevy Subframe . Not so easy something decent to construct because the subfloor is not flat and i have to fix it at the body. After several tries, i did it and fixed the subframe at the existing screw holes in the middle.

Then I had time to inspect the underbody accurate and had to sit down first. Since the bottom was otherwise hidden by the frame, so you could not see the full extent. The sills are heavily corroded part and the supports for the body are not very reassuring. Think, there is an extreme need for action

Attached Images
IMG_6673.JPG IMG_6674.JPG IMG_6676.JPG IMG_6677.JPG IMG_6672.JPG IMG_6670.JPG IMG_6671.JPG
Last edited by Alligator; 10/23/18 07:18 AM.

Greetings André
------
1940 Special de Luxe Sport Sedan
https://1940specialdeluxe.wordpress.com
Joined: Apr 2012
Posts: 490
Likes: 3
Backyard Mechanic
OP Offline
Backyard Mechanic
Joined: Apr 2012
Posts: 490
Likes: 3
I´am a little bit frustrated about the rocker panel condition. Were can i get good sheet metall for the inner rocker panels and the bracket supports
Found only from Cot40s, but what is the different between "Rocker Patch Panel" and "Rocker panel"? Seems that Rocker Panel is the complete panel and much longer, but it is cheaper?? Can someone tell me details about the quality?

Last edited by Alligator; 06/22/16 02:53 PM.

Greetings André
------
1940 Special de Luxe Sport Sedan
https://1940specialdeluxe.wordpress.com
Joined: Nov 2008
Posts: 408
Likes: 10
Backyard Mechanic
Offline
Backyard Mechanic
Joined: Nov 2008
Posts: 408
Likes: 10
Andre, Take a look at the patch panels on the attached link. Very good quality however I'm not sure they sell the inner rocker panel separately. I used the complete rocker panel assembly and door bottoms on my 41 convertible and was very happy with the results. let me know if I can help.. Mike

www.emsautomotive.com

minetto #370696 06/23/16 02:42 AM
Joined: Apr 2012
Posts: 490
Likes: 3
Backyard Mechanic
OP Offline
Backyard Mechanic
Joined: Apr 2012
Posts: 490
Likes: 3
Hello Mike,
EMS i have seen, but thats allmost for 2 door
and i have a 4 door sedan. Think i could only use them separately. But they dont have the supports for the bracket.
Shipping to germany is expensive, so i should buy from one supplier.

Andre


Greetings André
------
1940 Special de Luxe Sport Sedan
https://1940specialdeluxe.wordpress.com
Joined: Oct 2007
Posts: 2,306
ChatMaster - 2,000
Offline
ChatMaster - 2,000
Joined: Oct 2007
Posts: 2,306
Hi Andre,

I have been out of town so have not been able to comment on your body removal nor rocker panel damage. Please be a little more patient I will make comments latter

Mike


Mike 41 Chevy
Joined: Sep 2002
Posts: 2,323
Likes: 6
ChatMaster - 2,000
Offline
ChatMaster - 2,000
Joined: Sep 2002
Posts: 2,323
Likes: 6
The approach I took with the supports on the 38 was to remove them, remove all the rust with chemicals and weld reinforcements in to provide the strength. Someone with fabrication skills could make them from scratch.


My 1951 1 Ton is now on the road! My 38 Master 4 Door is also now on the road .
old216 #370793 06/24/16 11:29 PM
Joined: Oct 2007
Posts: 2,306
ChatMaster - 2,000
Offline
ChatMaster - 2,000
Joined: Oct 2007
Posts: 2,306
Hi Andre,

I believe your problem maybe superficial if your floor braces are not compromised (not showing rust through). Use a pick and poke the ends to determine their integrity. I think rocker panels are basically cosmetic so of little structural importance other than for the general preservation of the floor and door bottoms from mud/water damage.

If I am correct then as the above post states you could cut out the damaged inner panel areas and glue, weld, rivet, or screw in new fabricated patches that you make. On my 41 I replaced my entire passenger side floor panel, cowl, part of my front floor, and the ends of my floor braces with EMS parts all welded in place. It was quite and undertaking with a lot of time spent getting the parts to align well and look original. Body lines were hard to duplicate, but 90% of the people would not know the areas were repaired.

On my driver's side where my damage was not real bad I just made cosmetic repairs. I replaced no sheetmetal except for the cowl and a 5" area where the inner rocker panel was rusted through.

If the outer surface of your rocker panels are okay I would recommend replacing or repairing just the worse inner panel areas. I am aware that my driver's side repairs are not recommended for professional repairs but here is what I did.

I coated the inside and outer surface of my panels (not the painted side by your running boards), and ends of my floor braces with fiberglass. My theory is rust needs air/humidity, to create more rust so it can be stopped by being encapsulated. The fiberglass encapsulates the rust and also strengthens the remaining metal. Of course the fiberglass can crack with the flexing/movement of a body part. My theory is that rocker panels are not under stress so are not prone to movement.

I will post pictures tomorrow.

Best wishes, Mike


Mike 41 Chevy
Joined: Sep 2002
Posts: 2,323
Likes: 6
ChatMaster - 2,000
Offline
ChatMaster - 2,000
Joined: Sep 2002
Posts: 2,323
Likes: 6
The inner and outer rocker panels form a structure like a box beam and they are part of the support structure. If they are compromised severely, it will sag. If the damage is not extensive, in my opinion it is better to replace as little as possible. It is hard to beat the integrity of original panels that were spot welded together.


My 1951 1 Ton is now on the road! My 38 Master 4 Door is also now on the road .
old216 #370817 06/25/16 12:08 PM
Joined: Apr 2012
Posts: 490
Likes: 3
Backyard Mechanic
OP Offline
Backyard Mechanic
Joined: Apr 2012
Posts: 490
Likes: 3
Thanks for the response and tipps. The last two Days my work was, to cut out the damaged parts on the right side.

In the middle i must cut off the floor sheet, because the nut for fastening the frame was loose and i have to fix a new one. Also the floor sheet has some holes and it was better to cut off the rest from the bracket.

After i realised that the rusted brackets are only for the running boards and the floor braces seem in good condition, i feel a little better.
The inner panel and the brackets are easy to prepare an so i will do them myself.
The inside from the rocker panel i will prepare with "Owatrol Oil" and "Fertan Rust Converter" don´t know if this is available in USA. The corner at the front is massiv corroded and i have to see how i can retsore this. Now i think i will have a break for a few days or weeks. Stay tuned ;-)


Attached Images
1.jpg 2.jpg 3.jpg 4.jpg 5.jpg 6.jpg 7.jpg 8.jpg 9.jpg 10.jpg
Last edited by Alligator; 05/10/19 06:33 PM.

Greetings André
------
1940 Special de Luxe Sport Sedan
https://1940specialdeluxe.wordpress.com
old216 #370862 06/26/16 08:54 AM
Joined: Oct 2007
Posts: 2,306
ChatMaster - 2,000
Offline
ChatMaster - 2,000
Joined: Oct 2007
Posts: 2,306
Hi Andre,

As you are now well aware there is quite a learning curve for removing your body from your frame, and then designing a work station to complete repairs. From looking at your pictures it seems you may have compromised some of your body parts by the method you used to lift it with your hoist. Specifically, the parts that are used to mount the running boards to the body. With patience and time you can repair these areas.

Your ability to document your work with pictures is an important asset to use all in learning the steps in body off restoration. Please help us all by continuing to post your outstanding pictures. The pictures will also help you in your reassembly process, and documenting your work for historical purposes.

I strongly recommend that you fabricate your own replacement parts where you can. In some cases you can bend the metal parts just as well or better than a part supplier.

I have started accumulating pictures for a new post on my experience with a major body part supplier EMS.

As I have mentioned above I completely agree with old216 and his comments.

Best wishes, Mike


Mike 41 Chevy
Joined: Apr 2012
Posts: 490
Likes: 3
Backyard Mechanic
OP Offline
Backyard Mechanic
Joined: Apr 2012
Posts: 490
Likes: 3
Hello Mike,
Didn't compromised the body parts. They were in this bad condition. Lifted the body only at the frame mountings in the front and the rear middle.
Thanks for the compliments about the photos. Sometimes pictures say more than words and I will continue my documentation.

Andre


Greetings André
------
1940 Special de Luxe Sport Sedan
https://1940specialdeluxe.wordpress.com
Joined: Apr 2012
Posts: 490
Likes: 3
Backyard Mechanic
OP Offline
Backyard Mechanic
Joined: Apr 2012
Posts: 490
Likes: 3
One more day Bodywork. First i have to close the hole in the ground sheet. Prepared it with a offsetting pliers and the replacement sheet with holes for spot welding. As you see, the first were in the wrong sheet - mistake, but could weld them from the underside.

Fits not bad. Then everything was welded and hammered after each point, so that the sheets are also free of gaps to each other. The control from below gives a good welding profile, all points are "blown". After that, grind and applied properly "Owatrol oil" for gap sealing. Later, I will still work with body sealing compound, but that is far away.
Fits ever not bad. Then everything was welded and hammered after each point, so that the sheets are also free of gaps to each other. The control from below gives a good welding profile, all points are "blown". After that grind and applied properly "Owatrol oil" for gap sealing. Later, I will still work with body sealing compound, as far as we are far but.

Bigger problem is the area of the right frame rest in front of the rear fender. The sheet is here heavily corroded and the Rocker Panel behind it is probably only rudimentary. Correct step is here cut out the Traverse, newly customize, replace Rocker Panel plate and attach new Traverse. Unfortunately, this is not a simple part and I'll try me in sheet origami. Have there been a few ideas and the first trials for the Running board support also look hopeful.

Attached Images
1.jpg 2.jpg 3.jpg 4.jpg 5.jpg 6.jpg 7.jpg 8.jpg 9.jpg
Last edited by Alligator; 10/23/18 02:53 PM.

Greetings André
------
1940 Special de Luxe Sport Sedan
https://1940specialdeluxe.wordpress.com
Joined: Feb 2010
Posts: 323
Backyard Mechanic
Offline
Backyard Mechanic
Joined: Feb 2010
Posts: 323
Hello Andre.

Nice seen your work you are doing a great job there.
I should recommend using a tinning paste and lead after spot welding.
It is not difficult to do and its fun using old techniques.


Jianis driving

Last edited by JianisNl; 07/22/16 05:20 PM.
JianisNl #374439 08/27/16 02:00 PM
Joined: Apr 2012
Posts: 490
Likes: 3
Backyard Mechanic
OP Offline
Backyard Mechanic
Joined: Apr 2012
Posts: 490
Likes: 3
Back from Holiday with fresh energy i spent the last days to prepare the sheet metal. After some "braining" I decided to cut out the complete console.

Has so far also worked well, unfortunately missed a point and ripped the bottom plate.

Then the remains of the inner rocker panel removed.


Attached Images
1.jpg 2.jpg 3.jpg 4.jpg 5.jpg
Last edited by Alligator; 10/23/18 02:46 PM.

Greetings André
------
1940 Special de Luxe Sport Sedan
https://1940specialdeluxe.wordpress.com
Joined: Apr 2012
Posts: 490
Likes: 3
Backyard Mechanic
OP Offline
Backyard Mechanic
Joined: Apr 2012
Posts: 490
Likes: 3
Unfortunately it turned out on closer inspection, which had the outer sill under thick filler and holes. Remained only separate out the damaged area and use a new sheet metal insert. The only way is to separate out the damaged area and use a new sheet metal insert. With the new sill underside, this area is much better than before.


Attached Images
1.jpg 2.jpg 3.jpg 4.jpg 5.jpg 6.jpg 7.jpg 8.jpg 9.jpg
Last edited by Alligator; 10/13/21 12:56 PM.

Greetings André
------
1940 Special de Luxe Sport Sedan
https://1940specialdeluxe.wordpress.com
Joined: Apr 2012
Posts: 490
Likes: 3
Backyard Mechanic
OP Offline
Backyard Mechanic
Joined: Apr 2012
Posts: 490
Likes: 3
Origami Sheet, so you can call what my talented workmate has done for me. When he saw my console he began to make some paper templates, makes new sheet metal and cut out the rusted areas. Then he welded with WIG. Good work. I made then the new support bracket.

Meanwhile I´ve made new Brackets for the running board. The top I leaved a little bit longer, because I will adjust this with the mounted Running boards. Next week I will do more work.

Next week i will do more sheet metal work. Keep on Rockin

Attached Images
1.jpg 2.jpg 3.jpg 4.jpg 5.jpg 6.jpg 7.jpg 8.jpg 9.jpg
Last edited by Alligator; 10/23/18 02:49 PM.

Greetings André
------
1940 Special de Luxe Sport Sedan
https://1940specialdeluxe.wordpress.com
Joined: Apr 2012
Posts: 490
Likes: 3
Backyard Mechanic
OP Offline
Backyard Mechanic
Joined: Apr 2012
Posts: 490
Likes: 3
What do you mean, should i post the Pictures, or only the links to them??


Greetings André
------
1940 Special de Luxe Sport Sedan
https://1940specialdeluxe.wordpress.com
Joined: Oct 2007
Posts: 2,306
ChatMaster - 2,000
Offline
ChatMaster - 2,000
Joined: Oct 2007
Posts: 2,306
Hi Andre,

I recommend posting the pictures. If you think you are posting to many then post a link. I would also not restrict access to my pictures (mine are linked to Photobucket) to only a specific picture. I would leave it open (public access) to anyone who wanted to look at my pictures trusting that no one would hack the account? I have only my 41 Chevy restoration pictures on my Photobucket site. Here are my Photobucket pictures Mike's Photobuck for his 41.

The reason to consider this option is to insure future generations of chat site users access to our knowledge and experiences. I do have all my 41 pictures stored on my own computer and backed up on a separate portable hard drive.

Best wishes, Mike

P.S. You are doing an awesome job of fabricating your damaged body parts. The 1940 guys have to be encouraged by your work.

P.S. #2 I am also open to advice on what others think on this topic.


Mike 41 Chevy
Joined: Apr 2012
Posts: 490
Likes: 3
Backyard Mechanic
OP Offline
Backyard Mechanic
Joined: Apr 2012
Posts: 490
Likes: 3
Well, another week of hard work. First had to close the holes in the floor ground, in front of and under the rear seat.

Next was the front from the Rocker panel. Cut out the damaged parts and made a new sheet.
The metal plate inside is for the new thread to mount the fender.

Attached Images
1.jpg 2.jpg 3.jpg 4.jpg 5.jpg 6.jpg 7.jpg 8.jpg 9.jpg
Last edited by Alligator; 10/23/18 02:53 PM.

Greetings André
------
1940 Special de Luxe Sport Sedan
https://1940specialdeluxe.wordpress.com
Joined: Apr 2012
Posts: 490
Likes: 3
Backyard Mechanic
OP Offline
Backyard Mechanic
Joined: Apr 2012
Posts: 490
Likes: 3
The Floor in the front, was corroded a little bit too, so I fixed this with a new sheet, also

The sheet that my workmate made for me, does not fit correct. So I had to make a little cut and weld it, to correct the position

The next big step was to make a paper template from the inner rocker panel
After this work i think it was impossible to take the manufactured panels from chevs. Because there is no way how they could fit. The ground was so uneven, from former welding and rust corrosion.


Attached Images
1.jpg 2.jpg 3.jpg 4.jpg 5.jpg 6.jpg 7.jpg
Last edited by Alligator; 10/23/18 02:57 PM.

Greetings André
------
1940 Special de Luxe Sport Sedan
https://1940specialdeluxe.wordpress.com
Joined: Apr 2012
Posts: 490
Likes: 3
Backyard Mechanic
OP Offline
Backyard Mechanic
Joined: Apr 2012
Posts: 490
Likes: 3
So i made the rocker panel from three sheet pieces - so I could handle it better - and weld them together for the best fit. After this I made the holes for spot welding

Then I had to install the brackets for running board. After several test I fixed the right position and weld them with a welding clamp

Attached Images
1.jpg 2.jpg 3.jpg 4.jpg 5.jpg 6.jpg 7.jpg 8.jpg 9.jpg
Last edited by Alligator; 10/23/18 03:00 PM.

Greetings André
------
1940 Special de Luxe Sport Sedan
https://1940specialdeluxe.wordpress.com
Joined: Apr 2012
Posts: 490
Likes: 3
Backyard Mechanic
OP Offline
Backyard Mechanic
Joined: Apr 2012
Posts: 490
Likes: 3
Most of the threads to mount the running boards are damaged. So I had to drill them out and insert threaded rivets.

Some holes were no longer present or heavily corroded, so I had to replace them or drilling new ones

Finally, after one week work, I could weld the inner Rocker panel. Only to 30% at this time, but next will do the other 70% and then the right site is done - I hope. Stay tuned


Attached Images
1.jpg 2.jpg 3.jpg 4.jpg 5.jpg 6.jpg 7.jpg 8.jpg 9.jpg
Last edited by Alligator; 10/23/18 03:03 PM.

Greetings André
------
1940 Special de Luxe Sport Sedan
https://1940specialdeluxe.wordpress.com
Joined: May 2002
Posts: 6,149
Likes: 42
ChatMaster - 6,000
Offline
ChatMaster - 6,000
Joined: May 2002
Posts: 6,149
Likes: 42
Andre
You have done a good job on the panel replacement, you seem to have had some training in metal shaping or panel beating.
Tony


1938 1/2 ton Hope to drive it before I retire
Joined: Oct 2007
Posts: 2,306
ChatMaster - 2,000
Offline
ChatMaster - 2,000
Joined: Oct 2007
Posts: 2,306
Hi Andre,

You are doing a fine job. Thanks for documenting your work so others can understand the process. Until you have worked through replacing severely damaged body parts, especially with rust damage, you have no idea of the finer steps in the process. Welding is so sensitive to the amount of heat used to keep parts from distorting. You also have to be well aware of what areas are so week from rust that they can not be welded. A lot of patience, imagination, Origami, and refitting to get thinks right.

As seen in some of your pictures (red painted areas) it is important to use a rust sealer under your work to protect as much of the old and new metal as possible.

Keep up the good work,

Mike Buller


Mike 41 Chevy
Joined: Sep 2012
Posts: 300
Backyard Mechanic
Offline
Backyard Mechanic
Joined: Sep 2012
Posts: 300
Amazing work Alligator !!!! Thanks for all the picts.!!!!!


David Martin-Hendersonville NC, Pine Island Fl....... 1940 Chevy SDSS,
Joined: Apr 2012
Posts: 490
Likes: 3
Backyard Mechanic
OP Offline
Backyard Mechanic
Joined: Apr 2012
Posts: 490
Likes: 3
Thanks for the positive Feedback. Yesterday could do some more Work on the Chev and get the Inner Panel closed.

After this, i realised that there was something missing at the behind fender to install the Frame Console

Attached Images
1.jpg 2.jpg 3.jpg 4.jpg 5.jpg 6.jpg 7.jpg 8.jpg 9.jpg
Last edited by Alligator; 10/23/18 03:10 PM.

Greetings André
------
1940 Special de Luxe Sport Sedan
https://1940specialdeluxe.wordpress.com
Joined: Apr 2012
Posts: 490
Likes: 3
Backyard Mechanic
OP Offline
Backyard Mechanic
Joined: Apr 2012
Posts: 490
Likes: 3
Yesterday finshed the work on the right inner panel (I hope). Prepared with rust sealer and sealing compouned i could weld in the last part

On the left side i began to cut out the bad parts

Attached Images
1.jpg 2.jpg 3.jpg 4.jpg 5.jpg 6.jpg 7.jpg 8.jpg
Last edited by Alligator; 10/23/18 03:13 PM.

Greetings André
------
1940 Special de Luxe Sport Sedan
https://1940specialdeluxe.wordpress.com
Joined: May 2002
Posts: 6,149
Likes: 42
ChatMaster - 6,000
Offline
ChatMaster - 6,000
Joined: May 2002
Posts: 6,149
Likes: 42
Your idea of rust prevention after each step is good but I have found that welding the next piece in removes the preventative and also this material can smolder for a long time and then flare up when you least want it to (I destroyed 1 truck that way).
Tony


1938 1/2 ton Hope to drive it before I retire
tonyw #376647 10/10/16 06:02 AM
Joined: Apr 2012
Posts: 490
Likes: 3
Backyard Mechanic
OP Offline
Backyard Mechanic
Joined: Apr 2012
Posts: 490
Likes: 3
Hello Tony,
Yes, you are right with your hint, but after welding I could not go to this place anymore and without protection I did not want to close it. For Security I stay in the Garage after Welding two or three Hours


Greetings André
------
1940 Special de Luxe Sport Sedan
https://1940specialdeluxe.wordpress.com
Joined: May 2002
Posts: 6,149
Likes: 42
ChatMaster - 6,000
Offline
ChatMaster - 6,000
Joined: May 2002
Posts: 6,149
Likes: 42
The 2 or 3 hour wait is good, I waited 15 or 20 minutes then 30 minutes later the neighbours were calling the fire brigade.
Tony


1938 1/2 ton Hope to drive it before I retire
tonyw #387302 04/09/17 10:56 AM
Joined: Apr 2012
Posts: 490
Likes: 3
Backyard Mechanic
OP Offline
Backyard Mechanic
Joined: Apr 2012
Posts: 490
Likes: 3
In October I worked a few more days on the car, but then it was too cold. Now 6 months later the weather is better and the temperatures in the garage are much better for working on the Chevy. Here are some pictures from work. The newest Pictures are on top.
Next week I will bring the framework to dry ice blasting. I'm already looking forward to the result. When assessing the frame, I noticed that a mounting point is not identical with the opposite one. Is this correct?

Left Side / First three Pictures - Right Side / Last two Pictures

Attached Images
1.jpg 2.jpg 3.jpg 4.jpg 5.jpg
Last edited by Alligator; 10/23/18 03:20 PM.

Greetings André
------
1940 Special de Luxe Sport Sedan
https://1940specialdeluxe.wordpress.com
Joined: Apr 2012
Posts: 490
Likes: 3
Backyard Mechanic
OP Offline
Backyard Mechanic
Joined: Apr 2012
Posts: 490
Likes: 3
No one any idea why they are different or if this is correct?


Greetings André
------
1940 Special de Luxe Sport Sedan
https://1940specialdeluxe.wordpress.com
Joined: Jan 2002
Posts: 30,701
Likes: 141
ChatMaster - 25,000
Offline
ChatMaster - 25,000
Joined: Jan 2002
Posts: 30,701
Likes: 141
I CAN SEND YOU SOME FACTORY PICTURES OF THE FRAME BUT WOULD NEED YOUR EMAIL ADDRESS TO DO SO

GENE SCHNEIDER


Gene Schneider
Joined: May 2002
Posts: 293
Likes: 2
Backyard Mechanic
Offline
Backyard Mechanic
Joined: May 2002
Posts: 293
Likes: 2
André

The right side mounting bracket is correct. It is the same as my '40. It uses the same mounting pad as the left side does. When I replaced my original pads some 20 years ago, the original right and left pads (cushions) were identical to each other.

I do not know why they are different.


Mike
Joined: Apr 2012
Posts: 490
Likes: 3
Backyard Mechanic
OP Offline
Backyard Mechanic
Joined: Apr 2012
Posts: 490
Likes: 3
Hmm, a special thing from the RHD??


Greetings André
------
1940 Special de Luxe Sport Sedan
https://1940specialdeluxe.wordpress.com
Joined: Apr 2012
Posts: 490
Likes: 3
Backyard Mechanic
OP Offline
Backyard Mechanic
Joined: Apr 2012
Posts: 490
Likes: 3
News from the Frame. Looks fine.Here are Videos before

and after

Ice Blasting

Last edited by Alligator; 04/30/18 11:43 AM.

Greetings André
------
1940 Special de Luxe Sport Sedan
https://1940specialdeluxe.wordpress.com
Joined: Apr 2012
Posts: 490
Likes: 3
Backyard Mechanic
OP Offline
Backyard Mechanic
Joined: Apr 2012
Posts: 490
Likes: 3
Now the Frame is painted and i put the Chassis on it for a Test. I´ve bought the Body Mounting Pats from Chevs.

I´ve counted fourteen mounting places on my Frame, but in the set are much more pads. Left you see the needed and on the right side the remaining Pads. Are the rest, because they fit also on other models, or did I forget them somewhere ?

Attached Images
IMG_7199.JPG IMG_7266.JPG IMG_7273.JPG IMG_7281.JPG IMG_7282.JPG
Last edited by Alligator; 10/23/18 03:36 PM.

Greetings André
------
1940 Special de Luxe Sport Sedan
https://1940specialdeluxe.wordpress.com
Joined: Oct 2007
Posts: 2,306
ChatMaster - 2,000
Offline
ChatMaster - 2,000
Joined: Oct 2007
Posts: 2,306
Hi Andre,

Always exciting to see what you have done and the degree of professionalism you show with each repair. The 4 pads on the right side of your last picture are pads used for mounting the radiator. You are correct that some of the pads are extra and not needed. I did not use all four of the radiator pads. I used only the wider middle pad and used a metal shim with it. The shim I made was in the same shape as the wide rubber pad.

Best wishes always,
Mike


Mike 41 Chevy
Joined: Apr 2012
Posts: 490
Likes: 3
Backyard Mechanic
OP Offline
Backyard Mechanic
Joined: Apr 2012
Posts: 490
Likes: 3
Hi Mike,
thank you for the praise. Next week will get back my engine, than i will have a look by mounting the radiator. Another questions about the chassis shims. How will i see if the chassis is on the right level. It's not a lightweight and will press down on the frame anyway, or not? Did not look for this in the manual yet

Last edited by Alligator; 06/15/17 08:17 PM.

Greetings André
------
1940 Special de Luxe Sport Sedan
https://1940specialdeluxe.wordpress.com
Joined: Oct 2007
Posts: 2,306
ChatMaster - 2,000
Offline
ChatMaster - 2,000
Joined: Oct 2007
Posts: 2,306
Hi Andre,

In the best case senario you didn't have any shims when you removed the body from the frame just the rubber pads were there. If you have not done any body work to the areas were the pads are installed then everything should go back with no problem. You do want to checkout how well the doors align before and after you tighten the body to the frame, and should assume any area where the frame is not pinching the pads should require shimming. I let my body sit on my frame with the pads installed and the bolts in place but not tightened for awhile (a couple of weeks) and did other work. I assume an over night wait is plenty and then tightening everything gradually (same torque) to watch if the door alignment changes. I had replaced the ends of my floor braces on the passenger side and the bottoms of both firewall braces. Only the firewall braces needed extra shimming.

Good luck, Mike

P.S. SEARCH results on Bolting Body to Frame


Mike 41 Chevy
Joined: Apr 2012
Posts: 490
Likes: 3
Backyard Mechanic
OP Offline
Backyard Mechanic
Joined: Apr 2012
Posts: 490
Likes: 3
Thanks Mike, than will do this way and see what happens


Greetings André
------
1940 Special de Luxe Sport Sedan
https://1940specialdeluxe.wordpress.com
Joined: Apr 2012
Posts: 490
Likes: 3
Backyard Mechanic
OP Offline
Backyard Mechanic
Joined: Apr 2012
Posts: 490
Likes: 3
Hi - Yes, I'm still at work on my 1940 Chevy. A Prolonged Illness has set me back in my schedule, but now I'm back.
As I said, in June 2017 get back my, again refurbished, Engine. More on this Thread
https://vccachat.org/ubbthreads.php/topics/344166/4.html
The above described Chassis mounting Test was, to find the right position of the brackets I´ve forgot to weld on the inner panel.

Next I had to remove the complete wiring harness, because the cable sheathing was broken everywhere and the cables had contact with each other. So it is necessary to make a new W.Harness
Next Project, was the Firewall, were I have to disconnect the whole foot pedal linkage, to clean it. On the passage from Firewall to Footboard, did some Body sealant and put Owatrol Oil on the sheet, for better Rust prevent. Over this I paint 2-3 layer Ovagrundol

In this Thraed https://vccachat.org/ubbthreads.php/topics/387523/harrison-heater-mount.html talked about cracks in the firewall from Heater Mounting. To repair this, I weld sheet metal from the inside and than I weld the Cracks from outside. First Try´s with braze the cracks did not work

Attached Images
1.jpg 2.jpg 3.jpg 4.jpg 5.jpg 6.jpg 7.jpg 8.jpg 9.jpg
Last edited by Alligator; 10/23/18 03:36 PM. Reason: Image Link Repair

Greetings André
------
1940 Special de Luxe Sport Sedan
https://1940specialdeluxe.wordpress.com
Joined: Apr 2012
Posts: 490
Likes: 3
Backyard Mechanic
OP Offline
Backyard Mechanic
Joined: Apr 2012
Posts: 490
Likes: 3
Dobble Post?!

Last edited by Alligator; 10/21/18 12:22 PM.

Greetings André
------
1940 Special de Luxe Sport Sedan
https://1940specialdeluxe.wordpress.com
Joined: Apr 2012
Posts: 490
Likes: 3
Backyard Mechanic
OP Offline
Backyard Mechanic
Joined: Apr 2012
Posts: 490
Likes: 3
Finally, after two Years, now the Time has come, to do new Paint on the Underbody. But first hard work to remove the old one.

3 Layers Overgrundol and then 2 Layers Chassislack O.H. That looks great cool

More Pictures you can find under https://flic.kr/s/aHskUTUqs5


Attached Images
1.jpg 2.jpg 3.jpg 4.jpg 5.jpg 6.jpg 7.jpg 8.jpg
Last edited by Alligator; 10/23/18 03:40 PM.

Greetings André
------
1940 Special de Luxe Sport Sedan
https://1940specialdeluxe.wordpress.com
Joined: Apr 2006
Posts: 3,511
Likes: 47
ChatMaster - 3,000
Online Content
ChatMaster - 3,000
Joined: Apr 2006
Posts: 3,511
Likes: 47
Wow. Mucho work that was wonderfully done!

Congrats, Dean


Dean 'Rustoholic' Meltz
old and ugly is beautiful!


Joined: Jan 2002
Posts: 30,701
Likes: 141
ChatMaster - 25,000
Offline
ChatMaster - 25,000
Joined: Jan 2002
Posts: 30,701
Likes: 141
Just to let others know - If you are building a car that you want to have judged the under body was a medium gray color.


Gene Schneider
Joined: Apr 2012
Posts: 490
Likes: 3
Backyard Mechanic
OP Offline
Backyard Mechanic
Joined: Apr 2012
Posts: 490
Likes: 3
Hi Chevgene,
thanks for the interesting info. It Is not so important to me.Mine is from Chevrolet Argentina, the question arises whether the same colors were used. The outside color, by example, I could not assign.


Greetings André
------
1940 Special de Luxe Sport Sedan
https://1940specialdeluxe.wordpress.com
Chev Nut #407511 05/03/18 08:41 PM
Joined: Aug 2014
Posts: 101
Likes: 1
Shade Tree Mechanic
Offline
Shade Tree Mechanic
Joined: Aug 2014
Posts: 101
Likes: 1
Hi Gene, sent you an email, interested in seeing the factory frame colors as well. Were the frame and underbody the same color?


1942 Chevrolet Fleetline Aerosedan
1942 Chevrolet Fleetmaster Cabriolet
Daryl B.
BetoB #407514 05/03/18 10:12 PM
Joined: Jan 2002
Posts: 30,701
Likes: 141
ChatMaster - 25,000
Offline
ChatMaster - 25,000
Joined: Jan 2002
Posts: 30,701
Likes: 141
Email sent


Gene Schneider
Chev Nut #407636 05/06/18 02:13 PM
Joined: Apr 2012
Posts: 490
Likes: 3
Backyard Mechanic
OP Offline
Backyard Mechanic
Joined: Apr 2012
Posts: 490
Likes: 3
Think, that is interesting for us, too?

Last edited by Alligator; 05/06/18 02:14 PM.

Greetings André
------
1940 Special de Luxe Sport Sedan
https://1940specialdeluxe.wordpress.com
Joined: Apr 2012
Posts: 490
Likes: 3
Backyard Mechanic
OP Offline
Backyard Mechanic
Joined: Apr 2012
Posts: 490
Likes: 3
A lot of work has gone by. The engine is back in the car and the chassis is on the frame. I also glued some insulating mats on the interior. More pictures can be found here on Flickr.
At the Moment I reinstall all the Linkage for Throttle, Brakes and Shifting. And here i have a Problem. The upper Linkage does not fit at the Gear Box, at the Vaccum Shifter it´s perfect. In the Pictures I´ve made some Comments for better understanding.
When I did the Chassis back on the Frame, had to loose the Steeering Wheel clamps at the Dash Board, because the Steering Gear Bolts doesn´t fit in the Frame. Had to do the Gear Box about 1/2" backwards. On the Picture from the Steering Mast you can see the Marks from the earlier Position.
Is it possible that the Linkage does not fit in case of this? The other Steering Linkage Positions from the Manual are correct. It seems that the Position of the Chassis is a little bit too much backward, but all the Bolts fit - only the one on the left front doesn´t fit 100%. Tried to correct the Position of the Chassis - no Chance, and as you can see on the Picture, there is also not enough rest thread to adjust the Linkage. I could only remove the linkage and re-cut the thread?!


Attached Images
IMG_8096.JPG IMG_8098.JPG IMG_80981.JPG IMG_8148.JPG IMG_8151.JPG IMG_8126.JPG IMG_8155.JPG IMG_8157.JPG
Last edited by Alligator; 10/21/18 06:51 PM.

Greetings André
------
1940 Special de Luxe Sport Sedan
https://1940specialdeluxe.wordpress.com
Joined: Jan 2002
Posts: 30,701
Likes: 141
ChatMaster - 25,000
Offline
ChatMaster - 25,000
Joined: Jan 2002
Posts: 30,701
Likes: 141
Note the the car has right side steering and parts/location may be different from left steering.


Gene Schneider
Joined: Apr 2012
Posts: 490
Likes: 3
Backyard Mechanic
OP Offline
Backyard Mechanic
Joined: Apr 2012
Posts: 490
Likes: 3
More progress I'd like to share with you. The passenger side had to be filled and painted, also because of the accident with the rear door.
https://vccachat.org/ubbthreads.php/topics/291418/re-what-a-desaster.html#
I painted with an airbrush gun. I think it is really good and the color difference is relatively small.

Attached Images
IMG_8172.JPG IMG_8173.JPG IMG_8181.JPG IMG_8183.JPG IMG_8228.JPG IMG_8236.JPG IMG_8248.JPG IMG_8231.JPG
Last edited by Alligator; 05/10/19 09:52 PM.

Greetings André
------
1940 Special de Luxe Sport Sedan
https://1940specialdeluxe.wordpress.com
Joined: Apr 2012
Posts: 490
Likes: 3
Backyard Mechanic
OP Offline
Backyard Mechanic
Joined: Apr 2012
Posts: 490
Likes: 3
The next big step was to attach the front section. So that the whole looks again like a car. Unfortunately I had to find out that the left fender didn't fit at all. Unfortunately it cracked during the adjustment. It was already very rusted and thin. So there was a lot of sheet metal work to do.

Attached Images
IMG_8280.JPG IMG-20190323-WA0012.jpg IMG_8290.JPG IMG_8291.JPG IMG_8318.JPG IMG_8304.JPG IMG_8317.JPG
Last edited by Alligator; 05/10/19 10:07 PM.

Greetings André
------
1940 Special de Luxe Sport Sedan
https://1940specialdeluxe.wordpress.com
Joined: Apr 2012
Posts: 490
Likes: 3
Backyard Mechanic
OP Offline
Backyard Mechanic
Joined: Apr 2012
Posts: 490
Likes: 3
Since there was no painting under the lamps and also no gaskets, I had to rework also here. The screwing edge of the fender had to be repaired and also the parking light attachment was perforated.

Attached Images
IMG_0052.jpg IMG_0055.jpg IMG_0045.jpg IMG_8323.JPG IMG_8325.JPG IMG_8326.JPG IMG_8330.JPG IMG_8331.JPG IMG_0228.jpg 9DAA2044-2C95-4644-913C-C067002612D3.jpg
Last edited by Alligator; 10/11/21 08:57 PM.

Greetings André
------
1940 Special de Luxe Sport Sedan
https://1940specialdeluxe.wordpress.com
Joined: Apr 2012
Posts: 490
Likes: 3
Backyard Mechanic
OP Offline
Backyard Mechanic
Joined: Apr 2012
Posts: 490
Likes: 3
I spent the last week getting the overhauled engine running. After 2 days of failed tries I finally realized that I was trying to ignite the engine on the fourth cylinder all the time and it finally ran. A great feeling and an important step Forward


Last edited by Alligator; 05/10/19 10:50 PM.

Greetings André
------
1940 Special de Luxe Sport Sedan
https://1940specialdeluxe.wordpress.com
Joined: Jun 2007
Posts: 1,743
Likes: 11
ChatMaster - 1,500
Online Content
ChatMaster - 1,500
Joined: Jun 2007
Posts: 1,743
Likes: 11
woohoo beermugs carbana


Russell #38868
'48 4 door Fleetline
Joined: Jun 2007
Posts: 1,894
ChatMaster - 1,500
Offline
ChatMaster - 1,500
Joined: Jun 2007
Posts: 1,894
Sounds good. Glad to see you are making progress. That sure is a nice shop you have to work in.


1938 Canadian Pontiac Business Coupe (aka a 1938 Chevy Coupe with Pontiac shaped front sheet metal - almost all Chevy!)
1975 4-speed L82 Vette
Joined: Apr 2012
Posts: 490
Likes: 3
Backyard Mechanic
OP Offline
Backyard Mechanic
Joined: Apr 2012
Posts: 490
Likes: 3
Last mounth i’ve got back the car from the upholstery. The interior is in creme velour. The windlaces are made with ”žoldtimer“ fabric and foam roller. Door handles, rear shelf and finger tipps at the sunvisors are in brown leather. The headliner was purchased at Rockauto. Very fine work!

Attached Images
315A7071-1AEA-47E3-AAE9-7154781DCA5E.png BB389B45-B300-41B2-AF1E-D92A404B688F.png 354BFDEE-1852-44F9-A4C1-CF3CAEDD5BA9.png B4565882-0639-4D94-881B-37E75BB3D43F.png 91ED1F19-FFF3-4506-BF58-EFE7D3324C48.png 1ED79415-399A-4FB4-869A-4E22BB5DBF0B.png E2DA73EA-3C8E-4CB2-8F96-57BF416ABE92.png 660DF939-6EF1-47A6-BC4B-DE89E83FA3AC.png F0BC3C1C-9EC8-4B2C-8C63-361F4A31F4BF.png 19048EE1-9235-425A-AD0F-0C71D04C6821.jpeg
Last edited by Alligator; 07/11/21 12:01 PM.

Greetings André
------
1940 Special de Luxe Sport Sedan
https://1940specialdeluxe.wordpress.com
Joined: Apr 2012
Posts: 490
Likes: 3
Backyard Mechanic
OP Offline
Backyard Mechanic
Joined: Apr 2012
Posts: 490
Likes: 3
More Pictures

Attached Images
6ECE4D09-77D7-4712-AB42-67F15A6B0CFF.jpeg C88563FB-012B-416D-A896-9986ECC2AC51.jpeg 424EF85C-AF97-432D-AAAB-BB3ACDF3B835.jpeg FFA26CE3-3178-4C0F-9B5C-C4C61EF9BCBC.jpeg 69A640FF-4F0E-4EE4-8B30-0898EB8C78B7.jpeg 7E6C8965-0E42-49A9-81D4-F497DCFC55A6.jpeg

Greetings André
------
1940 Special de Luxe Sport Sedan
https://1940specialdeluxe.wordpress.com
Joined: Nov 2001
Posts: 19,758
Likes: 63
ChatMaster - 15,000
Offline
ChatMaster - 15,000
Joined: Nov 2001
Posts: 19,758
Likes: 63
Looks great! Much better when you consider it is being done across the "pond" where resources for Chevys are not the same as here.


How Sweet the roar of a Chevy four!
Joined: May 2002
Posts: 6,149
Likes: 42
ChatMaster - 6,000
Offline
ChatMaster - 6,000
Joined: May 2002
Posts: 6,149
Likes: 42
Looks like that upholsterer knows what he is doing and has done a good job.
Tony


1938 1/2 ton Hope to drive it before I retire
Joined: Apr 2012
Posts: 490
Likes: 3
Backyard Mechanic
OP Offline
Backyard Mechanic
Joined: Apr 2012
Posts: 490
Likes: 3
Thanks. Want to buy by Le Baron, but they are gone. So there was no other way to get a new Interieur. Don’t know what i had to pay by LB(+Installation here), but that was really a big part of my Restauration costs. Because he had to restore the back armrests and the front seat was made a little bit higher at the back. The Sunvisors are a couples from the old visors and the new mechanics because the new visors from COT40s are much smaller


Greetings André
------
1940 Special de Luxe Sport Sedan
https://1940specialdeluxe.wordpress.com
Joined: Apr 2012
Posts: 490
Likes: 3
Backyard Mechanic
OP Offline
Backyard Mechanic
Joined: Apr 2012
Posts: 490
Likes: 3
These days i made the first ride with my car. Feels great. Here you can you hear the first running of the engine.
https://youtube.com/shorts/uurj6il9oIQ?feature=share
Don’t no after years, but is this tok,tok,tok Sound correct? Or should i do some valve adjustment again?


Greetings André
------
1940 Special de Luxe Sport Sedan
https://1940specialdeluxe.wordpress.com
Joined: Jan 2002
Posts: 30,701
Likes: 141
ChatMaster - 25,000
Offline
ChatMaster - 25,000
Joined: Jan 2002
Posts: 30,701
Likes: 141
Sounds much too much nise.


Gene Schneider
Joined: Apr 2012
Posts: 490
Likes: 3
Backyard Mechanic
OP Offline
Backyard Mechanic
Joined: Apr 2012
Posts: 490
Likes: 3
You mean too much noise?


Greetings André
------
1940 Special de Luxe Sport Sedan
https://1940specialdeluxe.wordpress.com
Joined: May 2002
Posts: 6,149
Likes: 42
ChatMaster - 6,000
Offline
ChatMaster - 6,000
Joined: May 2002
Posts: 6,149
Likes: 42
To me it sounds like someone is in there with a big hammer, I would advise to get him out of there.
Tony


1938 1/2 ton Hope to drive it before I retire
Joined: Jul 2009
Posts: 302
Likes: 4
Backyard Mechanic
Offline
Backyard Mechanic
Joined: Jul 2009
Posts: 302
Likes: 4
Reset tappets with hot engine as it slowly idles.Not as difficult as it seems. 6 and 8 thou feeler gauge, 5/8 spanner to loosen nuts whilst engine runs and a large screwdriver to fit slot whilst tappets jump up and down. Start at no 1 cyl and by the time you get to no6 cyl its not so bad and the tappets are quiet.

Joined: Sep 2002
Posts: 2,323
Likes: 6
ChatMaster - 2,000
Offline
ChatMaster - 2,000
Joined: Sep 2002
Posts: 2,323
Likes: 6
I think you would want to set the exhaust at 13, not 8.


My 1951 1 Ton is now on the road! My 38 Master 4 Door is also now on the road .
Joined: Dec 2019
Posts: 1,139
Likes: 75
ChatMaster - 1,000
Offline
ChatMaster - 1,000
Joined: Dec 2019
Posts: 1,139
Likes: 75
Yes!!
What old216 says above!

Personally I much prefer setting not running... and cold.
The setting will end up being almost exactly the same once the engine is "properly" warmed up anyway.
This has been discussed in the forum before, and Chevrolet's own literature shows that the setting hot will settle out being the same as a cold setting anyway.
And without the noise, oil spatter, and hot parts to burn yourself on.
Also, much easier to tighten the lock nuts properly, and doesn't beat up your feeler gauges.

The noise I'm hearing on your video is unfortunately something deeper than a simple valve clearance issue.
Clearance produces more of a "clack" than a "tok"
Not sure what it is, but if you are really lucky it could be a bent pushrod touching something.
While setting the valves, and before taking anything else apart, spin each pushrod to make sure there is no wobble.

I'm hoping for ya that it isn't anything deeper than that! :-)


Ole S Olson
Stovblt #462943 10/25/21 04:21 PM
Joined: Dec 2019
Posts: 1,139
Likes: 75
ChatMaster - 1,000
Offline
ChatMaster - 1,000
Joined: Dec 2019
Posts: 1,139
Likes: 75
Additionally

Try to narrow down the location of the loudest "tok tok" using a stethoscope or a length of rod touching the engine in various places.
You may at least be able to narrow it down to the upper side (valve train) or the bottom end (bearings).

Never had this happen in a Chevrolet six, but have had a knock in a small block V8 turn out to be a broken spring in the fuel pump allowing the lever to fall away from the cam lobe between strokes.


Ole S Olson
Joined: Apr 2012
Posts: 490
Likes: 3
Backyard Mechanic
OP Offline
Backyard Mechanic
Joined: Apr 2012
Posts: 490
Likes: 3
Thanks for the comments, but now I'm really getting scared.
The engine is completely overhauled and a month ago it sounded like this.

There is not so much rattling and since then the car has not been driven. I'll have to go there probably more accurate troubleshooting. I have to drive Wednesday to a workshop because of the rear window about 3 miles one way. Can I risk that?


Greetings André
------
1940 Special de Luxe Sport Sedan
https://1940specialdeluxe.wordpress.com
Joined: Dec 2019
Posts: 1,139
Likes: 75
ChatMaster - 1,000
Offline
ChatMaster - 1,000
Joined: Dec 2019
Posts: 1,139
Likes: 75
OK!

Try dropping the fan belt off and run for a "very" short time.

The "tok tok" sound in the second video doesn't sound as serious and sounds louder on the left side and may just be belt noise judging from the frequency.


Ole S Olson
Joined: Apr 2012
Posts: 490
Likes: 3
Backyard Mechanic
OP Offline
Backyard Mechanic
Joined: Apr 2012
Posts: 490
Likes: 3
Thats exactly what i thought by looking the video again and again


Greetings André
------
1940 Special de Luxe Sport Sedan
https://1940specialdeluxe.wordpress.com
Stovblt #462955 10/25/21 04:56 PM
Joined: Dec 2019
Posts: 1,139
Likes: 75
ChatMaster - 1,000
Offline
ChatMaster - 1,000
Joined: Dec 2019
Posts: 1,139
Likes: 75
Still seems to make more noise than it should, but doesn't sound nearly as serious as that deep "tok tok" heard in the first video.
Sounds more like a deep "squeek" now.

Definitely reset the valves though.


Last edited by Stovblt; 10/25/21 04:57 PM.

Ole S Olson
Joined: Dec 2019
Posts: 1,139
Likes: 75
ChatMaster - 1,000
Offline
ChatMaster - 1,000
Joined: Dec 2019
Posts: 1,139
Likes: 75
What you want and expect from the car will determine the clearance you will want to set the valves at.

Factory specification was .006-.008 inches for intake and .013-.015 exhaust.
Except for heavy duty truck use where .010 intake and .020 exhaust was recommended.

If you want quiet, go toward the lower spec, but I myself don't like to go below .008 and .015, which will "clack" a little more but leaves a better margin of safety against burning valves.
Because I have a truck, I set to .010 and .017 and just put up with the noise. It is a truck after all! :-)


Ole S Olson
Joined: Dec 2019
Posts: 1,139
Likes: 75
ChatMaster - 1,000
Offline
ChatMaster - 1,000
Joined: Dec 2019
Posts: 1,139
Likes: 75
And yes...

If it were mine, and the oil pressure seems normal, I'd drive it the 3 miles.


Ole S Olson
Joined: Sep 2002
Posts: 2,323
Likes: 6
ChatMaster - 2,000
Offline
ChatMaster - 2,000
Joined: Sep 2002
Posts: 2,323
Likes: 6
I have had similar sounds with the 1940 216 in my 38. I used to get a rattle in the motor, going down the road. Several of the valves would have excess clearance after a short drive. I used a piece of 3/8" tubing to listen to each valve tappet. What I found was that a number of pushrods had excessive wear on the top end. The rocker ball had actually descended into the pushrod socket as the socket metal got thinner and yielded. After I installed new pushrods, most of the annoying noises disappeared.

I don't think that you have a serious knock there. It is not deep or hard in sound. By the way your engine bay looks amazing!


My 1951 1 Ton is now on the road! My 38 Master 4 Door is also now on the road .
Joined: Dec 2019
Posts: 1,139
Likes: 75
ChatMaster - 1,000
Offline
ChatMaster - 1,000
Joined: Dec 2019
Posts: 1,139
Likes: 75
Hi Andre

I sent you a PM but I'll try contacting you here as well as this is important.

On viewing your blog...
I noticed you have the "little metal hats" on the exhaust valves.
They NEED to be on the INTAKE valves.
I don't know if this is the source of some of your valve noise, but it could be.

The caps were meant to prevent excess oil from getting on the intake valve stems and being drawn into the combustion chamber.
If you have the newer style valves with two grooves at the end of the stem, and an O-ring has been installed in one of them, you don't need the caps at all.

Hope this helps.


Ole S Olson
Joined: Jan 2002
Posts: 30,701
Likes: 141
ChatMaster - 25,000
Offline
ChatMaster - 25,000
Joined: Jan 2002
Posts: 30,701
Likes: 141
The metal hats were first used on the 1941 intake valves. From 1942-1947 on both intake and exhaust. They were often removed be cause they breated more valve noise.....refered to as rattle caps.


Gene Schneider
Joined: Dec 2019
Posts: 1,139
Likes: 75
ChatMaster - 1,000
Offline
ChatMaster - 1,000
Joined: Dec 2019
Posts: 1,139
Likes: 75
I've learned something new today then. :-)

My 1942-46 overhaul manual only shows the hats on the intakes, and that's the only place I found them on my truck... so I didn't know they were ever on exhausts as well.

A question for you then Gene...
When they were removed, did that necessitate using the newer 2 groove valves with O-ring seals?
Or was there much noticeable difference if you just threw the hats away with no other change?

Would Andre be able to back off his tappet adjusting screws enough to remove the hats from his exhausts without removing the rocker assembly? (I'm thinking he can.)


Ole S Olson
Joined: Apr 2012
Posts: 490
Likes: 3
Backyard Mechanic
OP Offline
Backyard Mechanic
Joined: Apr 2012
Posts: 490
Likes: 3
@Stovblt - Oh, I see, you were the one who made my blog visitor statistics explode laugh
Look, what i found in my older posts
https://vccachat.org/ubbthreads.php/topics/344172/re-1940-216-engine-disassembly.html#Post344172
https://vccachat.org/ubbthreads.php/topics/411070/re-1940-216-engine-disassembly.html#Post411070
Many Tips here, what i can do. Thanks. On Saturday we know more i hope, than i am back in the garage for work.

EDIT: My Valves from EGGE are only with one Groove without oil ring.

Last edited by Alligator; 10/27/21 06:54 AM.

Greetings André
------
1940 Special de Luxe Sport Sedan
https://1940specialdeluxe.wordpress.com
Joined: Apr 2012
Posts: 490
Likes: 3
Backyard Mechanic
OP Offline
Backyard Mechanic
Joined: Apr 2012
Posts: 490
Likes: 3
Checked my Pictures from years ago. The caps were only on the Exhausts - so this was wrong, when i get the car! Will change this, or do them away.


Greetings André
------
1940 Special de Luxe Sport Sedan
https://1940specialdeluxe.wordpress.com
Joined: Sep 2002
Posts: 2,323
Likes: 6
ChatMaster - 2,000
Offline
ChatMaster - 2,000
Joined: Sep 2002
Posts: 2,323
Likes: 6
On my 1940 217 head, I had them install neoprene umbrella hats on the valves , on the shafts under the top. I think they were used on the Ford 302.


My 1951 1 Ton is now on the road! My 38 Master 4 Door is also now on the road .
Joined: Apr 2012
Posts: 490
Likes: 3
Backyard Mechanic
OP Offline
Backyard Mechanic
Joined: Apr 2012
Posts: 490
Likes: 3
Surprise, surprise, Before I went to the workshop, I checked the belt tension. The alternator was loose. The nut on the clamping screw has turned through because of defective thread. New nut with new screw and from the noise was almost nothing more to hear


Greetings André
------
1940 Special de Luxe Sport Sedan
https://1940specialdeluxe.wordpress.com
Joined: Dec 2019
Posts: 1,139
Likes: 75
ChatMaster - 1,000
Offline
ChatMaster - 1,000
Joined: Dec 2019
Posts: 1,139
Likes: 75
Yes!!

Very good to hear!
Think I'd still take the hats off though. :-)


Ole S Olson
Joined: Dec 2007
Posts: 4,024
Likes: 99
ChatMaster - 4,000
Offline
ChatMaster - 4,000
Joined: Dec 2007
Posts: 4,024
Likes: 99
I installed the Ford 302 rubber umbrella seals on all the valves on my ”˜37. That eliminated the big puff of blue smoke whenever I left a stop light.


Rusty

VCCA #44680
Joined: Apr 2012
Posts: 490
Likes: 3
Backyard Mechanic
OP Offline
Backyard Mechanic
Joined: Apr 2012
Posts: 490
Likes: 3
Actually I wanted to write here much more about my experiences / setbacks and feelings of happiness during the restoration of my 40 Chevy, but repairing was always somehow more important - sorry
What started with a transmission repair and an engine overhaul ended in a complete restoration, including a new interior. I never regretted it and had a lot of fun doing it. Above all I would like to thank this forum for the mental support, many tips and also spare parts. Very special thanks go, among many others, especially to

thankuMike Buller, 41specialdeluxe, Mike Deeter, Curt K. (cskennedy10?)thanku


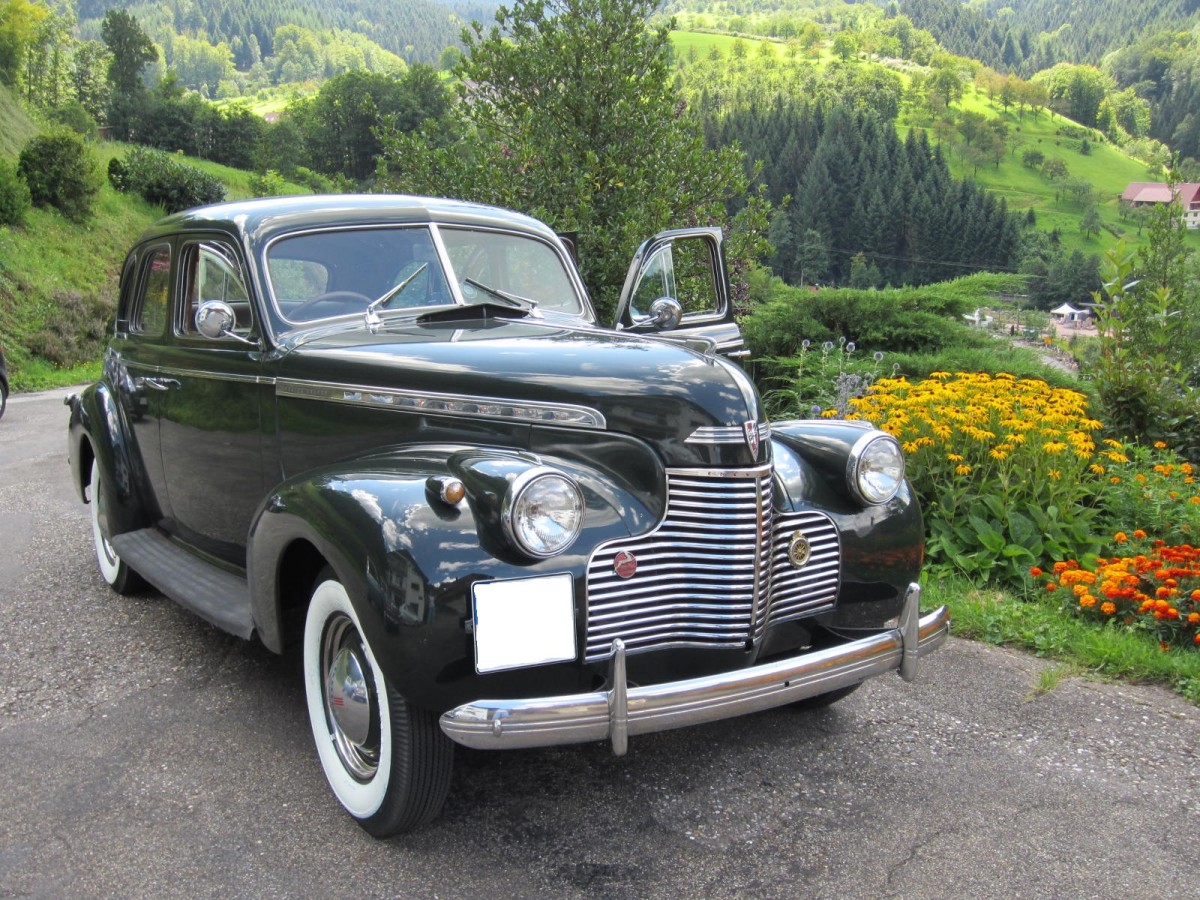
In July 2022, the Chevy had its first ride since 2015. It passed the technical inspection without any faults and the engine now runs like a sewing machine, thanks to a capable mechanic. Here are a few pictures.

Attached Images
IMG_5060 (Large).JPG IMG_5061 (Large).JPG IMG_5055 (Large).JPG IMG_5056 (Large).JPG IMG_5057 (Large).JPG IMG_5058 (Large).JPG IMG_5059 (Large).JPG IMG_5063 (Large).JPG IMG_3929 (Large).PNG IMG_3823 (1).jpeg
Last edited by Alligator; 03/16/23 12:24 PM.

Greetings André
------
1940 Special de Luxe Sport Sedan
https://1940specialdeluxe.wordpress.com
2 members like this: Dave39MD, Clement
Joined: Apr 2012
Posts: 490
Likes: 3
Backyard Mechanic
OP Offline
Backyard Mechanic
Joined: Apr 2012
Posts: 490
Likes: 3
more

Attached Images
IMG_3810 (Andere).JPG IMG_3926 (Large).PNG IMG_3823 (8).jpeg

Greetings André
------
1940 Special de Luxe Sport Sedan
https://1940specialdeluxe.wordpress.com
1 member likes this: Clement
Joined: Jan 2002
Posts: 30,701
Likes: 141
ChatMaster - 25,000
Offline
ChatMaster - 25,000
Joined: Jan 2002
Posts: 30,701
Likes: 141
That is so nice of you to post all the photos so we can see and appreciate all your hard work especially living in wonderful far away Germany.The best of luck to you and continue to enjoy your manty years of restoring your car.

ENJOY THE RIDE FOR MANY YEARS parking


Gene Schneider
1 member likes this: Clement
Joined: Nov 2002
Posts: 7,472
Likes: 26
ChatMaster - 7,000
Offline
ChatMaster - 7,000
Joined: Nov 2002
Posts: 7,472
Likes: 26
Those are really nice photos of a fine looking car.


Steve D
Joined: Dec 2019
Posts: 1,139
Likes: 75
ChatMaster - 1,000
Offline
ChatMaster - 1,000
Joined: Dec 2019
Posts: 1,139
Likes: 75
I've always had a hard time deciding which I like the look of better, 1940's or 41's.
You are definitely swaying me toward 1940!
Beautiful!
Got any pictures of the dash and instrument panel?


Ole S Olson
Joined: Jan 2006
Posts: 7,046
Likes: 107
Hall Monitor
ChatMaster - 7,000
Offline
Hall Monitor
ChatMaster - 7,000
Joined: Jan 2006
Posts: 7,046
Likes: 107
Beautiful car and thank you for sharing the update.


VCCA Member 43216
Save a life, adopt a senior shelter pet.
1938 HB Business Coupe
1953 210 Sedan
Joined: May 2002
Posts: 6,149
Likes: 42
ChatMaster - 6,000
Offline
ChatMaster - 6,000
Joined: May 2002
Posts: 6,149
Likes: 42
You have done a nice job restoring that car.
Tony


1938 1/2 ton Hope to drive it before I retire
Joined: Dec 2001
Posts: 2,037
Likes: 5
ChatMaster - 2,000
Offline
ChatMaster - 2,000
Joined: Dec 2001
Posts: 2,037
Likes: 5
Great looking 1940 sedan. You have truely done an excellent job.

dtm


the toolman
60th Anniversary Meet Chairperson
Dave
VCCA # L 28873
VCCA #83 Tool Technical Advisor for 1914-1966
VCCA #83 1940 Chevrolet Technical Advisor
Joined: Apr 2012
Posts: 490
Likes: 3
Backyard Mechanic
OP Offline
Backyard Mechanic
Joined: Apr 2012
Posts: 490
Likes: 3
Thank you for all the compliments. Have also made a lot of effort to keep everything in its original condition. Unfortunately, the interior was too worn. But the saddler has oriented himself to original photos to reconstruct it as authentic as possible. Outside it is still original and I continue to drive with 6 volts. Headlights via relay and of course I made all the wires new / made them myself. The one fuse for everything, was clearly too unsafe for me.
Dashboard photos I have only from before the restoration, but there has not changed much. In the near future I would like to make a YT video with many pictures. So according to the motto 7 years in 20 minutes. Let's see.

Attached Images
IMG_0982.JPG IMG_20181229_140121.jpg IMG_3922 (Large).PNG 11.jpg IMG_0422_1024x1024_500KB.jpg IMG_0423_1024x1024_500KB.jpg
Last edited by Alligator; 03/17/23 01:32 PM.

Greetings André
------
1940 Special de Luxe Sport Sedan
https://1940specialdeluxe.wordpress.com
Joined: Jun 2007
Posts: 1,743
Likes: 11
ChatMaster - 1,500
Online Content
ChatMaster - 1,500
Joined: Jun 2007
Posts: 1,743
Likes: 11
I too want to commend you on a fabulous job! Well done!!! And thanks for taking us along.


Russell #38868
'48 4 door Fleetline
1 member likes this: Clement
Joined: Dec 2019
Posts: 1,139
Likes: 75
ChatMaster - 1,000
Offline
ChatMaster - 1,000
Joined: Dec 2019
Posts: 1,139
Likes: 75
If that's your before restored dash board,
that's still very nice!

Thanks again for the pictures!

Last edited by Stovblt; 03/17/23 04:41 PM.

Ole S Olson
Joined: Apr 2012
Posts: 490
Likes: 3
Backyard Mechanic
OP Offline
Backyard Mechanic
Joined: Apr 2012
Posts: 490
Likes: 3
The dash still looks the same, it has not been changed, except for a used Signal Stat 900 turn signals


Greetings André
------
1940 Special de Luxe Sport Sedan
https://1940specialdeluxe.wordpress.com
Joined: Dec 2007
Posts: 50
Likes: 1
Shade Tree Mechanic
Offline
Shade Tree Mechanic
Joined: Dec 2007
Posts: 50
Likes: 1
Great job on the restoration. Thanks for sharing the pictures.

Page 1 of 5 1 2 3 4 5

Link Copied to Clipboard
 

Notice: Any comments posted herein do not necessarily reflect the official position of the VCCA.

Powered by UBB.threads™ PHP Forum Software 7.7.5